Survival
Last updated: 2025-01-14
To follow this course, make sure to be registered on our Platform.
Welcome 👋
Welcome to the beginning of your Web3 adventure. You've joined the Motoko Bootcamp, an elite recruiting programm for the top Web3 soldiers.
Just like the steam engine made the Industrial Revolution possible by harnessing physical power, DAOs harness political power and make a Web3 revolution possible. This could fundamentally change how we organize society and resources, with the end goal of creating a more stable, flourishing and collaborative civilization.
During this training, you'll learn how to create a DAO from scratch on the Internet Computer platform, using the Motoko programming language.

Prerequisites ✅
No prior experience with Web3, the Internet Computer, or Motoko is required to participate in this program. This bootcamp is tailored for developers who have a foundational understanding of programming, web development and foundational notions such as:
- Essential programming concepts such as variables, loops, and functions.
- Basic web development skills, including knowledge of HTML, CSS, and JavaScript.
- A high-level understanding of blockchain technology and smart contracts.
Coding Environment 🛠️
Start coding instantly with our online environment, or work on your local machine. For the quickest setup, we recommend our online option – just click below 👇

Facing issues when setting up the workspace?
- Deactivate your browser extensions. For instance, we've identified the Plug wallet extension as causing issues.
- Switch to the Incognito Mode.
- Switch to another browser (Chrome is recommended)
- Empty your cache and refresh the page.
- Reach out directly on our feedback channel.
Prefer to work locally? Read our local setup guide.
Course 🧑💻
The course is organized into 7 distinct sections, comprising 5 main chapters, a Qualification section, and a Graduation segment. There is also a bonus section if you desire to continue your journey after graduation.
| Day | Project | Description |
|---|---|---|
| Qualification | Can you prove your skills? | Get started and deploy your first application on the Internet Computer. |
| Chapter 1 | What is your dream? | Define your project and develop a vision. |
| Chapter 2 | Create your tribe | Learn about the power of the collective and how to build a community. |
| Chapter 3 | Making money | Create and manage a token. |
| Chapter 4 | Listen to your community | Implement a voting system and a proposal mechanism and learn about the power of governance and decision-making. |
| Chapter 5 | Build your brand | Build a webpage and develop a branding for your dApp. |
| Graduation | Graduation | Have you followed the course? It's time to graduate and submit your final project. |
The course also offers 13 optional yet strongly advised Motoko lessons, essential for each chapter. For every chapter, we'll suggest relevant lessons.
Quick Start ⚡️
Begin with our introduction video:
Playlist 🍿
To help your training, we have created a playlist with all the videos you need to complete the course - our channel also contains additional resources and tutorials about Motoko, the Internet Computer, and DAOs.
Access the playlist here.
Credits ✏️
Written by seb_icp with support from Code & State.
Registration
To properly follow this course and record our progression - we need to register on the Submission website.
Create an Internet Identity
To register on the Submission website and record your progression through this course, you need to own an Internet Identity. If you don't have one yet, you can create one by following the instructions on the Internet Computer Wiki.

Register on the Submission website
Once you have your Internet Identity, login on the Submission website - by clicking on the Login button in the top right corner and follow the instructions.

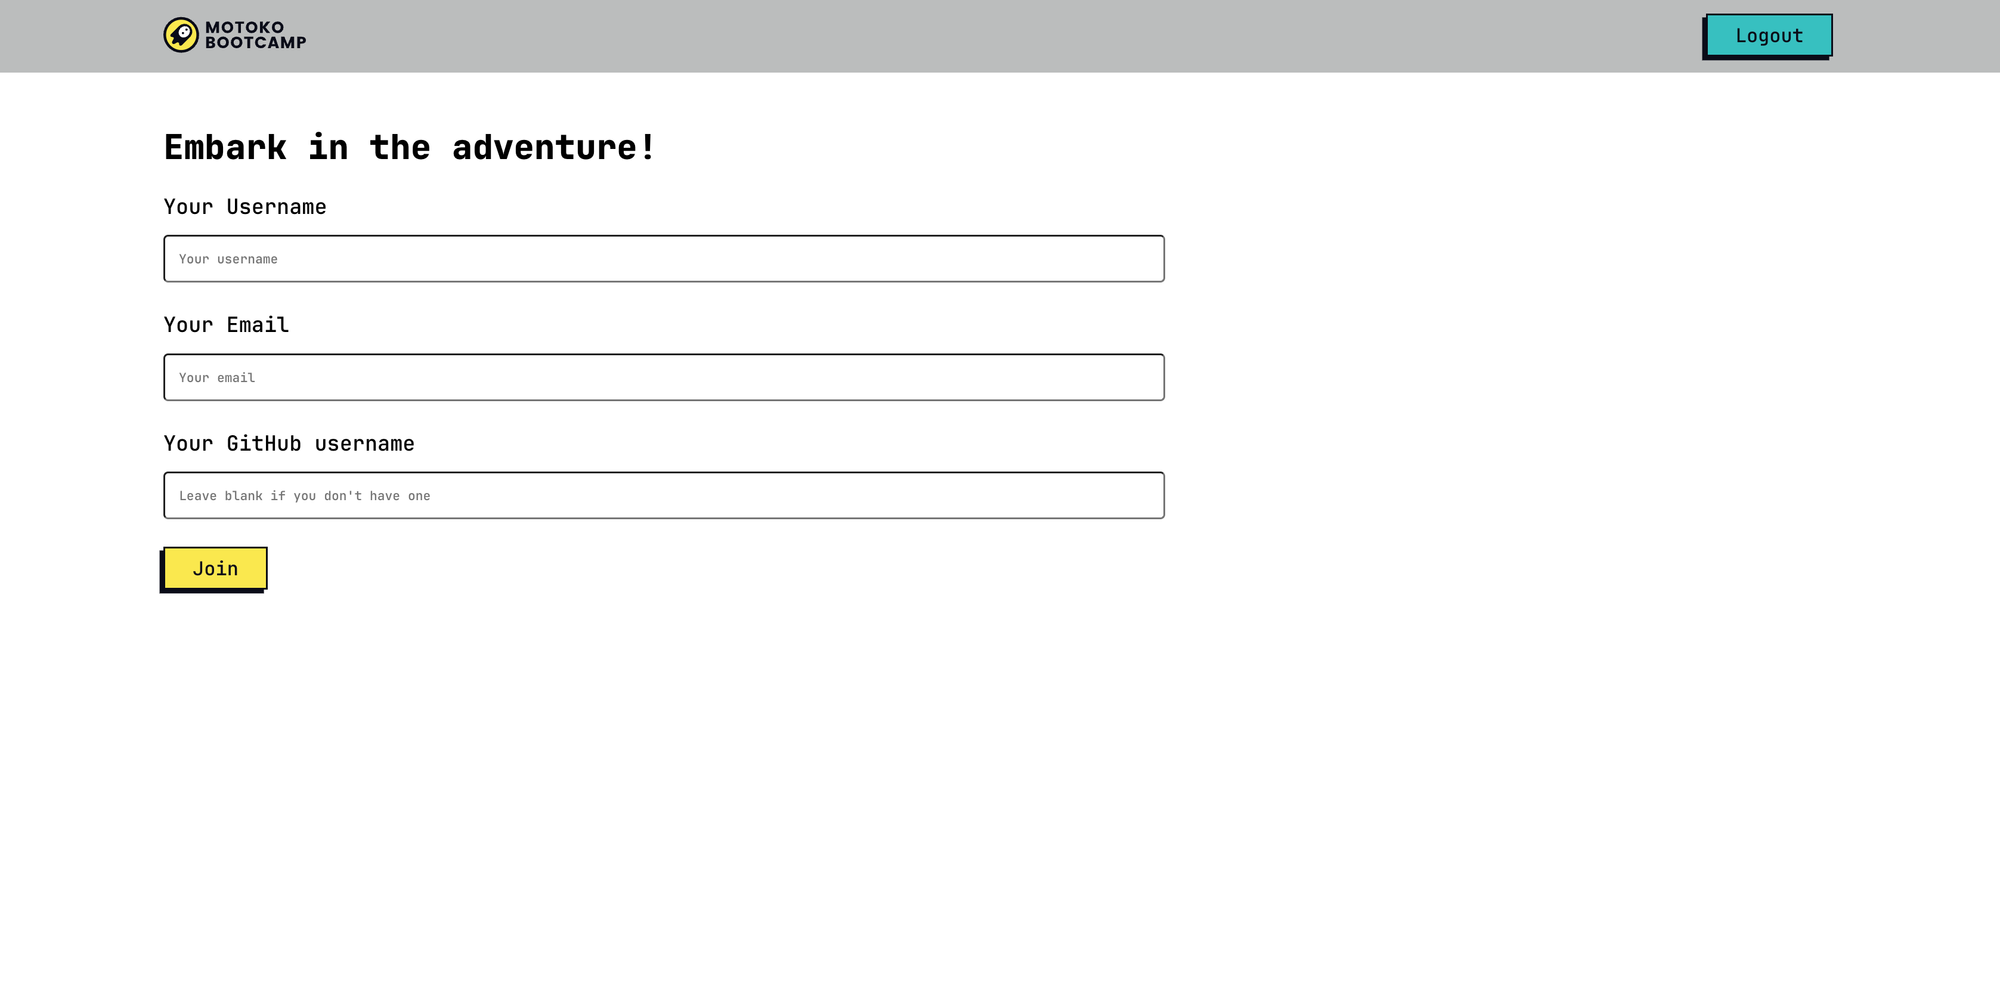
Your first challenge!
Let's dive in and tackle our first challenge right away!
Registration
To properly follow this course and record our progression - we need to register on the Submission website.
Create an Internet Identity
To register on the Submission website and record your progression through this course, you need to own an Internet Identity. If you don't have one yet, you can create one by following the instructions on the Internet Computer Wiki.
Register on the Submission website
Once you have your Internet Identity, login on the Submission website - by clicking on the Login button in the top right corner and follow the instructions.
Your first challenge!
Let's dive in and tackle our first challenge right away!
Your first challenge
"So you want to join the Motoko Bootcamp?" Before joining us, you need to prove your worth by building and deploying your first application on the Internet Computer... let's do it!
Setting up your environment
Gitpod
GitPod is a cloud-based development environment. We will use it to access and edit the project files directly your web browser. That way you don’t have to install any additional software or worry about setting up your development environment locally. Get started with just one click 👇
Login
To use GitPod, you'll need to authenticate with one of the following platforms:
- GitLab
- GitHub
- Bitbucket
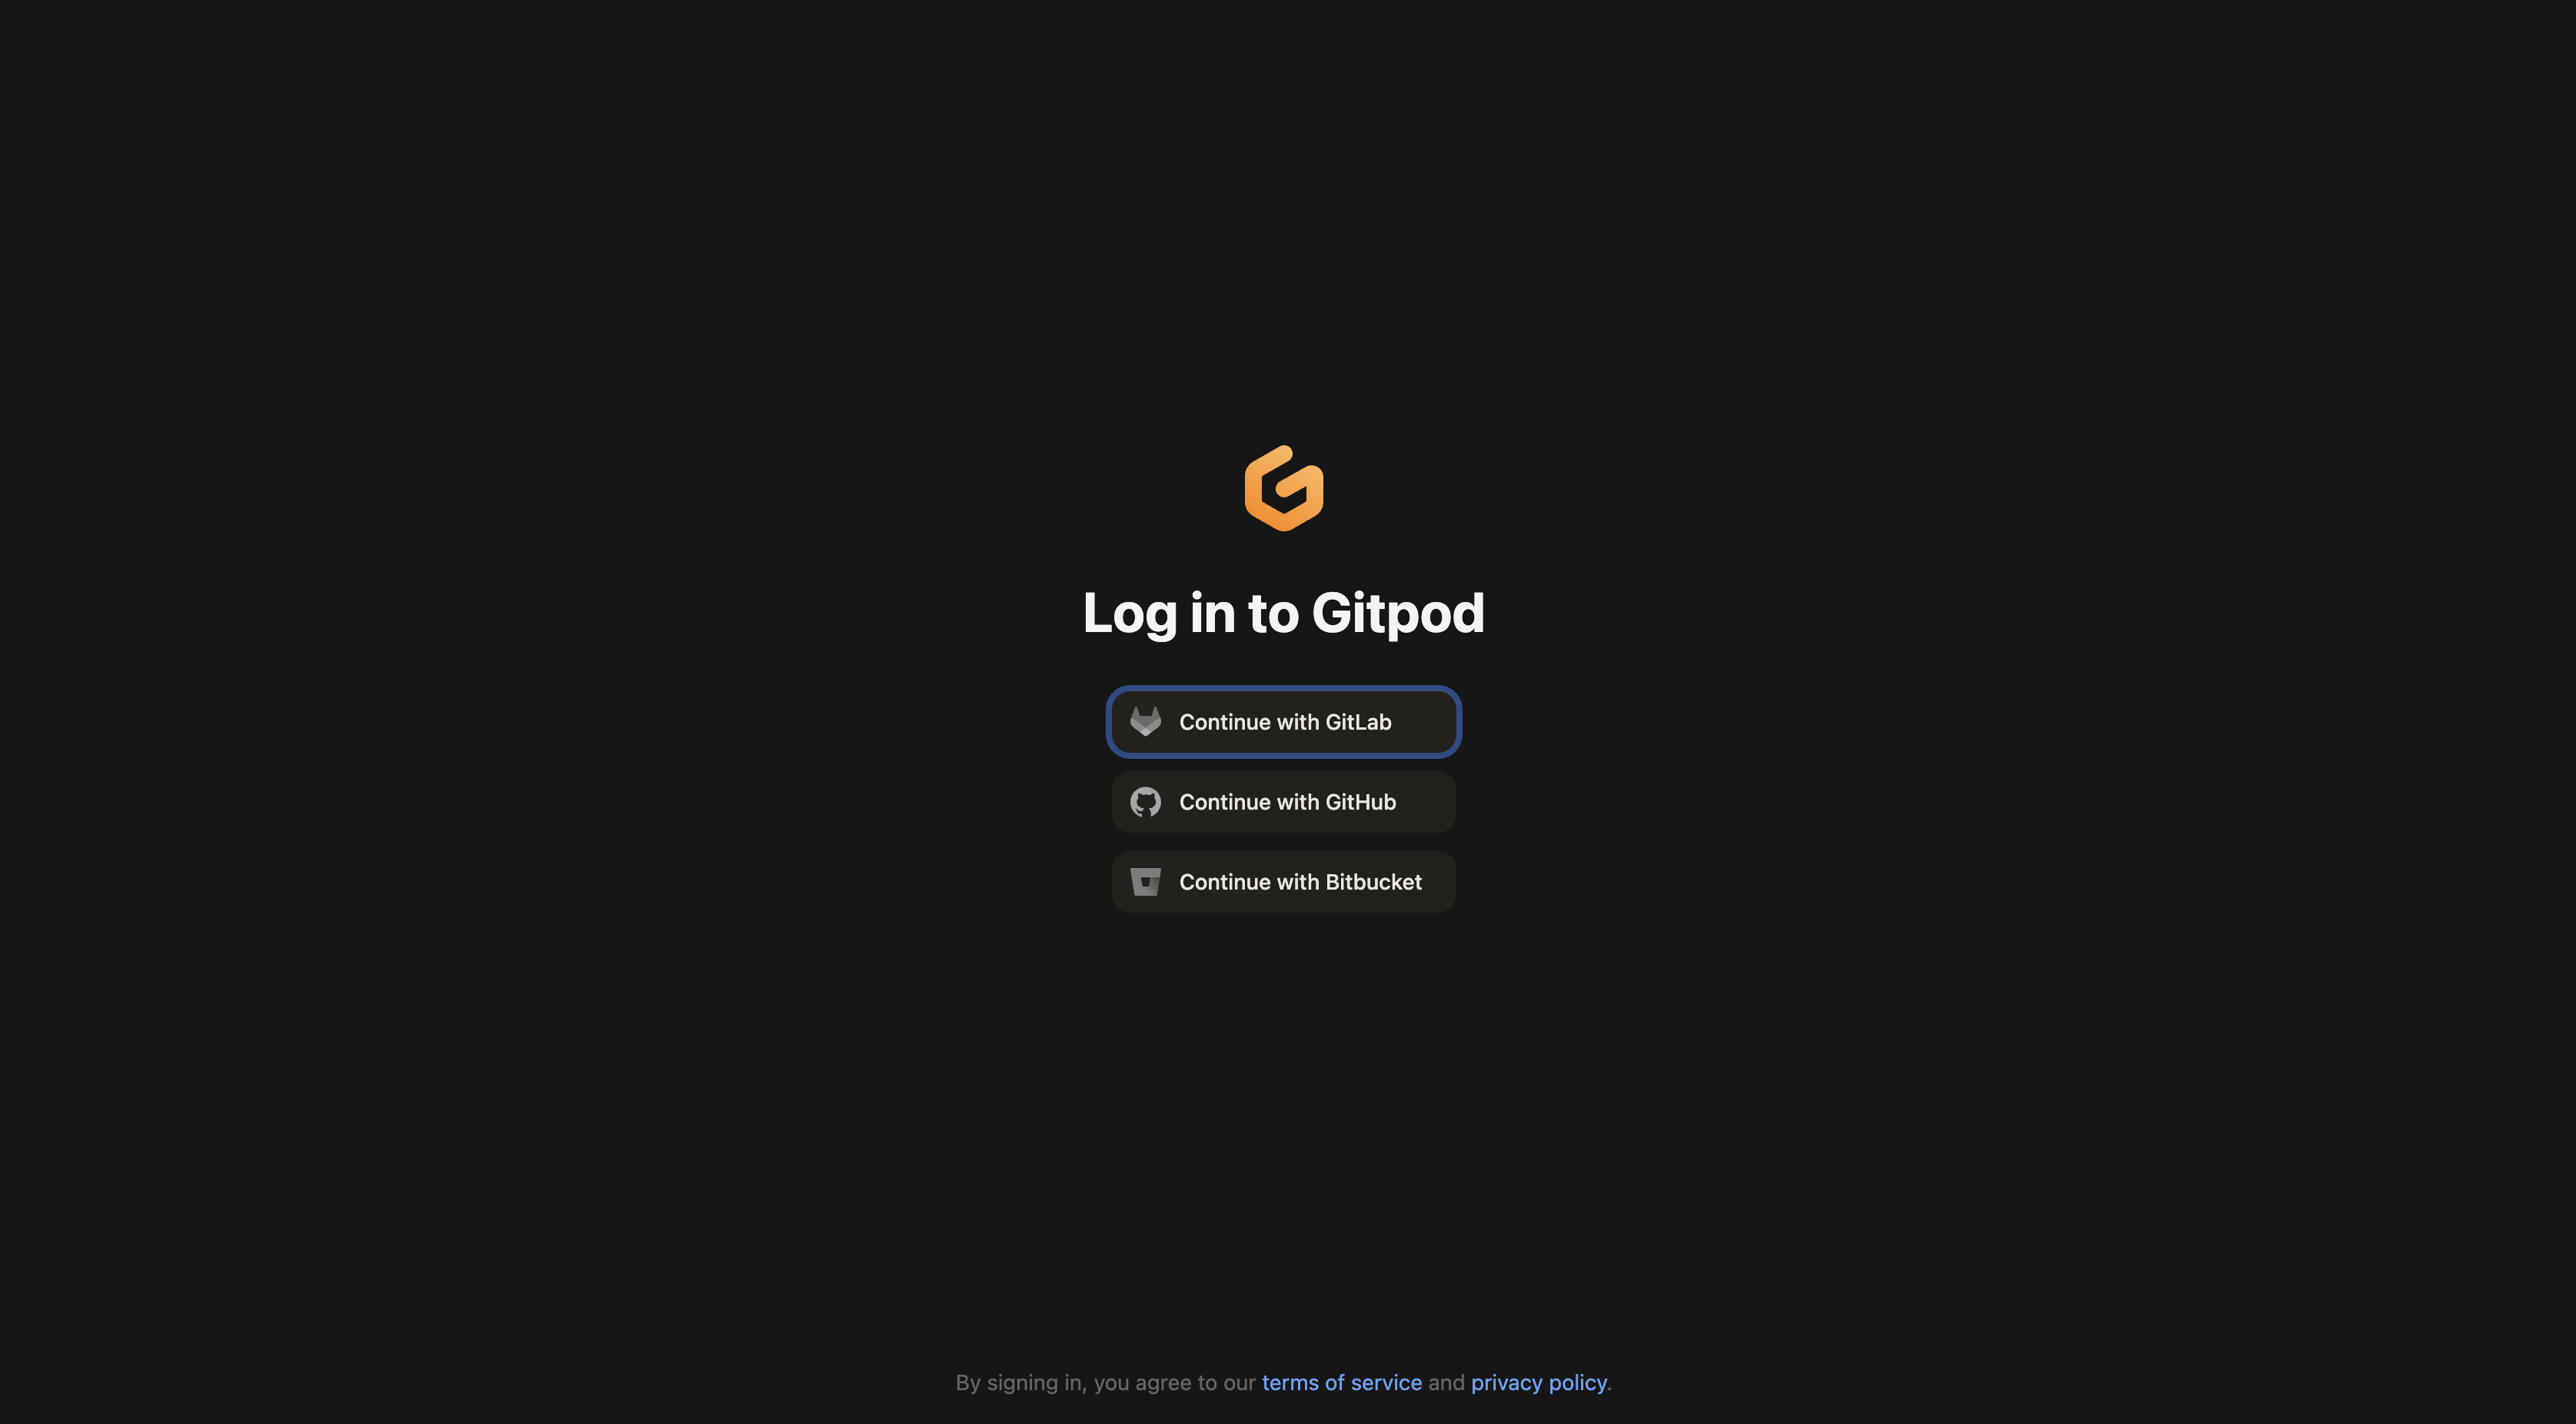
If you lack these accounts, we suggest creating a GitHub account; it's quick, takes just 2 minutes, and is essential for your building journey!
With the free plan, we have up to 50 hours per month. This should be more than enough to complete the course.
Create your workspace
To continue you need to select the options for your workspace:
- The repository
- The IDE
- The configuration
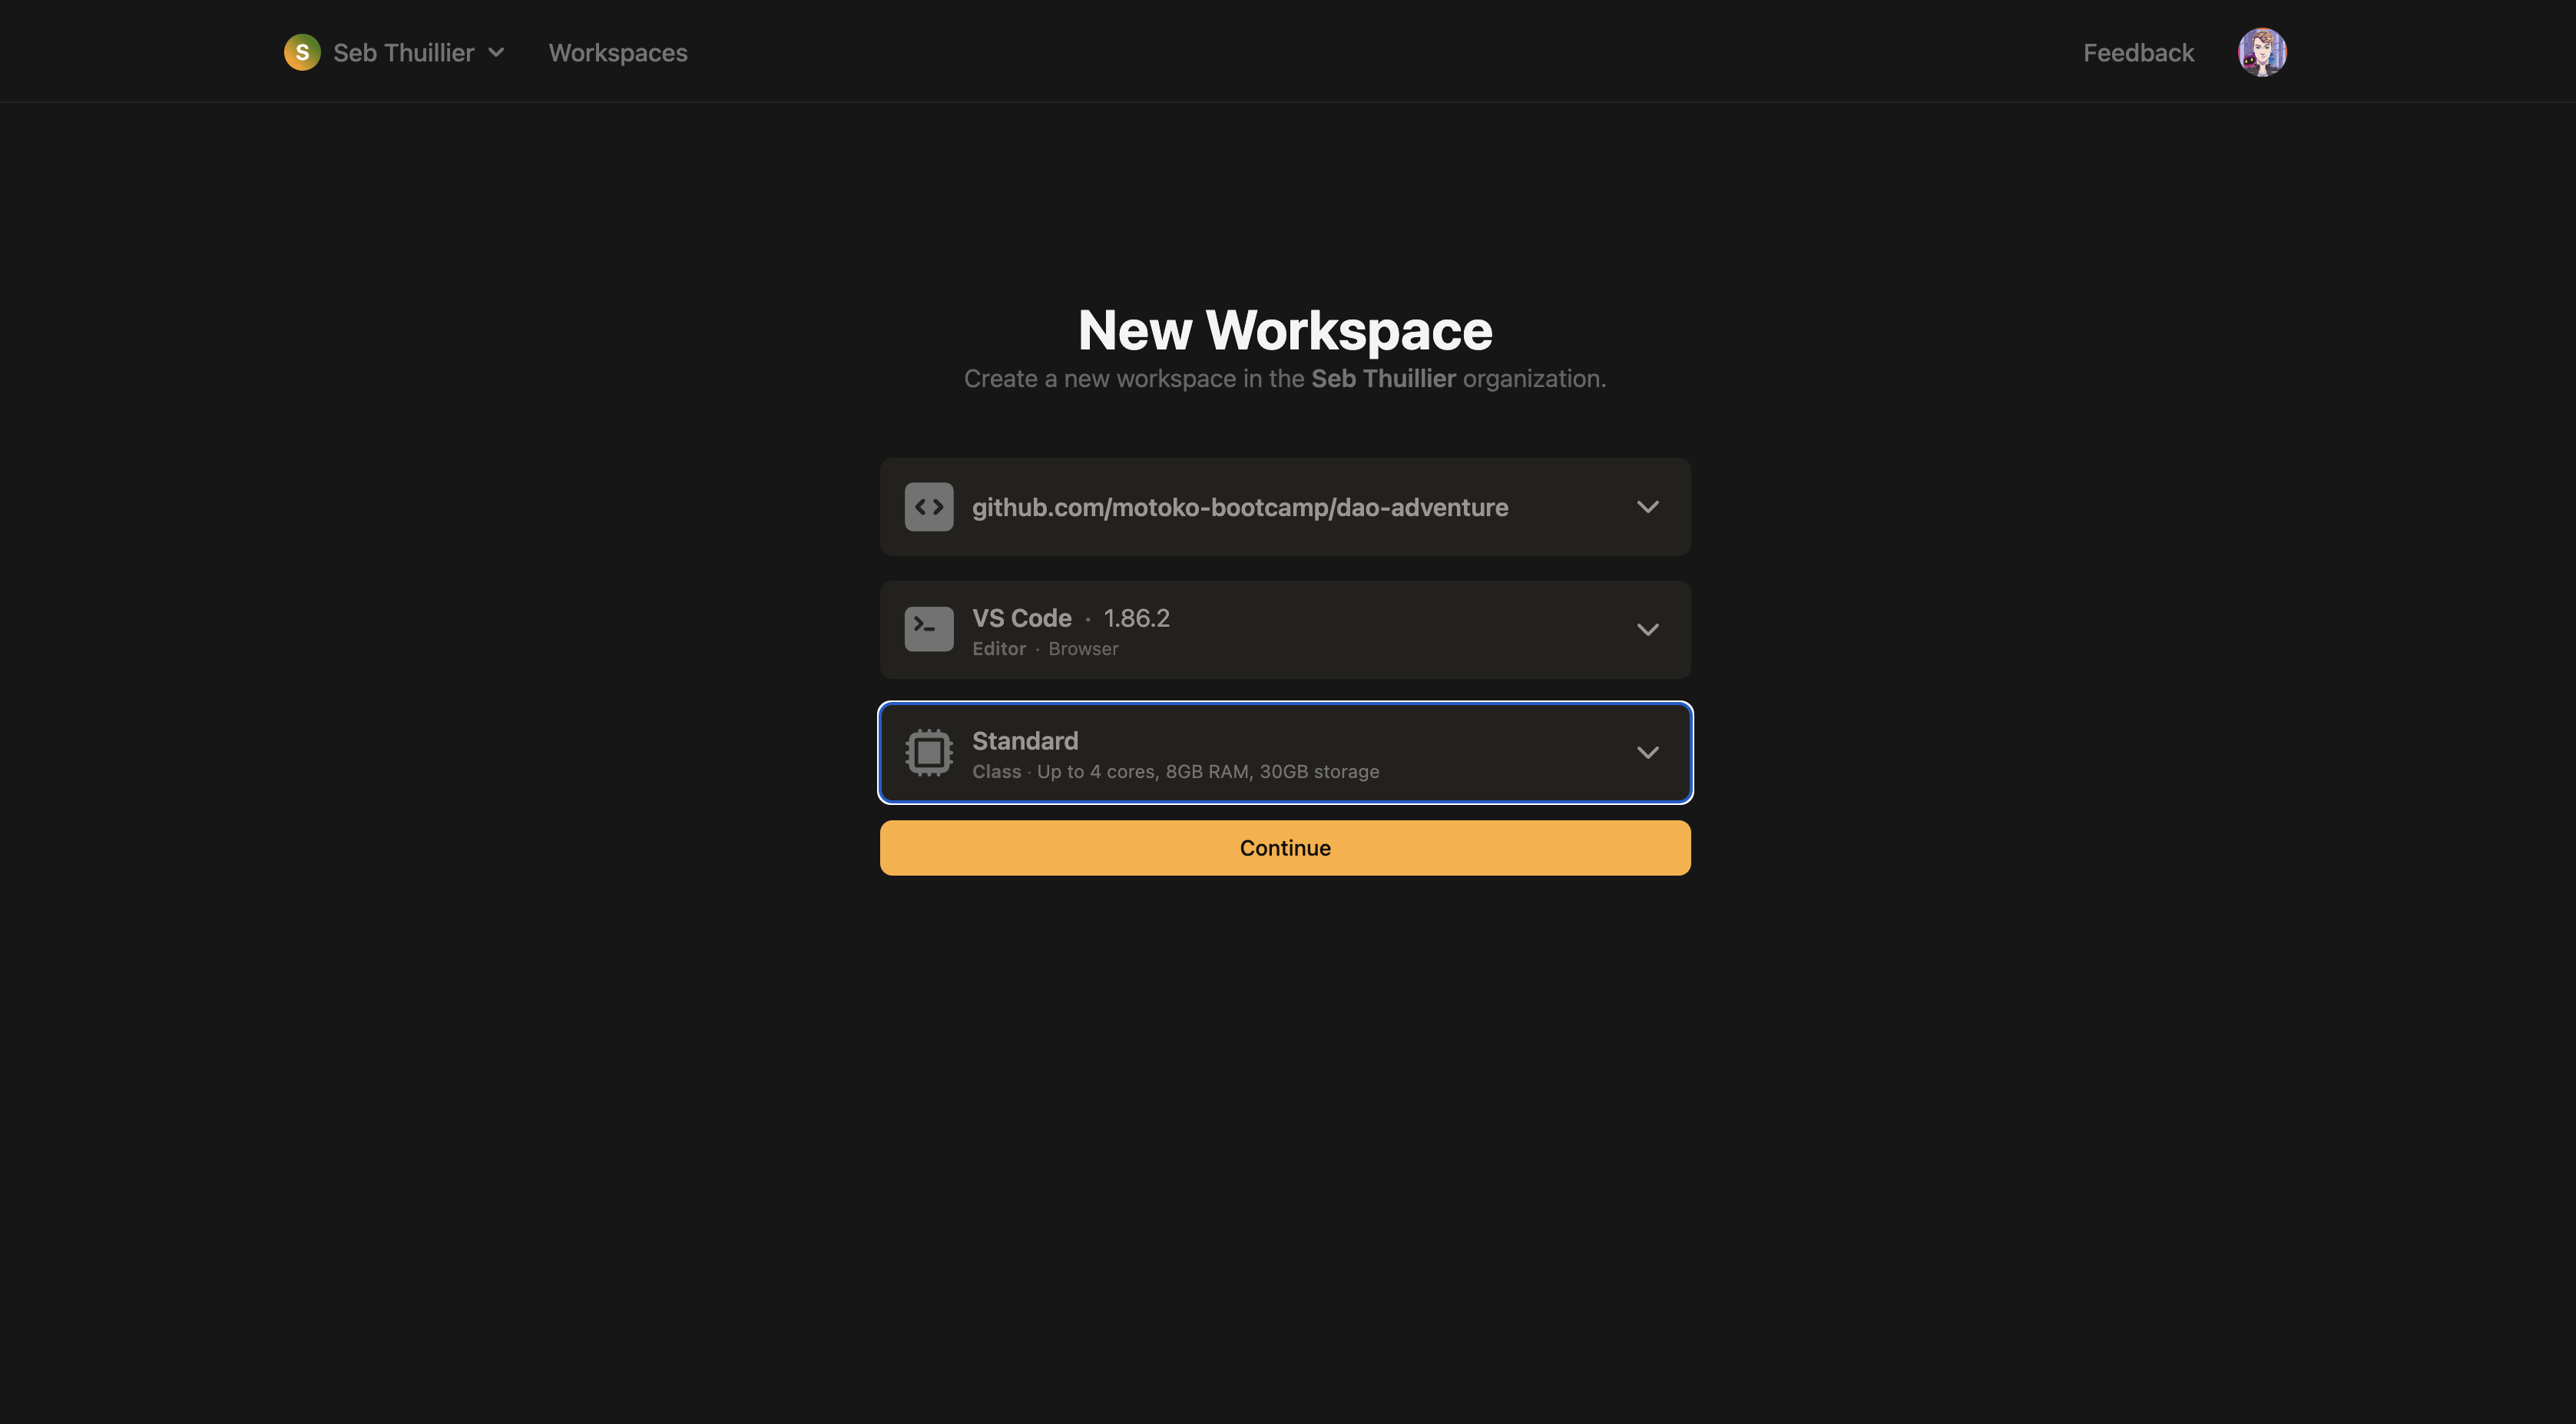
Continue with the following options:
- The repository should be
bootcamp - The IDE VSCode (Browser)
- The standard configuration.
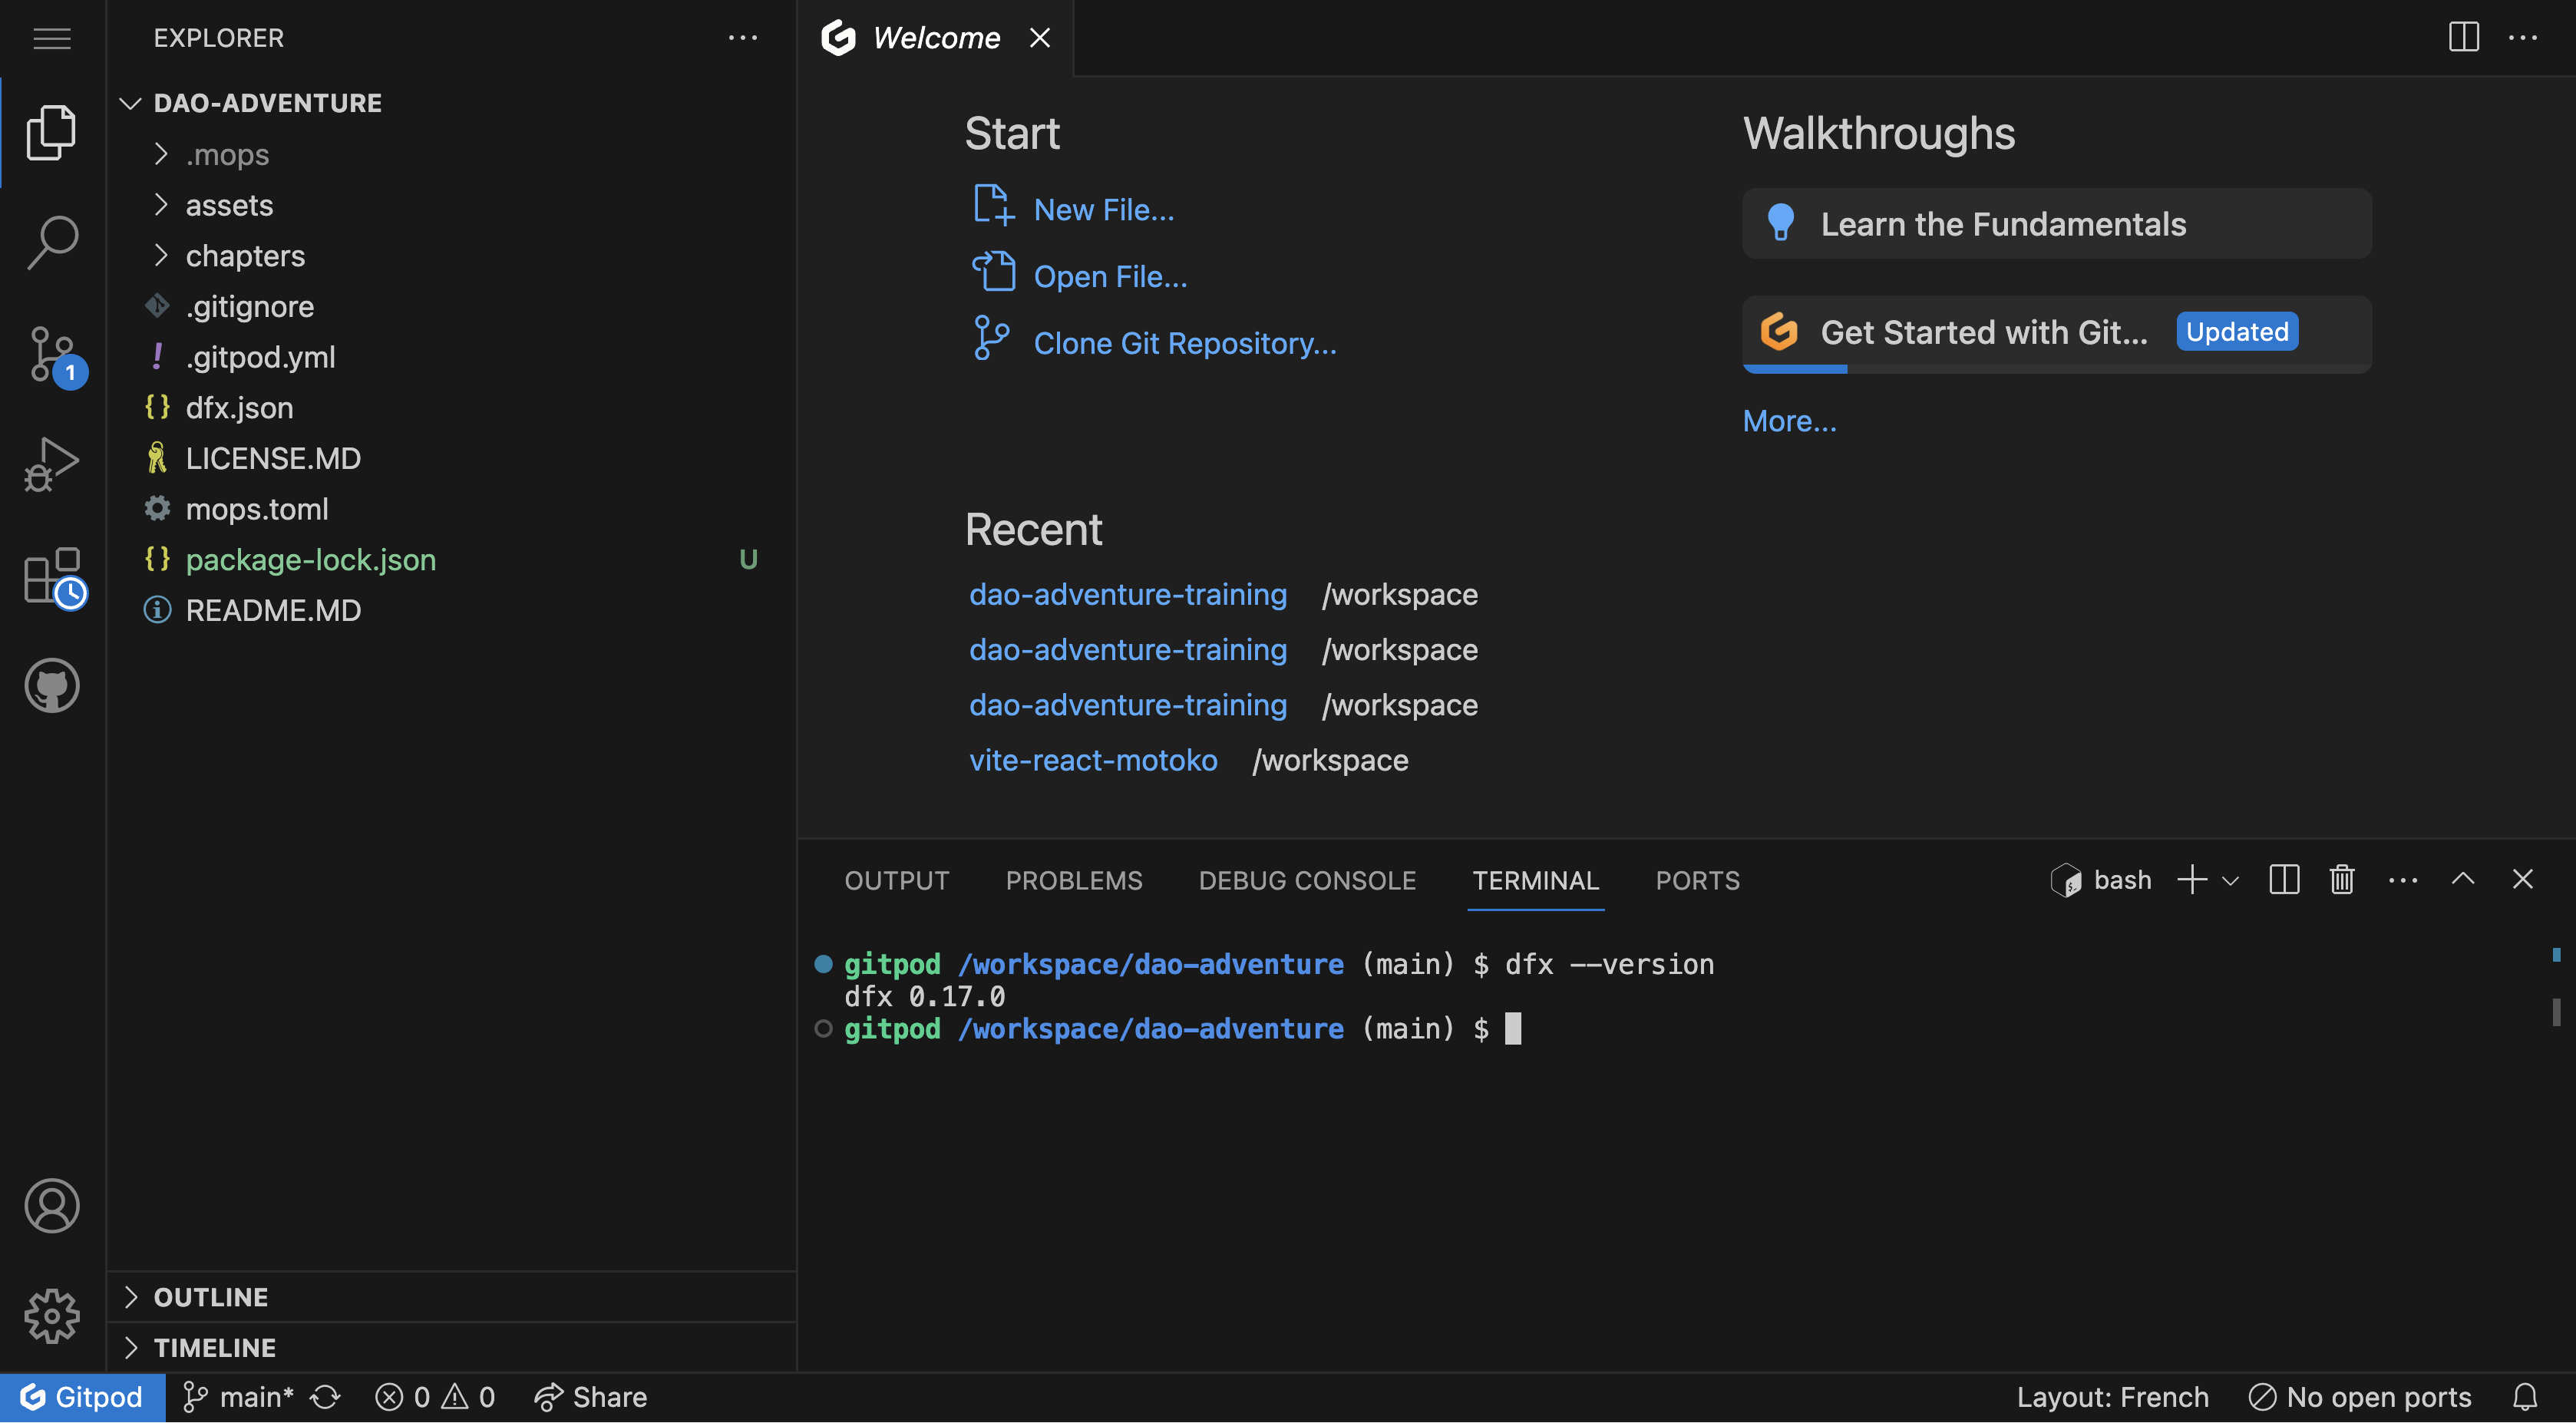
Setting up the workspace
After installation, your files appear on the left, and the terminal displays "Installation complete. Please close this terminal and open a new one to finalize the setup and begin your project." Open a new terminal by clicking "+" and close the current one.
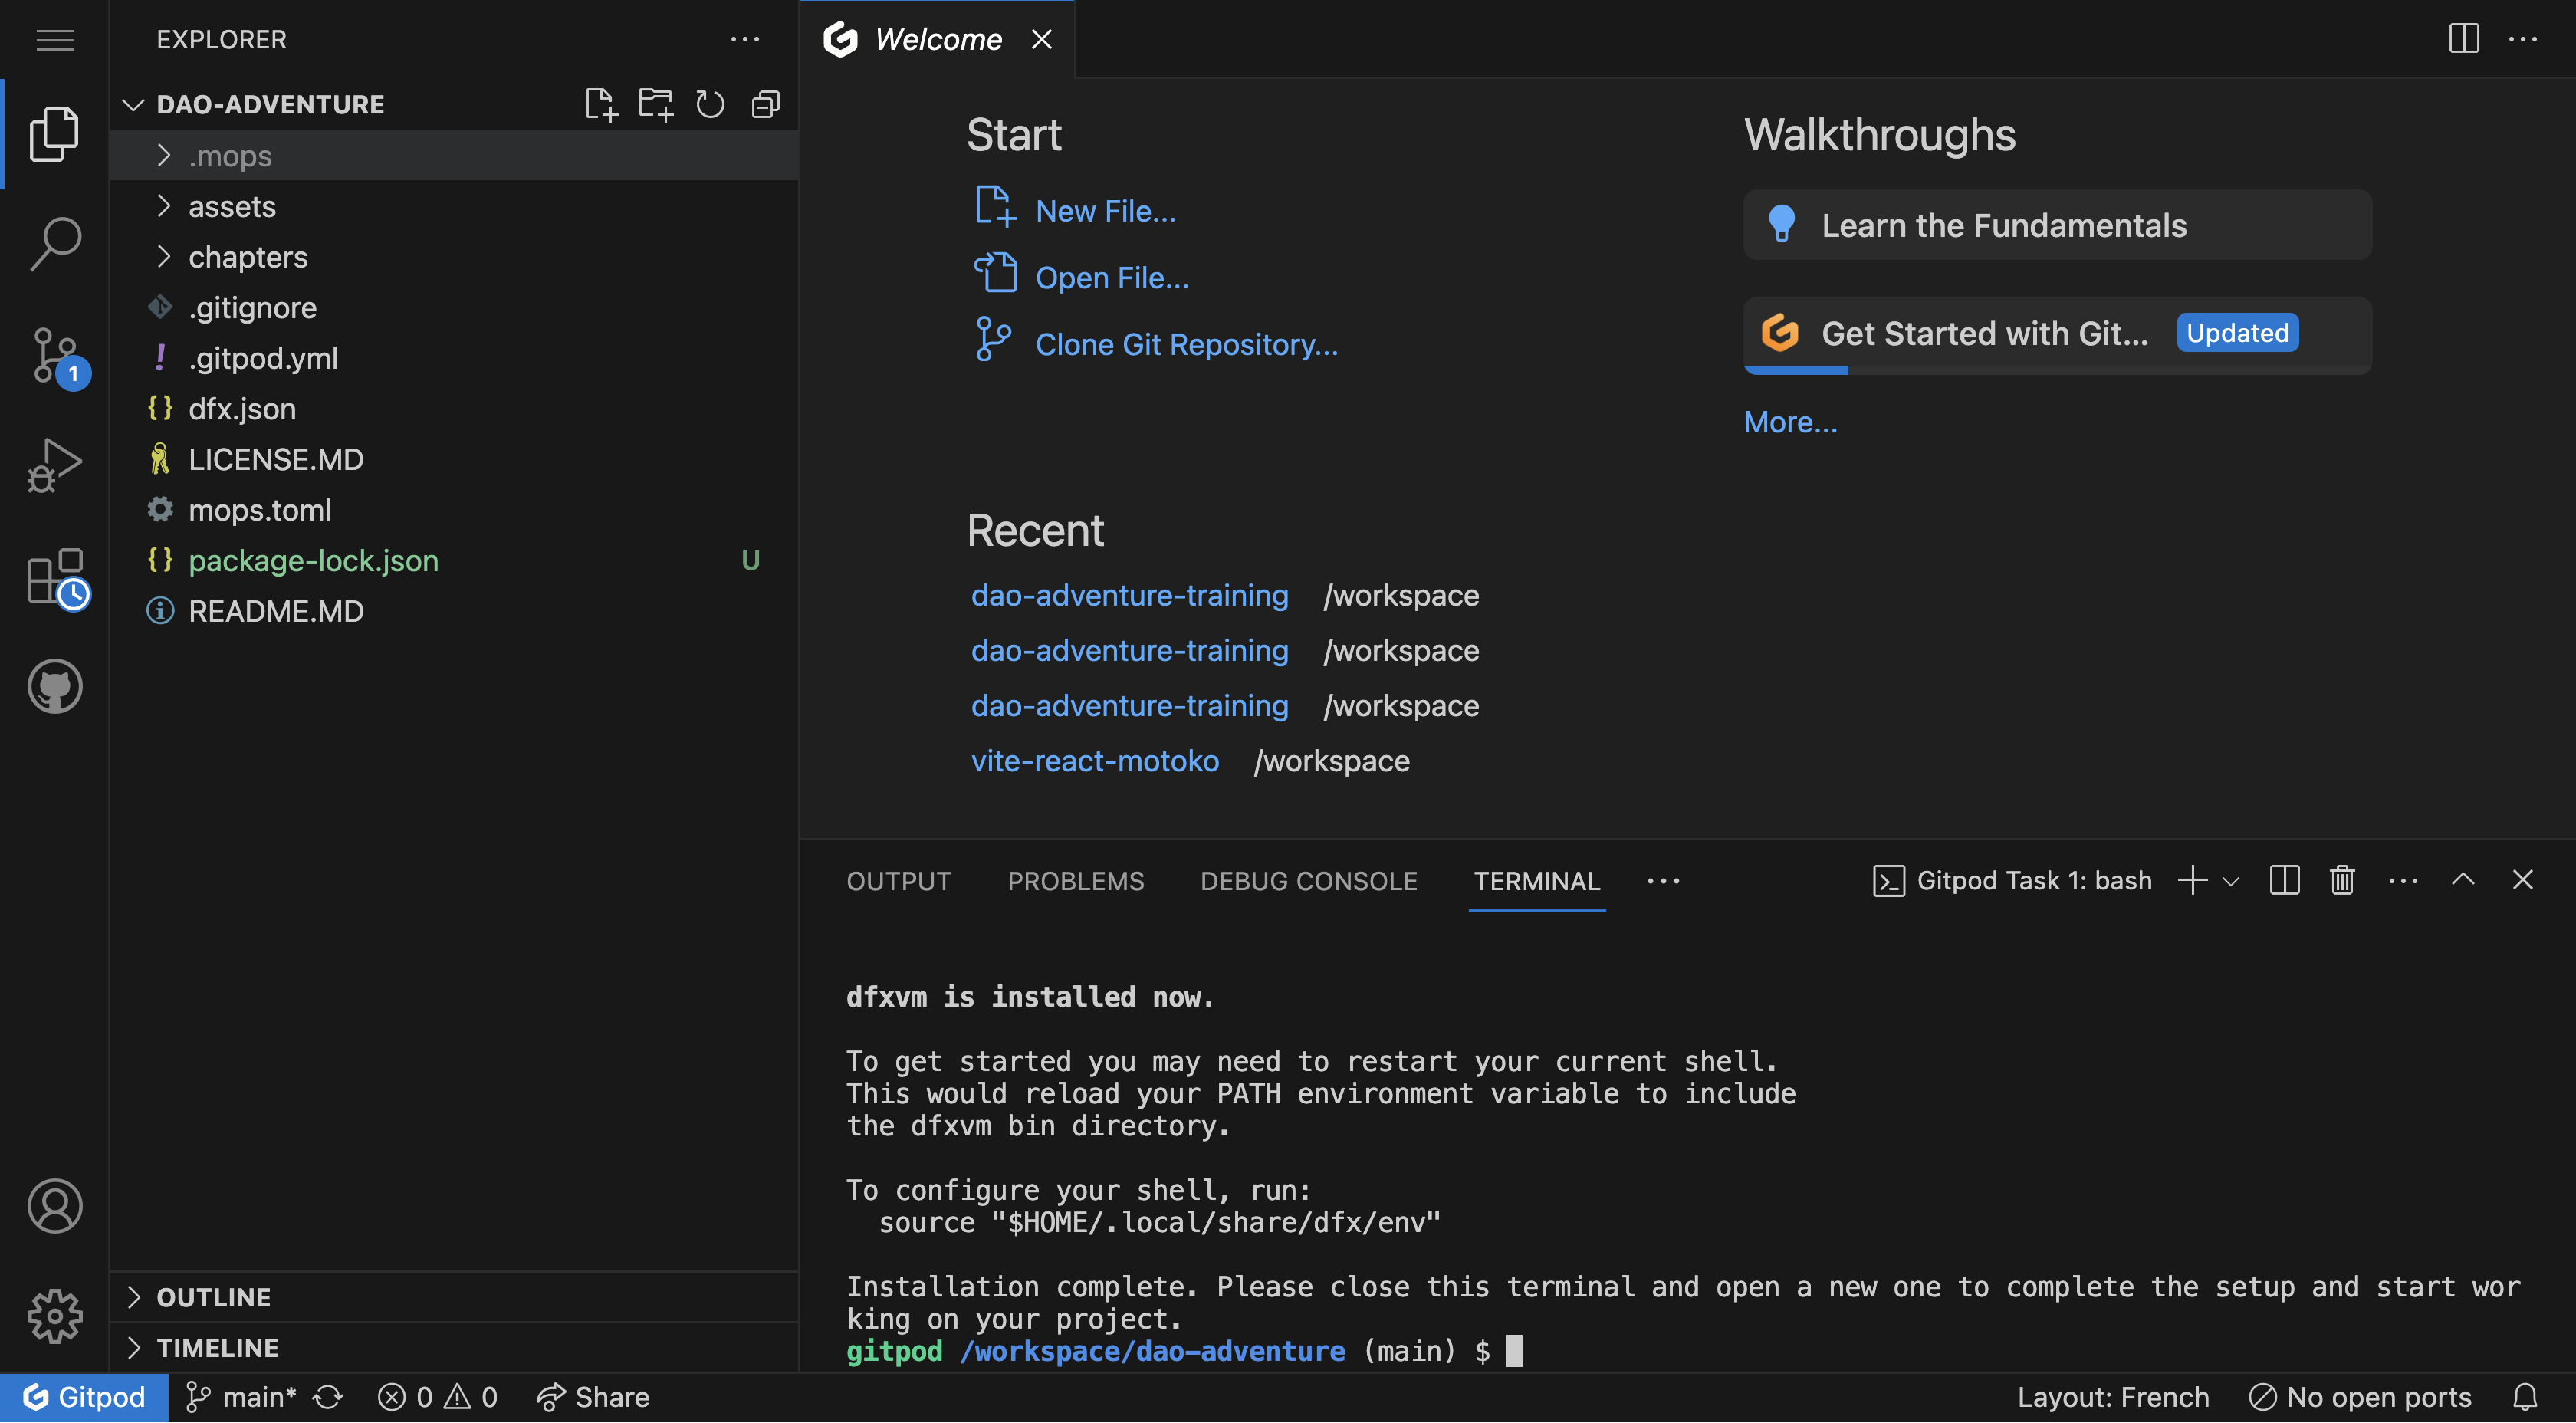
Verify the workspace setup by running dfx --version in the newly open terminal.
Facing issues when setting up the workspace?
- Deactivate your browser extensions. For instance, we've identified the Plug wallet extension as causing issues.
- Switch to the Incognito Mode.
- Switch to another browser (Chrome is recommended)
- Empty your cache and refresh the page.
- Reach out directly on our feedback channel.
Your first challenge
Navigate to the folder chapters/qualification/challenge and open the main.mo file
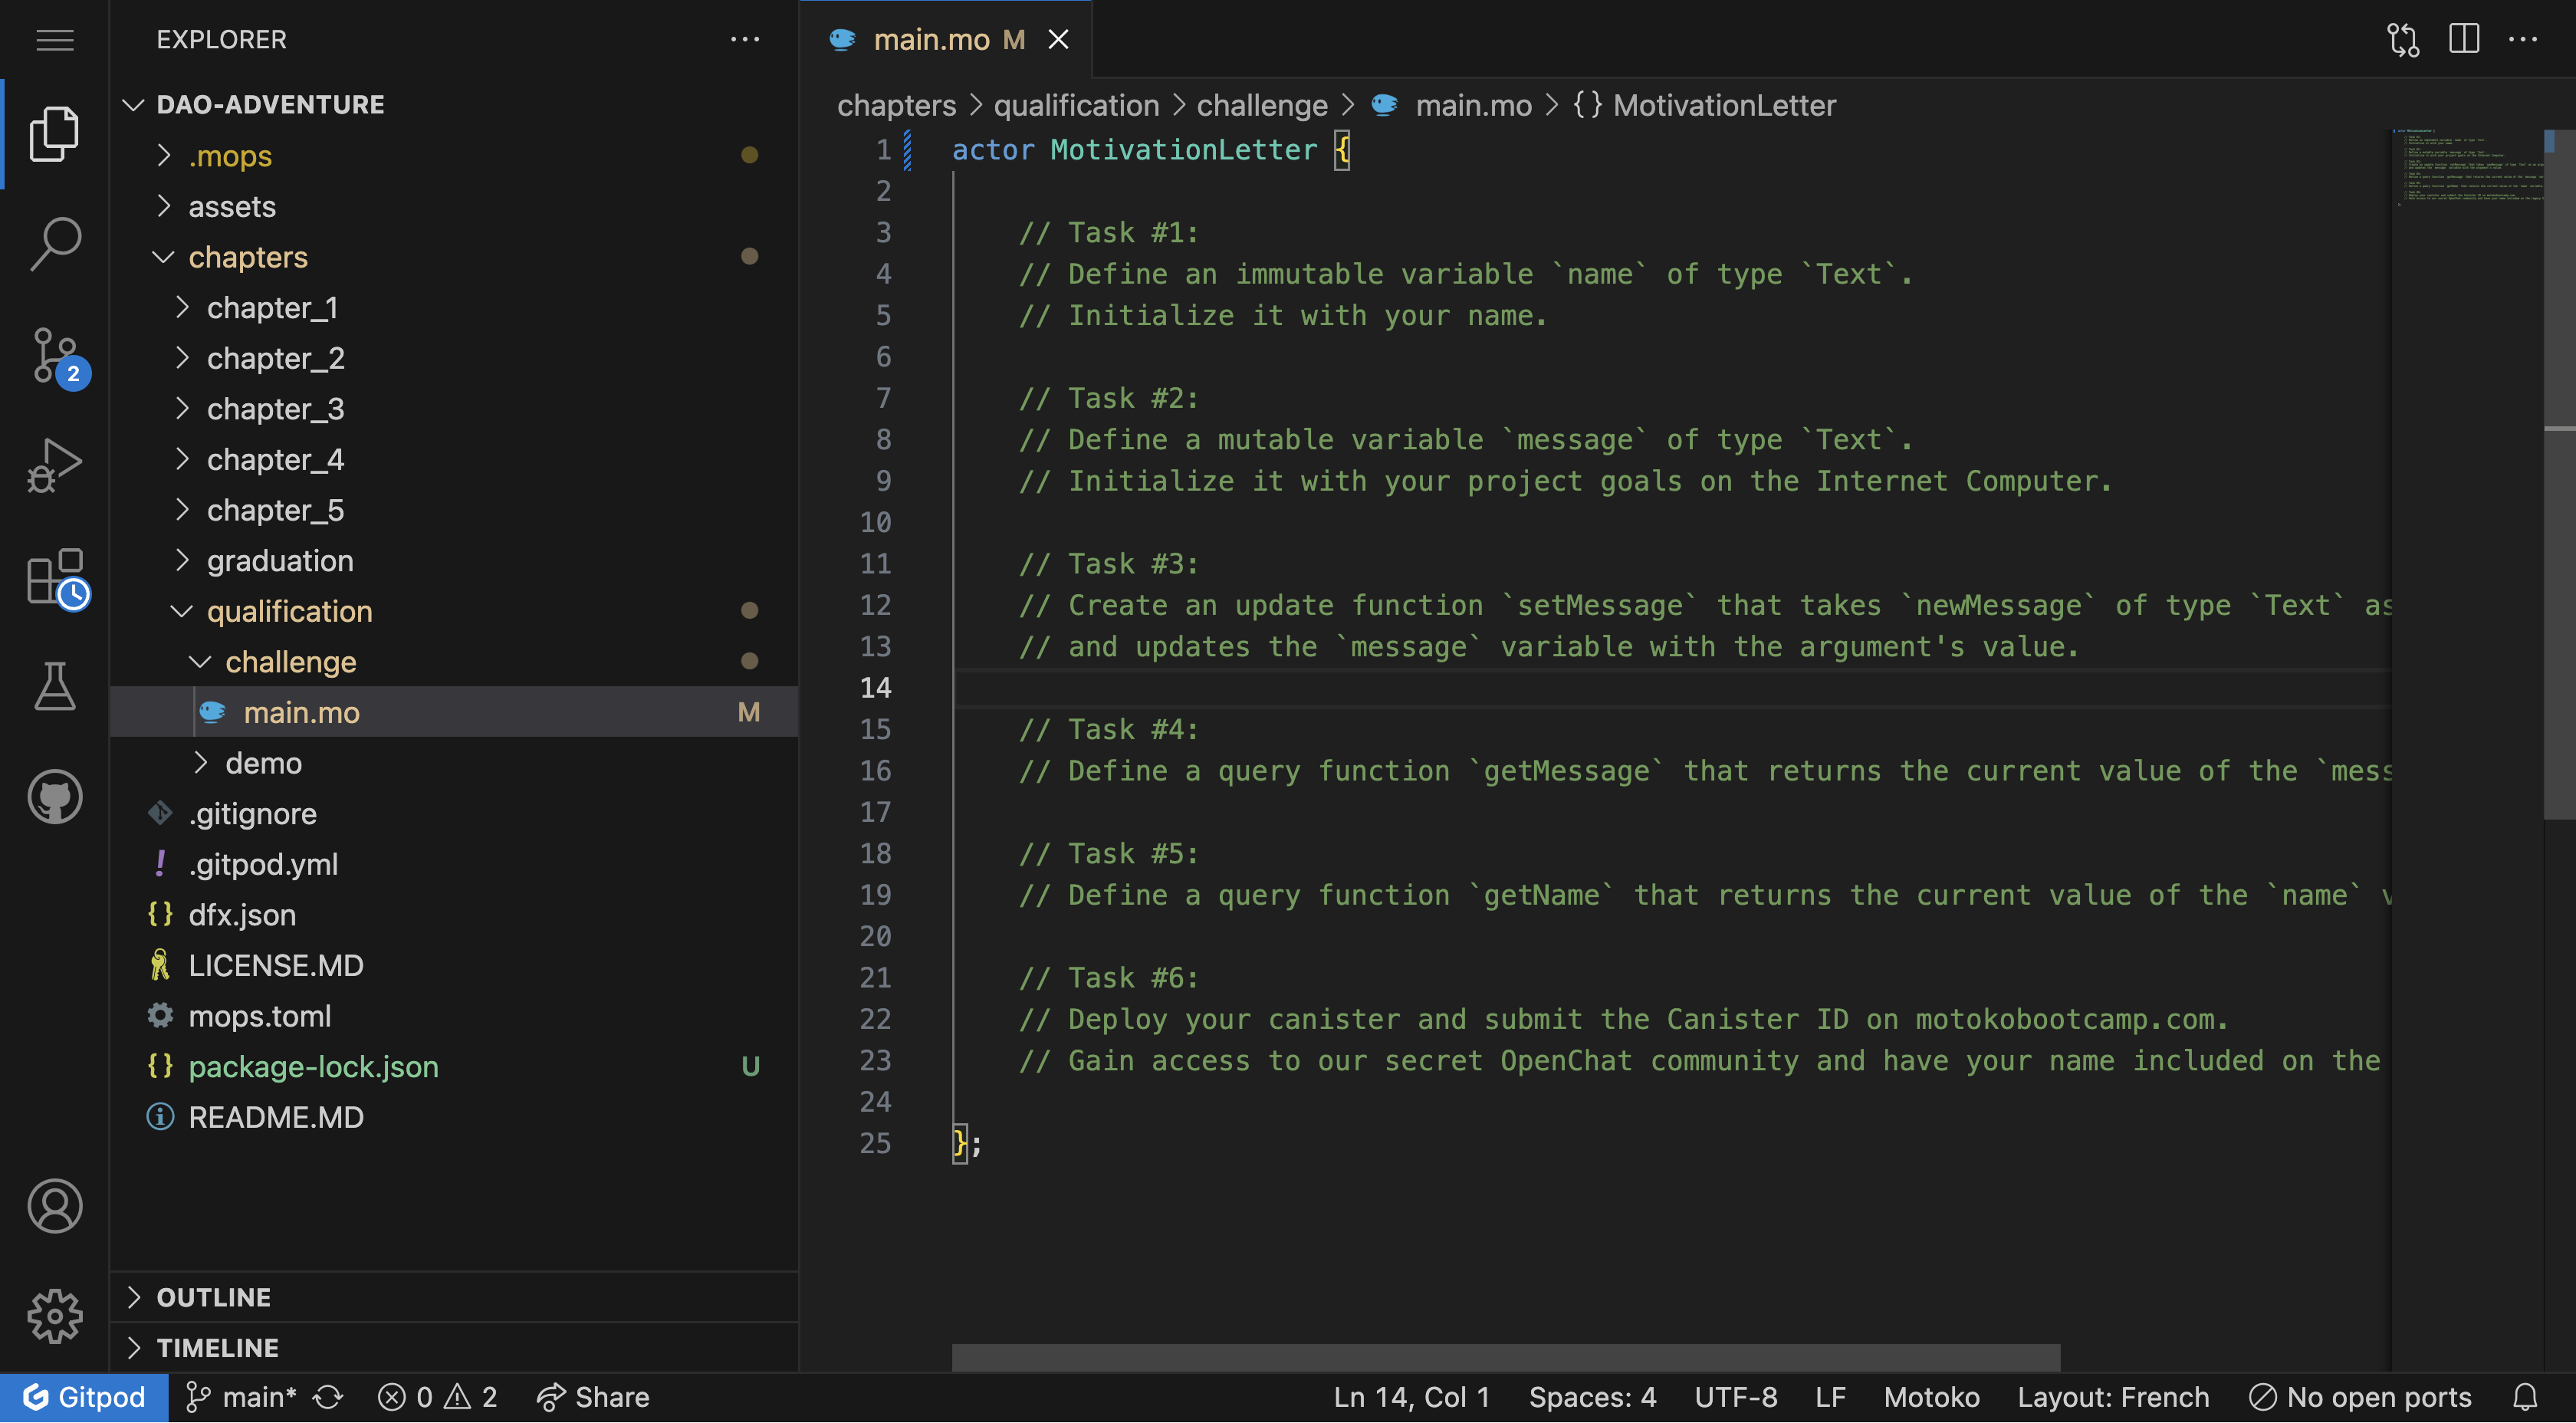
This is our first Motoko file, let's dive in!
Writing a motivation letter
A motivation letter, often known as a "statement of purpose," is a personalized document detailing an individual's aspirations, qualifications, and reasons for wanting to join a particular program or institution.
This application will symbolically represent a Motivation Letter. You're not just creating an app; you're stepping into the transformative world of the Internet Computer.
Demo
To illustrate the next sections let's define a simple actor Counter - the code for this canister can be found in chapters/qualification/demo/ folder.
actor Counter {
    var counter : Nat = 0;
    let message : Text = "Motoko Bootcamp will become the best Web3 bootcamp in the world!";


    public func setCounter(newCounter : Nat) : async () {
        counter := newCounter; // We assign a new value to the counter variable based on the provided argument
        return;
    };

    public func incrementCounter() : async () {
        counter += 1; // We increment the counter by one
        return;
    };

    public query func getCounter() : async Nat {
        return counter;
    };
}
Actor
Whenever you open a Motoko file, there is a high probability that the first word you encounter is actor:
actor {

}
An actor is how a canister is defined in Motoko. This term comes from the Actor model - a theory on how to design systems that can handle multiple tasks concurrently.
Think of an actor as a small robot that can receive messages, do some work, and then send messages to other actors. Actors can also instantiate new actors. All the actors talk to each other by sending messages but they can't access the state of each other directly.
For instance, an external canister looking to access the value of the current welcoming message would have to do it through a message - also called an inter-canister call.
You can choose to give your actor a name if you want, by writing the name right after the word actor.
actor Counter {

}
Variables and Types
Inside the body of the actor, we can define variables. In Motoko, variables are grouped into two categories: immutable and mutable.
- Immutable variables are variables that cannot be changed after they have been assigned a value. The
letkeyword is used to define an immutable variable in Motoko.
let message : Text = "Motoko Bootcamp will become the best Web3 bootcamp in the world!";
Task #1 - Define an immutable variable
nameof typeText. Initialize it with your name.
- Mutable variables are variables that can be changed after they have been assigned a value. The
varkeyword is used to define a mutable variable in Motoko.
var counter : Nat = 0;
Tast #2 - Define a mutable variable
messageof typeText. Initialize it with an explanation of what you want to build with Motoko.
In Motoko, every variable has a specific type. This is a crucial aspect of Motoko because it helps avoid mistakes by ensuring that variables of different types cannot be combined or confused.
For instance, you wouldn't be able to add a variable of type
Textwith a variable of typeNat.
The : specifies a variable's type. In our Counter example, we use Text for text strings and Nat for natural numbers (0, 1, 2, 3...), both built-in types in Motoko.
Functions
In this project, we use only public functions accessible by anyone as part of the canister's public interface. Later, we'll cover how to define private functions.
Just like we had two types of variables - in Motoko we have two types of functions:
The Counter is live on the Internet Computer, allowing you to interact with it via its Candid UI.
Update
Update calls modify a canister's state and require consensus from all nodes, resulting in a 2-3 second delay. Update calls are used in these instances:
- Posting on social media, such as DSCVR.
- Sending a message on a messaging application, such as OpenChat.
- Buying a NFT on Entrepot.
In Motoko, every function is an update function by default, unless specified otherwise using the query keyword (more on that in the next section).
public func setCounter(newCounter : Nat) : async () {
    counter := newCounter; // We assign a new value to the counter variable based on the provided argument
    return;
};
Task #3 - Create an update function
setMessagethat accepts anewMessageargument of type Text and updates the message variable with the provided argument's value.
Query
Query calls, ideal for reading data without altering state, are fast (about 200ms) since a single node can respond. However, they're less secure due to the risk of false information from malicious nodes. Query calls are used in scenarios like:
- Reading an article on Nuance.
- Checking your user profile picture on DSCVR.
- Loading a video or a picture on any platform on Taggr
In Motoko, we define query functions by using the query keyword.
public query func getCounter() : async Nat {
    return counter;
};
Task #4 - Define a
queryfunctiongetMessage. This function returns the value of themessagevariable.
Task #5 - Define a
queryfunctiongetName. This function returns the value of thenamevariable.
Deploying a Canister
To deploy a canister, we will use the dfx command line tool.
dfx deploy --playground qualification
This command deploys your canister to the Internet Computer using the dfx.json file. Within dfx.json, we specify the canister's name and the main Motoko's entry point. The entry point is the Motoko file hosting the actor along with public functions, forming the canister's public interface.
{
  "canisters": {
    "counter": {
      "main": "src/qualification/demo/main.mo",
      "type": "motoko"
    }
  }
}
Your turn!
Task #6 - To complete your qualification, deploy your canister and submit your ID on motokobootcamp. com
Each canister deployed on the Internet Computer has an unique identifier called Canister ID. You need to identify the canister ID of your deployed application and submit it.
Rewards
After your Qualification project is submitted and verified, you'll unlock your first reward! Head over to the reward tab to access them it.
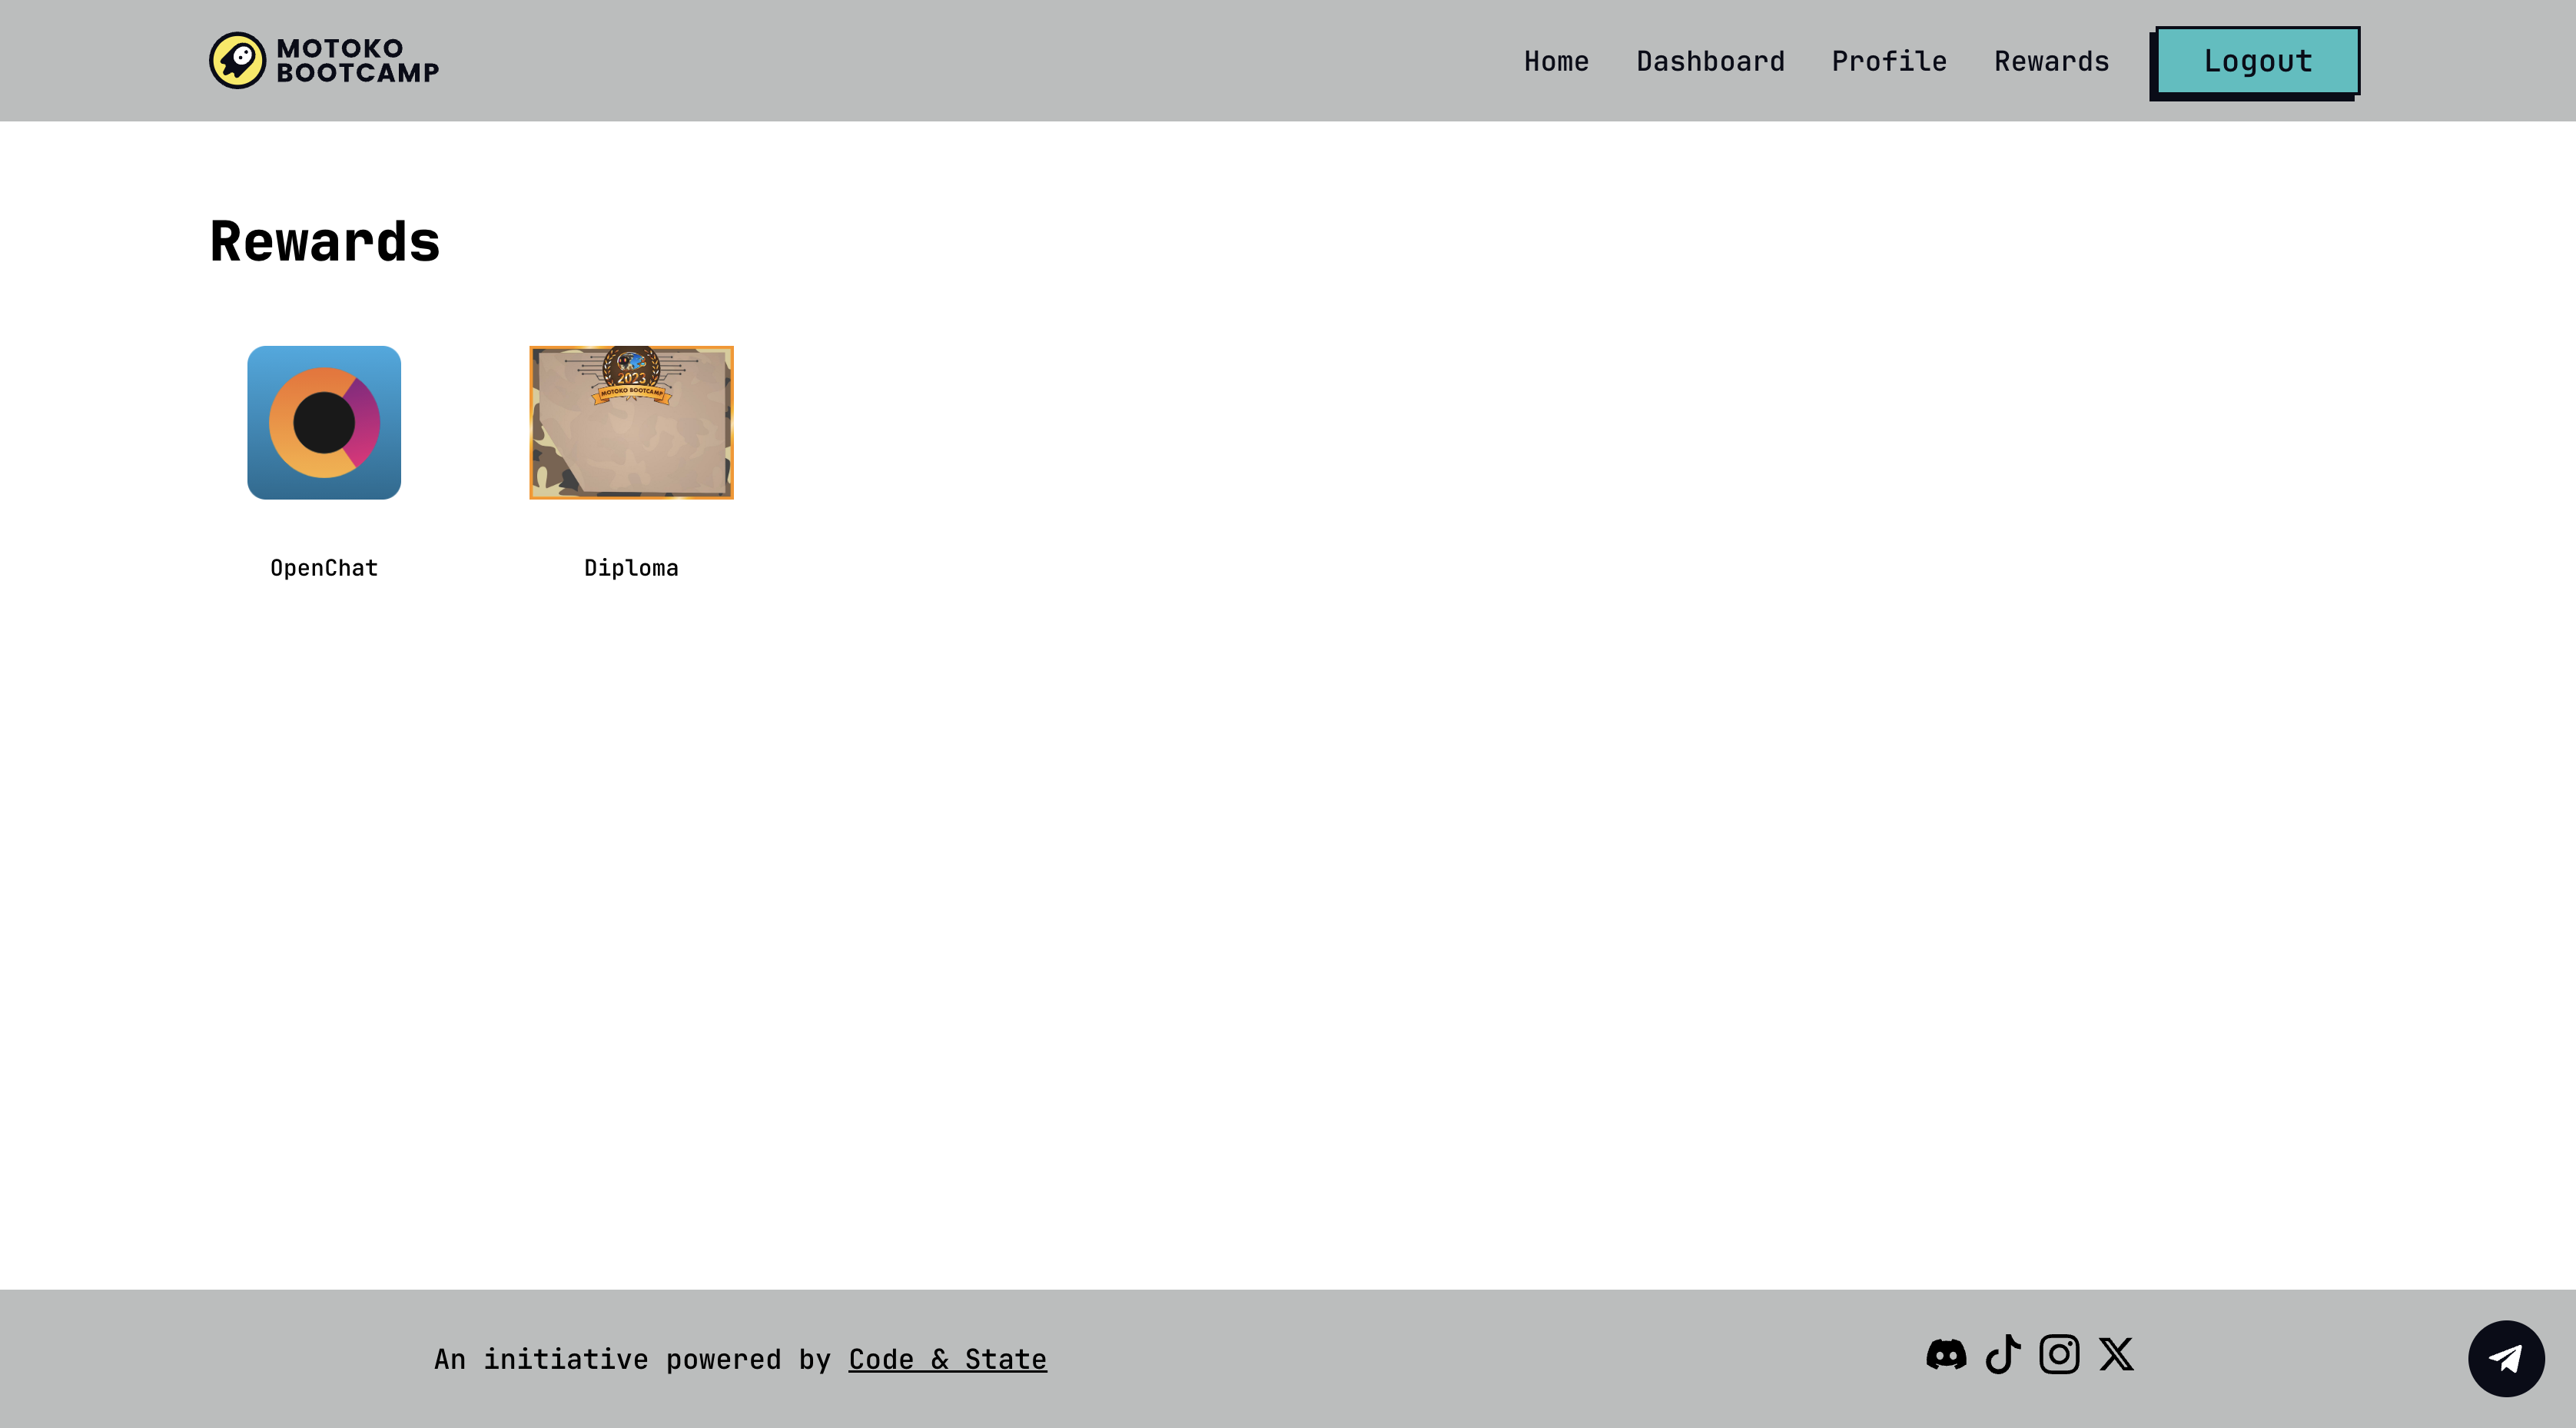
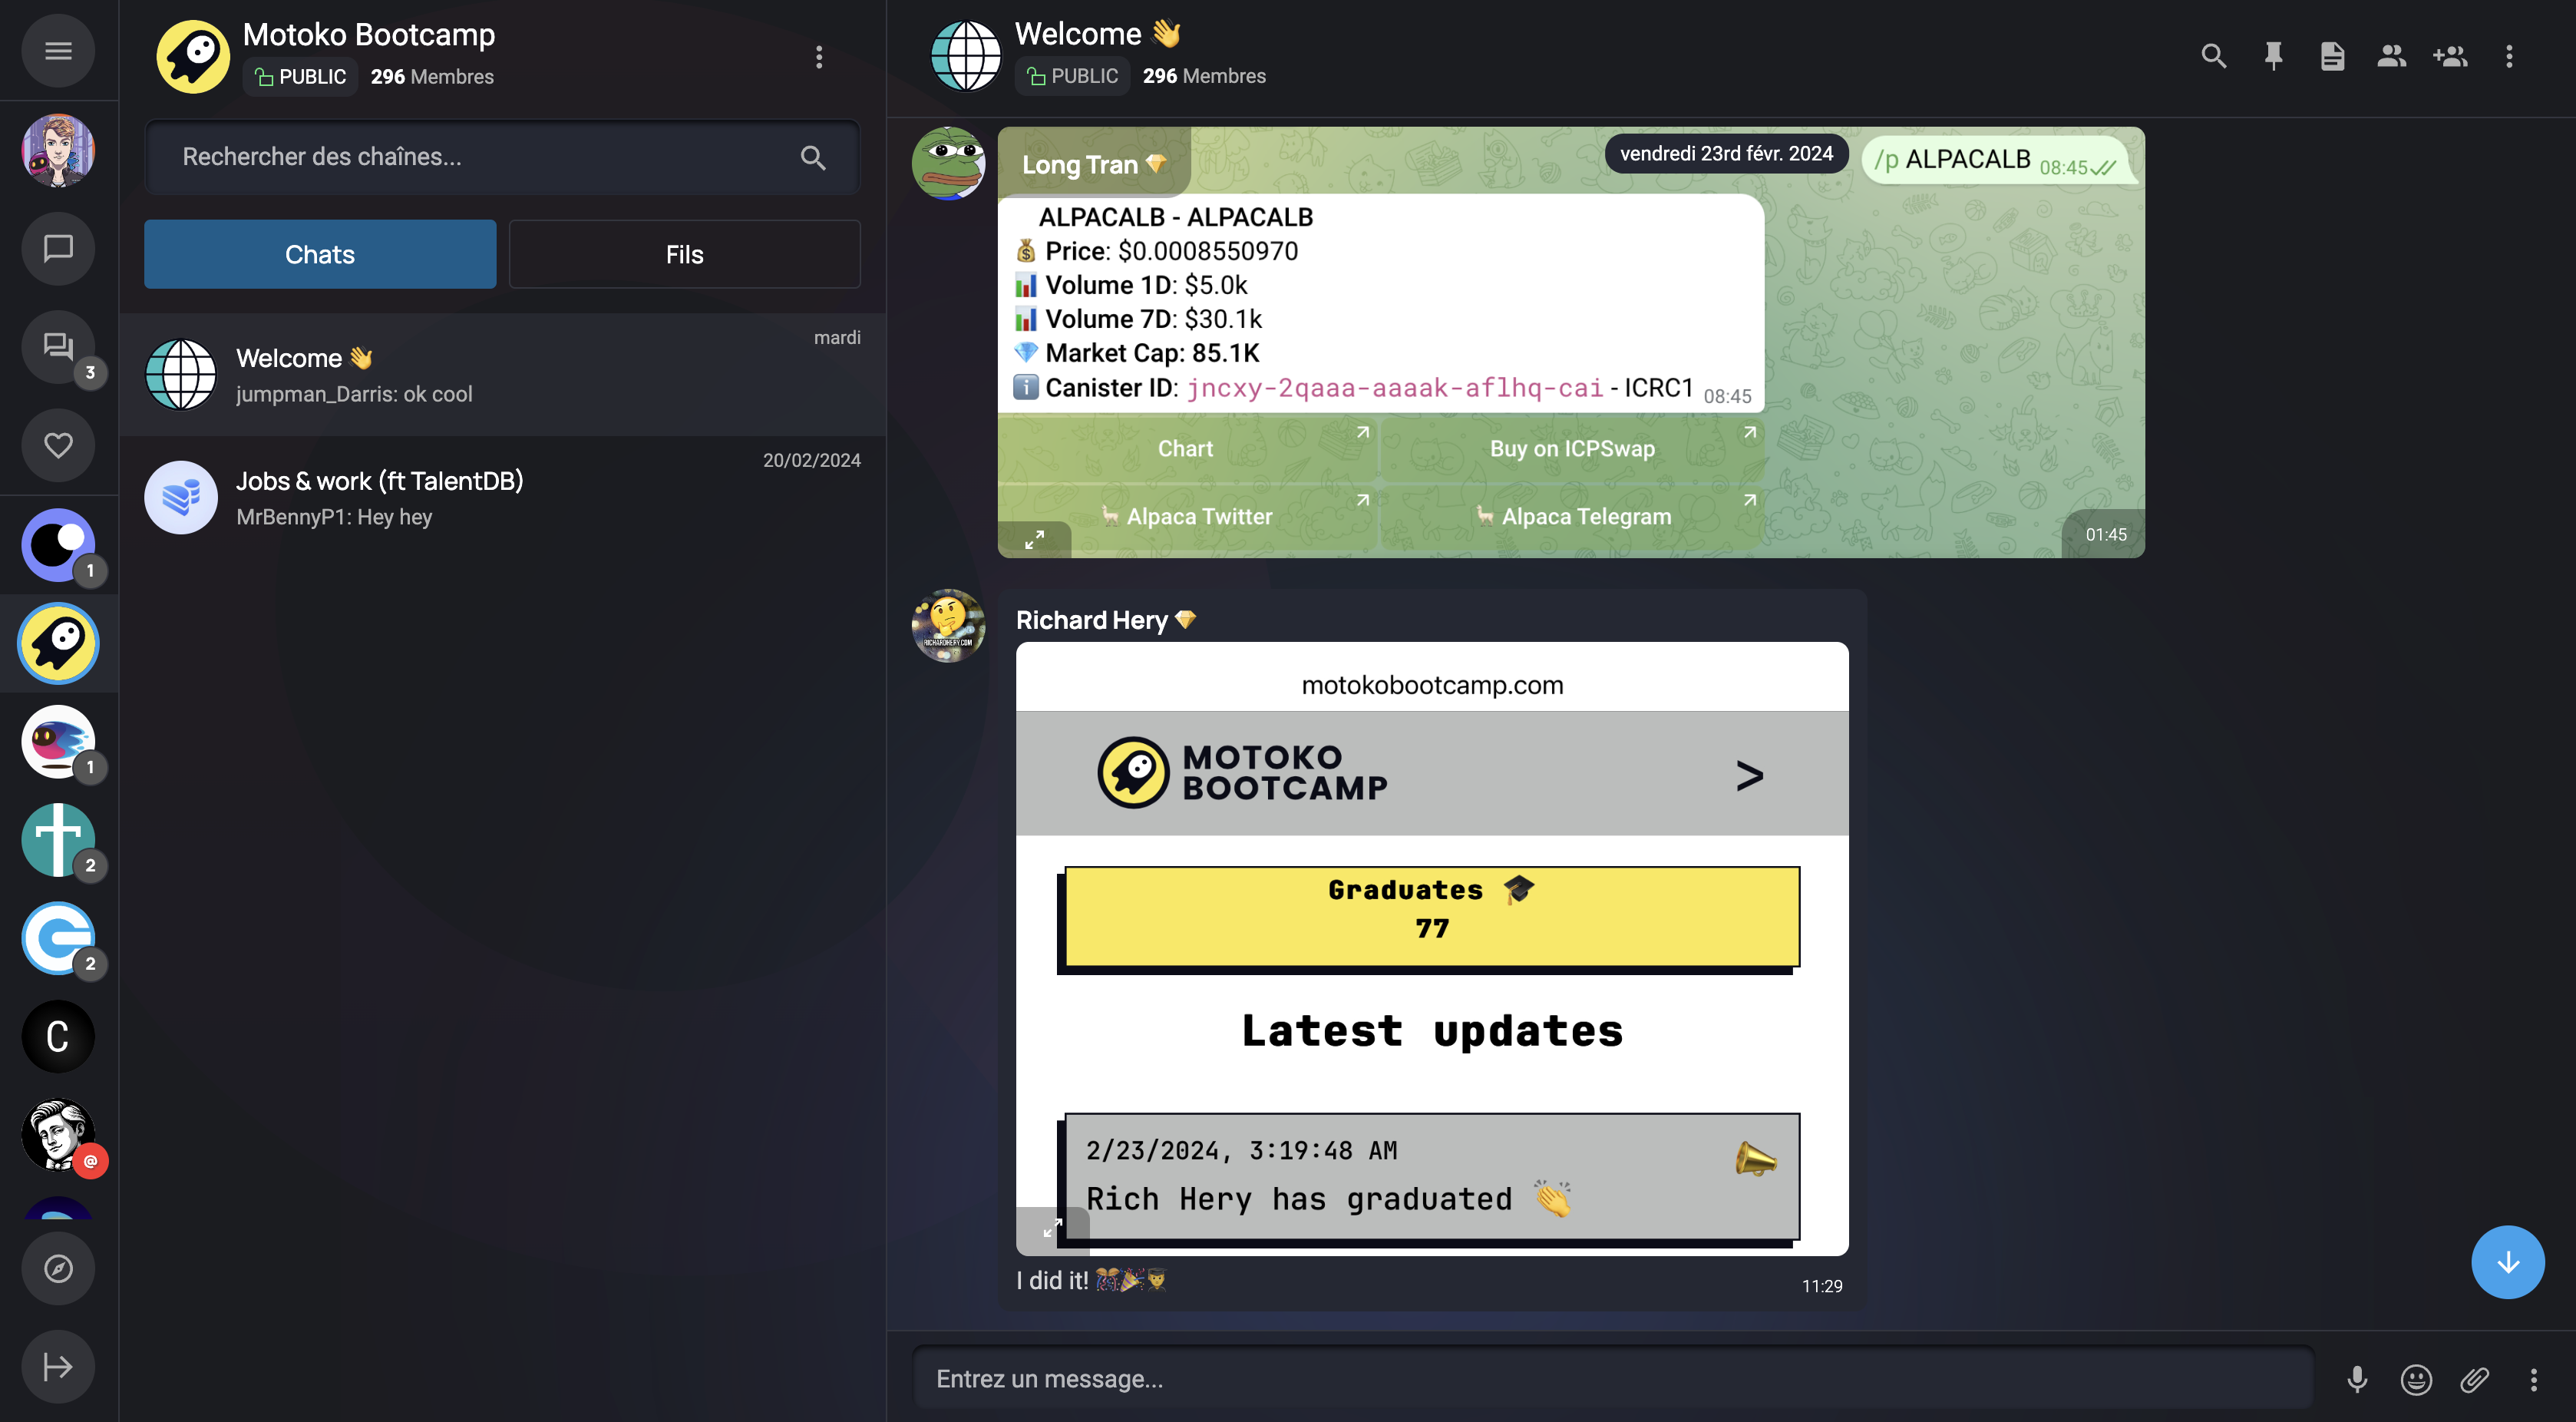
Your first reward unlocks access to the official Motoko Bootcamp OpenChat group! Welcome.
Building the future
Before diving into the next part of this course, let's understand why DAOs, the Internet Computer and Motoko represent a unique opportunity for you to shape the future and participate in building a new society.
The Internet Computer: crypto x computing.
The Internet Computer is a decentralized cloud. Traditional clouds are owned and operated by a single company (Amazon Web Services, Google Cloud, Microsoft Azure...) - the Internet Computer is owned and operated by a DAO - the Network Nervous System (NNS).
-
You can use the Internet Computer to build and run any application (Game, Website, DeFi, NFT...)
-
The Internet Computer is built leveraging blockchain technology which makes it secure, transparent and decentralized.
-
The Internet Computer is managed by the Network Nervous System (NNS), a DAO that is responsible for managing the network, the economics and the governance. The governance is a public and open process that is managed by the community.
Imagine if Bitcoin and Google Cloud had a baby. That baby would be the Internet Computer.
A canister: a decentralized server
Whether you are considering building:
- A Website
- A DeFi application
- A Game
- A NFT collection
- A social network
- Your application will run from a canister. A canister is a unit of compute and storage that is powerd by the Internet Computer.
Developers write their application by writting code for their canisters. The canister is deployed on the Internet Computer and users can interact with canisters through the Internet.
You can think of a canister as a transparent, autonomous and decentralized computer. The computer can perfom diverse tasks for us and we are able to trust that the tasks will be performed - no matter who write the code.
Motoko: a new language for a new environment
To operate and run tasks canisters run a virtual machine: WebAssembly. WebAssembly is extremly fast, efficient and secure. Unfortunately, WebAssembly is a low level language. Developers don't write code in WebAssembly - they use a higher level language that compiles to WebAssembly.
There was no language that was specifically designed for WebAssembly and the Internet Computer. That's why, the DFINITY Foundation created the Motoko language.
In this entire course, your code will be written in Motoko.
As a new language, Motoko represents a unique opportunity for developers to improve their skills and learn a Web3 native language.
Decentralized Application
A dApp is a decentralized application. For an application to be considered decentralized, it generaly needs to fulfill the following conditions:
- Open source.
- Transparent and auditable.
- Governed by a DAO.
- Running entirely from a decentralized network (like the Internet Computer).
Simply because an application runs on a blockchain doesn't mean it is decentralized.
There is no strict line between what is decentralized and what is not. Most applications and DAOs run somewhat decentralized with still some centralized components. The future looks more and more decentralized, but the path to decentralization is not an obvious one.
For instance, OpenChat is a decentralized application:
- The code for this project is open source, allowing anyone to confirm that the version running on the Internet Computer matches what's been shared on GitHub.
- The community has full access to review and audit the entire codebase and infrastructure.
- Governance of the application is handled by the OpenChat DAO, ensuring a decentralized control structure.
- Both the application and its user interface are hosted entirely on the Internet Computer.
The DAO Revolution
On the Internet Computer, canisters can govern other canisters. Notably, canisters can be used to upgrade the code of other canisters - in a fully transparent manner.
This represents an important building block to build DAOs (Decentralized Autonomous Organization). You can manage the day-to-day operations of your DAOs using canisters and assign the control of those canisters to your community.
If you do it well, others will know how the organization is run, how the funds are managed, how decisions are made and how rules are enforced. All of this can be achieved through fully transparent and auditable code.
This is the first time in human history that we can create organizations that are both fully transparent, auditable and extremly efficient. Imagine being able to collaborate on your projects with the entire world.
Today, humanity's most pressing issue is our inability to organize ourselves and work collaboratively without corruption, inefficiency, or immense inequalities. The Internet Computer and DAOs are incredible tools that enable us to solve these issues.
Imagine a school running from a decentralized infrastructure, imagine your local government running transparently and knowing where your taxes are spent, imagine a company owned and operated by an online community. This is the future that you can build today.
The system doesn't want to change? Let's build a new one.
Local setup (Optional)
Tools
We suggest using our online coding environment for one-click access to complete the course. However, if you prefer local development, you'll need:
We also advise installing the Official Motoko extension.
For assistance, watch the support video.
Repository
Simply clone the starter repository - you're ready to get started!
Chapter 1 - What is your dream?

In this Chapter, we are setting the foundation for your DAO. We will define its name, its objectives, and we will also craft a manifesto describing its guiding principles and vision.
Introduction
DAOs represent an entirely new way to fuel your dreams. Consider this: anyone can collaborate with the entire world without the need to travel, learn multiple languages, or sign any contract. Everything can happen through the blockchain.
Whether you are passionate about Web3, AI, music, economy, open source, 3D printing, or even politics - DAOs have something for you. You need to figure out what and how you to leverage this new technology. Let your imagination go wild. We are at the beginning of a new era. Now is the time to dream big and experiement crazy ideas.
Today, we're going to outline a vision, choose a name, and set goals for our DAO. If you have an existing project, think about adding a community aspect to it to form our DAO. If you don't have a project, think about any club you've liked or ever wanted to join. We'll use these to create our DAO.
Resources
To complete this Chapter, we suggest browsing the following resources:
- Lesson 1 - Fundamental concepts
- Lesson 2 - Programming concepts
- Lesson 3 - Primitives types
- Lesson 4 - Candid
- Buffer or the subsection Buffer of Lesson 6 - Data-structures
Tasks
To complete this project - you need to make use of the Buffer library in Motoko. Make sure that you've read the corresponding documentation.
- Define an immutable variable
nameof typeTextthat represents the name of your DAO. - Define a mutable variable
manifestoof typeTextthat represents the manifesto of your DAO.
A manifesto is a public declaration of the intentions, motives, or views of an individual or group. It is often political in nature, but may present an individual's life stance.
- Implement the
getNamequery function, this function takes no parameters and returns the name of your DAO. - Implement the
getManifestoquery function, this function takes no parameters and returns the manifesto of your DAO. - Implement the
setManifestofunction, this function takes a newManifesto of typeTextas a parameter, updates the value of manifesto and returns nothing. - Define a mutable variable goals of type
Buffer<Text>will store the goals of your DAO. - Implement the
addGoalfunction, this function takes a goal of typeTextas a parameter, adds a new goal to the goals buffer and returns nothing. - Implement the
getGoalsquery function, this function takes no parameters and returns all the goals of your DAO in an Array. - Complete Chapter 1 by deploying your canister and submitting your ID on motokobootcamp.com.
To deploy your application
dfx deploy --playground chapter_1(remember to paste this command in a new terminal).
Video
⚠️ Please be aware: the repository displayed in the video may not match the one you're working with, due to recent updates we've made to the repository which have not been reflected in the video. However, the core code should remain similar.
Chapter 2 - Create your tribe

In this chapter we will make it possible for others to join our DAO. For that, we will implement CRUD (Create, Read, Update, Delete) functionalities inside our canister.
Introduction
The key element of any DAO is its community. This community unites over shared interests, objectives, and often a vision for the future. Typically, in a DAO, members are active participants: they engage in decision-making, contribute to the DAO, and can even receive compensation for their contributions.
Today, we won't focus on building the community itself (this could take months). Instead, we'll concentrate on the technical side, setting up a system to enroll members into our application and keep track of some basic information about them.
Resources
To complete this Chapter, we suggest browsing the following resources:
- Lesson 6 - Data structures
- Lesson 7 - Non primitive types
- Lesson 8 - Advanced types
- Lesson 9 - Handling errors
- HashMap module
- Result module
- Iter module
Tasks
To complete this project - you need to make use of the
HashMapandResultlibrary in Motoko. Make sure that you've read the corresponding chapter.
To help you get started, we've defined different types in main.mo:
- A new type
Memberto represent the members of your DAO.
type Member = {
    name: Text;
    age : Nat;
};
- A new type
Resultthat we've imported from the Result library. This type will be used to return potential errors from your functions.
type Result<A,B> = Result.Result<A,B>;
- A type
HashMapthat we've imported from the HashMap library. This type will be used to store the members of your DAO.
type HashMap<K,V> = HashMap.HashMap<K,V>;
-
Define an immutable variable members of type
Hashmap<Principal,Member>that will be used to store the members of your DAO.You might be wondering why we're using an immutable variable in this context, especially when we plan to add members to the data structure. The reason for this choice is that we are using a HashMap, and our intention is not to change the reference to the HashMap itself, but rather to modify the content within the HashMap.
-
Implement the
addMemberfunction, this function takes amemberof typeMemberas a parameter, adds a new member to themembersHashMap. The function should check if the caller is already a member. If that's the case use aResulttype to return an error message. -
Implement the
getMemberquery function, this function takes aprincipalof typePrincipalas a parameter and returns the corresponding member. You will use aResulttype for your return value. -
Implement the
updateMemberfunction, this function takes amemberof typeMemberas a parameter and updates the corresponding member associated with the caller. If the member doesn't exist, return an error message. You will use aResulttype for your return value. -
Implement the
getAllMembersquery function, this function takes no parameters and returns all the members of your DAO as an array of type[Member]. -
Implement the
numberOfMembersquery function, this function takes no parameters and returns the number of members of your DAO as aNat. -
Implement the
removeMemberfunction, this function takes no parameter and removes the member associated with the caller. If there is no member associated with the caller, return an error message. You will use aResulttype for your return value. -
Complete Chapter 2 by deploying your canister and submitting your ID on motokobootcamp.com.
To deploy your application run
dfx deploy --playground chapter_2.
Video
⚠️ Please be aware: the repository displayed in the video may not match the one you're working with, due to recent updates we've made to the repository which have not been reflected in the video. However, the core code should remain similar.
Chapter 3 - Making money

In this chapter we implement a token for our DAO. This is an essential step to make our project economically sustainable. A mistake commonly made when creating a DAO is to believe that having a token is enough to guarantee a solid business strategy and consistent income for the organization - this is not the case.
Introduction
Creating and distributing a token is an essential step in any DAO. A token enables the creation of a market, enabling investors to invest in the DAO, community members to receive rewards for their contributions, and usually facilitates governance by allowing token holders to vote on key decisions and initiatives. Today, your mission, is to implement the code for a token.
On the Internet Computer, we can create a token by creating a canister that stores balances and manage transfer. Assuming the canister is not controlled we can consider the token to be safe, trustless and decentralized. In this project you will implement the code for a simple token. If you are interested in learning more about tokens, you can read the ICRC_1 standard.
Resources
To complete this Chapter, we suggest browsing the following resources:
Tasks
- Define the
ledgervariable. This variable will be used to store the balance of each user. The keys are of typePrincipaland the values of typeNat. You can use theHashMaporTrieMaptypes to implement this variable. - Implement the
tokenNamefunction, this function takes no parameters and returns the name of your token as aText.
Choose any name you want for your token.
- Implement the
tokenSymbolfunction, this function takes no parameters and returns the symbol of your token as aText.
Choose a symbol that is exactly 3 characters in length.
- Implement the
mintfunction. This function takes aPrincipaland aNatas arguments. It adds theNatto the balance of the givenPrincipal. You will use theResulttype for your return value. - Implement the
burnfunction. This function takes aPrincipaland aNatas arguments. It subtracts theNatfrom the balance of the givenPrincipal. You will use theResulttype for your return value. - Implement the
transferfunction. This function takes aPrincipalrepresenting the sender (from), aPrincipalrepresenting the recipient (to), and aNatvalue for the amount to be transferred. It transfers the specified amount of tokens from the sender's account to the recipient's account. You will use theResulttype for your return value. - Implement the
balanceOfquery function. This function takes aPrincipalas an argument and returns the balance of the given account as aNat. It should return 0 if the account does not exist in theledgervariable. - Implement the
totalSupplyquery function. This function takes no parameters and returns the total supply of your token as aNat. The total supply is calculated by adding together the balances of every user stored in theledgervariable. - Complete Chapter 3 by deploying your canister and submitting your ID on motokobootcamp.com.
To deploy your application run
dfx deploy --playground chapter_3.
Video
⚠️ Please be aware: the repository displayed in the video may not match the one you're working with, due to recent updates we've made to the repository which have not been reflected in the video. However, the core code should remain similar.
Chapter 4 - Listen to your community

In this chapter we implement a voting system. A voting system enables the community to take important decisions together on the future of the DAO. Governance is a complex area and many different type of governance model could be implemented depending on the need of the organization.
Introduction
Decentralized organizations are often critized for they lack of efficiency. A common misconception is that all DAO decisions require a vote from every member. This is both inefficient, frustrating, and unnecessary. The secret of DAOs lies in the subtle balance between efficiency, pragmastim and transparency.
Organizations with different purposes will likely require different types of governance.
Technology is on our side. We can create and refine any governance system based on outcomes, allowing us to conduct experiments and learn from them.
Today, for simplicity, we'll set up a basic, non-realistic voting system that meets these requirements
- Only allow members of the DAO to vote and create proposals.
- The voting power of each member should be equal to the number of tokens they hold.
- Creating a proposal should require to burn 1 token.
- A member can only vote once per proposal.
- Everytime a member votes, the score of the proposal is updated. Depending on whether or not the member voted for or against the proposal, the score should be increased or decreased by the member's voting power. For instance, if a member with 10 tokens votes for a proposal, the score should be increased by 10. If the same member votes against the proposal, the score should be decreased by 10.
- A proposal is automatically approved if the score reaches 100 or more. A proposal is automatically rejected if the score reaches -100 or less. Otherwise the proposal is still open to voting.
- Any approved proposal should be automatically executed by the DAO.
Resources
To complete this Chapter, we suggest browsing the following resources:
Tasks
To get started, we've provided various types in types.mo. Ensure you don't alter these types, as changes will cause the test to fail.
- Create a datastructure to store the proposals.
- Implement the
createProposalfunction. If the proposal is successfully created, the function should return the id of the proposal. - Implement the
getProposalfunction. - Implement the
voteProposalfunction. - Implement the
getAllProposalsfunction.
Video
⚠️ Please be aware: the repository displayed in the video may not match the one you're working with, due to recent updates we've made to the repository which have not been reflected in the video. However, the core code should remain similar.
Chapter 5 - Build your brand

In this chapter we will build a website and an identity for our DAO. This important step enables us to increase our visibility in the ecosystem and bring people that share the same vision together.
Introduction
Up until now, we've been working behind the scenes, mainly because Motoko is a language designed for backend development. Today, we're going to create a website for our DAO. We'll take advantage of canisters' ability to store assets and directly handle incoming HTTP requests to serve websites. When it comes to building a website on the Internet Computer, we have two main options:
Use the asset canister and make use of familiar frontend technologies like HTML, JavaScript, CSS, and any frameworks you like. Build the website from the Motoko side by implementing the http_request query method. Actually, these two approaches end up being similar. This is because the asset canister essentially uses the http_request method behind the scenes to serve web content but abstract away this complexity for the developer.
Resources
To complete this Chapter, we suggest browsing the following resources:
Tasks
- Select a logo for your DAO. You will need to find a logo that is available as an SVG file. You can use a website like FlatIcon.
SVG stands for Scalable Vector Graphics. We will use SVGs because they are basically text files that carry vector information about visuals. This means we don't have to worry about uploading any asset to our canister, we can simply copy the SVG file and paste it directly in our code.
- Set the value of the immutable variable called
logoof typeTextto the value of the logo.
You can copy the content of the SVG file and paste it directly into your code. Ensure that you use single quotes (`) for any quotes within the SVG file and double quotes (") for enclosing the entire text, as Motoko employs double quotes to delineate strings.
- Implement the
getStatsfunction. This function will be used to display some statistics about your DAO.
In Motoko, to serve a webpage, you simply need to implement a http_request query function. This function will be called by the Internet Computer when a user tries to access your webpage.
For instance this is how you would implement a simple http_request function that returns a simple Hello World webpage:
public query func http_request(request : HttpRequest) : async HttpResponse {
    let response = {
        body = Text.encodeUtf8("Hello world");
        headers = [("Content-Type", "text/html; charset=UTF-8")];
        status_code = 200 : Nat16;
        streaming_strategy = null
    };
    return(response)
}
- Implement the
http_requestquery function. This function will be used to serve the webpage of your DAO. You can use the_getWebpagefunction to generate the HTML of the webpage.
Video
⚠️ Please be aware: the repository displayed in the video may not match the one you're working with, due to recent updates we've made to the repository which have not been reflected in the video. However, the core code should remain similar.
Graduation

In this final chapter, we will build our graduation project. The end goal is to build a webpage where the text displayed is entirely controlled by a DAO. This project showcases the possibility of building community-owned web applications. Think of the webpage as just a starting point to show what else could be run by a DAO – like an entire game, a social network, an app, or even an AI model.
Introduction
Until now, we've only worked with applications that use a single canister. Today, we'll learn how to build an application that uses more than one canister. In this final project, you'll be working with three different canisters:
- The DAO canister, which contains the profile of your members, the logic for registration, and the voting system.
- The token canister, which contains the logic for the Motoko Bootcamp Token, stores balances and manages transfers.
- The webpage canister, which contains and serves your live webpage.
We could have combined all the functions of these three canisters into one to make the project simpler. However, we chose to use three separate canisters for a couple of reasons. First, by having everyone use the same token canister, all the DAOs (the decision-making tools) are linked financially. Second, we want to demonstrate how you can control one canister from another (using the DAO canister to manage the others). This is an important concept for creating self-managing applications and exploring new possibilities for your projects.
Requirements
- Membership and Token Allocation
- New members receive 10 Motoko Bootcamp Tokens (MBT) upon joining.
- MBTs are used for participating in DAO activities.
- Role System
- The DAO comprises three roles: Students, Graduates, and Mentors.
- Students: All members start as students. They are members who haven't completed the Motoko Bootcamp.
- Graduates: These are members who have completed the Motoko Bootcamp. They gain the right to vote on proposals. Any member can become a Graduate through a graduate function, which only a Mentor executes. There's no need to implement a verification process for this.
- Mentors: Graduates who are selected by the DAO become Mentors. They can both vote on and create proposals. An existing Mentor can assign the Mentor role to any Graduate member by creating a proposal. This proposal has to be approved by the DAO.
- Proposal Creation
- Only Mentors are authorized to create proposals.
- To create a proposal, a Mentor must burn 1 MBT, which decreases their token balance.
- Voting System
-
Only Graduates and Mentors are allowed to vote.
-
The voting power of a member is determined as follows:
-
If the member is a Student - the voting power is set to 0 (Student don't have voting power).
-
If the member is a Graduate - his voting power is directly equal to the number of MBC token they hold at the moment of voting.
-
If the member is a Mentor - his voting power is equal to 5x the number of MBC tokens they hold at the moment of voting.
-
The
yesOrNofield of the Vote object is aBoolrepresenting whether a vote is meant to approve or refuse a proposal.truerepresents a vote in favor of a proposal andfalserepresents a vote against a proposal. -
When a member votes on a proposal, his voting power is added or subtracted to the
voteScorevariable of theProposalobject. -
A proposal is automatically accepted if the
voteScorereaches 100 or more. A proposal is automatically rejected if thevoteScorereaches -100 or less. A vote stays open as long as it's not approved or rejected. -
Approved proposals are automatically executed.
For example, if a mentor possessing 15 Motoko Bootcamp Tokens (MBT) casts a vote in favor of a proposal (true), their vote contributes 75 to the voteScore due to the 5x multiplier for mentors' votes. If the voteScore before this vote was 30, it would increase to 105 after the vote is counted. Consequently, the proposal reaches the acceptance threshold and is successfully implemented.
- Proposal Types There are 2 types of proposals:
ChangeManifesto: those proposals contain aTextthat if approved will be the new manifesto of the DAO. If the proposal is approved the changes should be reflected on the DAO canister and the Webpage canister.AddMentor: those proposals contain a Principal that if approved will become a mentor of the DAO. Whenever such a proposal is created, we need to verify that the specified principal is a Graduate of the DAO, as only Graduate can become Mentors. If the proposal is approved the changes should be reflected on the DAO canister.
- Initial Setup The initial setup of the DAO should include an initial mentor to ensure that your DAO is operational:
- Mentor:
- Name:
motoko_bootcamp - Associated Principal:
nkqop-siaaa-aaaaj-qa3qq-cai
- Name:
You can decide to hardcode the initial setup or create an external one that will be executed upon canister deployment.
- Token Faucet You are required to use the Motoko Bootcamp Token, a free, educational token faucet. It allows unlimited minting but holds no real economic value; it's solely for educational use.
Find the token faucet source code in the token folder. Deploy it locally for building and testing. For your live project on the Internet Computer, you are required to use the existing token faucet on the Internet Computer with the canister ID jaamb-mqaaa-aaaaj-qa3ka-cai.
Access the interface of the deployed token faucet canister here.
You'll need to use the Faucet canister to:
- Mint tokens when a new member joins your DAO.
- Burn tokens when a new proposal is created.
Resources
To complete this Chapter, we suggest browsing the following resources:
Submission
As with previous chapters, you'll need to submit your project on the Submission website. For that project, you need to submit the canister ID of the DAO canister.
Upon submitting your project, to determine if you have graduated or not, a few tests will be automatically performed on your DAO canister. Those tests will take between 20 and 30 seconds.
- Do not interact with the DAO canister during the testing phase.
- Strictly respect the interface and types that are defined and provided in this repository. Any modification will result in a failed test.
- If your test fails without prompting an error message or loads for more than 1 minute, open your browser inspector, click on the developer console, take a screenshot, and report the issue in our feedback channel.
Video
⚠️ Please be aware: the repository displayed in the video may not match the one you're working with, due to recent updates we've made to the repository which have not been reflected in the video. However, the core code should remain similar.
What's next?
Introduction
Congratulations for making it this far. You've finished the foundational course and you can be proud of yourself, but keep in mind that this was only the beginning. The rest of the story belongs to you.
Keep building 👷♂️
There's only one way forward and that's the correct one - we have a lot of resources to help you on your journey.
Option 1: Keep building your project 🏗️
Since you already have the foundation. Why not keep building on top of it? Here are some suggestions:
- Add a frontend to your project.
- Improve the voting system to allow for more complex voting scenarios and long-term incentives.
- Create a treasury for the DAO and allow members to vote on how to spend the funds.
- Read more about the SNS framework and see how you can leverage it to raise funds and expand your DAO.
Option 2: Start a new project 🚀
DAOs are not the only thing you can build with Motoko. You can build anything you want. Here are some suggestions:
- Start your own NFT collection.
- Build a decentralized social network.
- Build a decentralized exchange or a decentralized marketplace.
- Build a game.
Your imagination is the only limit to what you can build on #ICP.
Get involved in the ecosystem 🌱
Join us for the next ICP Community Conference 🥳

The ICP Community Conference is the 1st organized conference that celebrates, inspires, & connects the #ICP ecosystem. The first one took place in May 2023 and gathered 100+ community members. This was an absolute blast and we're planning the next one for 2024!
- Check out the recap video of the first conference.
- Follow ICP Community Conference on Twitter to stay updated - @icp_cc.
- Join the Email List to get notified about the next conference and access early bird tickets.
Find a job with TalentDB 💼

Are you looking for a job in Web3? Make sure to check out TalentDB - a recruiting agency for the Internet Computer.
- Follow TalentDB on Twitter to stay updated with new opportunities - @TalentDB_ICP.
- Fill out this form to join the Talent Pool. This will allow you to be matched with the right opportunities.
- Connect with Ben in our Talent Room on Discord.
Apply for a grant with the DFINITY Foundation 💰
DFINITY operates a developer grant program to support those building on the Internet Computer platform. If you have an idea and want to develop on the IC, you can request funding, which can range from $5,000 to $100,000. The grant program focuses on the following areas:
- Canister Development Kits (CDKs) & Agents.
- Developer Tooling (such as IDEs, debuggers, and logging libraries).
- Infrastructure (including oracles and asset bridges).
- Integrations & APIs (e.g., chat, email, maps).
- Apps & Open Internet Services.
Additionally, DFINITY has announced a specific $5 million program to support the intersection of AI and blockchain technology, as detailed here.
DFINITY also offers a grant program for educational and community initiatives. If you have an idea for a hackathon, workshop, or other community event, you can apply for a grant to secure funding.
Please make sure to mention that you were referred by the Motoko Bootcamp when applying for a grant - that helps our reputation!
Get involved and help us write the next chapter of Motoko Bootcamp 🏕️


You can help us grow the Bootcamp by:
- Invite your friends or colleagues to the next Bootcamp.
- Give us your feedback on the Bootcamp, ideas on how we can improve it, and what you would like to see next in the feedback channel.
- Share your experience on social media and tag us on Twitter - @motoko_bootcamp.
- Help us organize events, what about hosting the next Bootcamp in your hometown?
Become an Entrepreneur In Residence at Code & State ⭐️

Finally, if you're passionate about the #ICP, want to work with a team, and have a big vision, you can apply to become an Entrepreneur In Residence at Code & State.
The Entrepreneur In Residence Program includes:
- Funding for 1-2 years for you and your team.
- Legal entity support.
- Strategic support and guidance.
- Talent and recruiting support.
- Marketing and PR support.
- Design and UI/UX support.
- Code auditing and technical support.
- Access to the Code & State network.
You can apply here.
Lesson 1: Fundamental concepts.
What is a canister?
There is one word you absolutely need to master from this entire week. Are you ready for it? It's... 🥁... CANISTER!
The Internet Computer is a platform that hosts a large number of applications, all of those applications run smoothly within special containers called canisters.
- The Internet Computer is responsible for smoothly and safely running all the canisters deployed on the platform in parallel.
- Developers build applications by writing the source code for those canisters. An application can be built into one or several canisters depending on the architecture.
- Users will interact with applications by sending messages to canisters. This happens whenever you use an application on the Internet Computer and interact with it - a few examples of such interactions are:
- When you post on a social network.
- When you send a token to another address.
- When you buy or sell an NFT.
- When you read content on a website hosted on the Internet Computer.
- And way more...
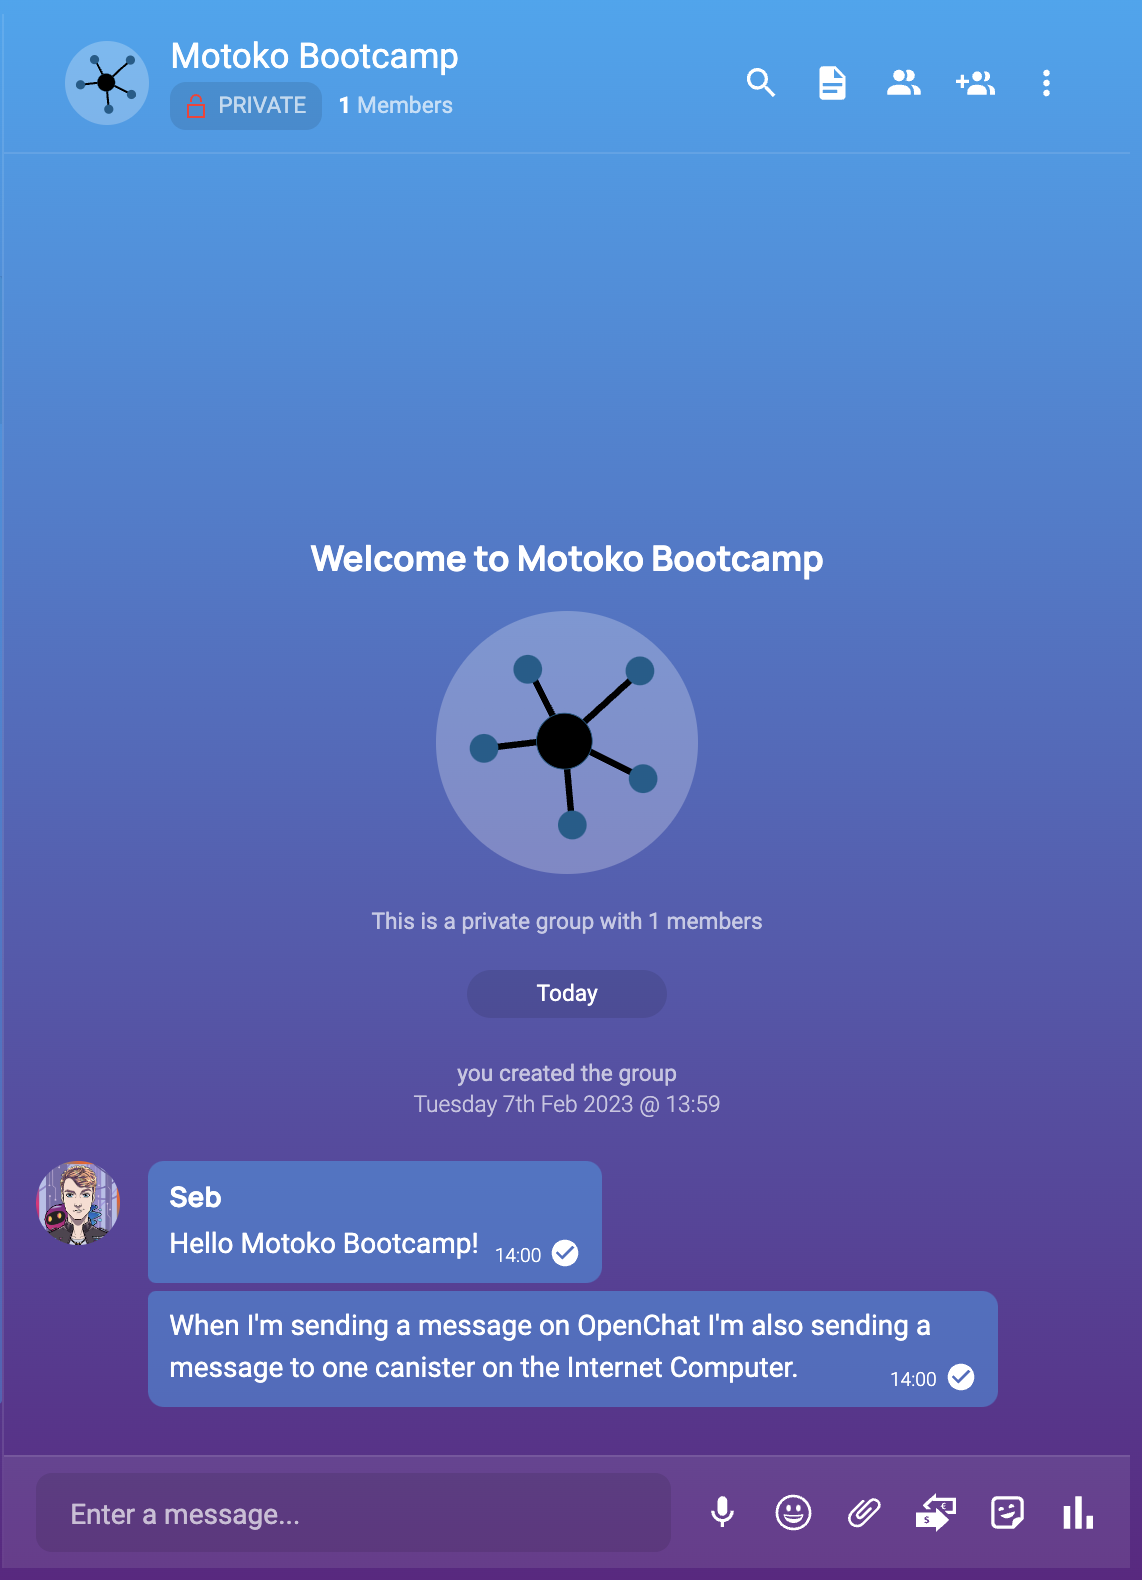
OpenChat is a decentralized messaging application built on the Internet Computer.
WebAssembly
Before we move on to Motoko - we actually need to explain another term: WebAssembly.
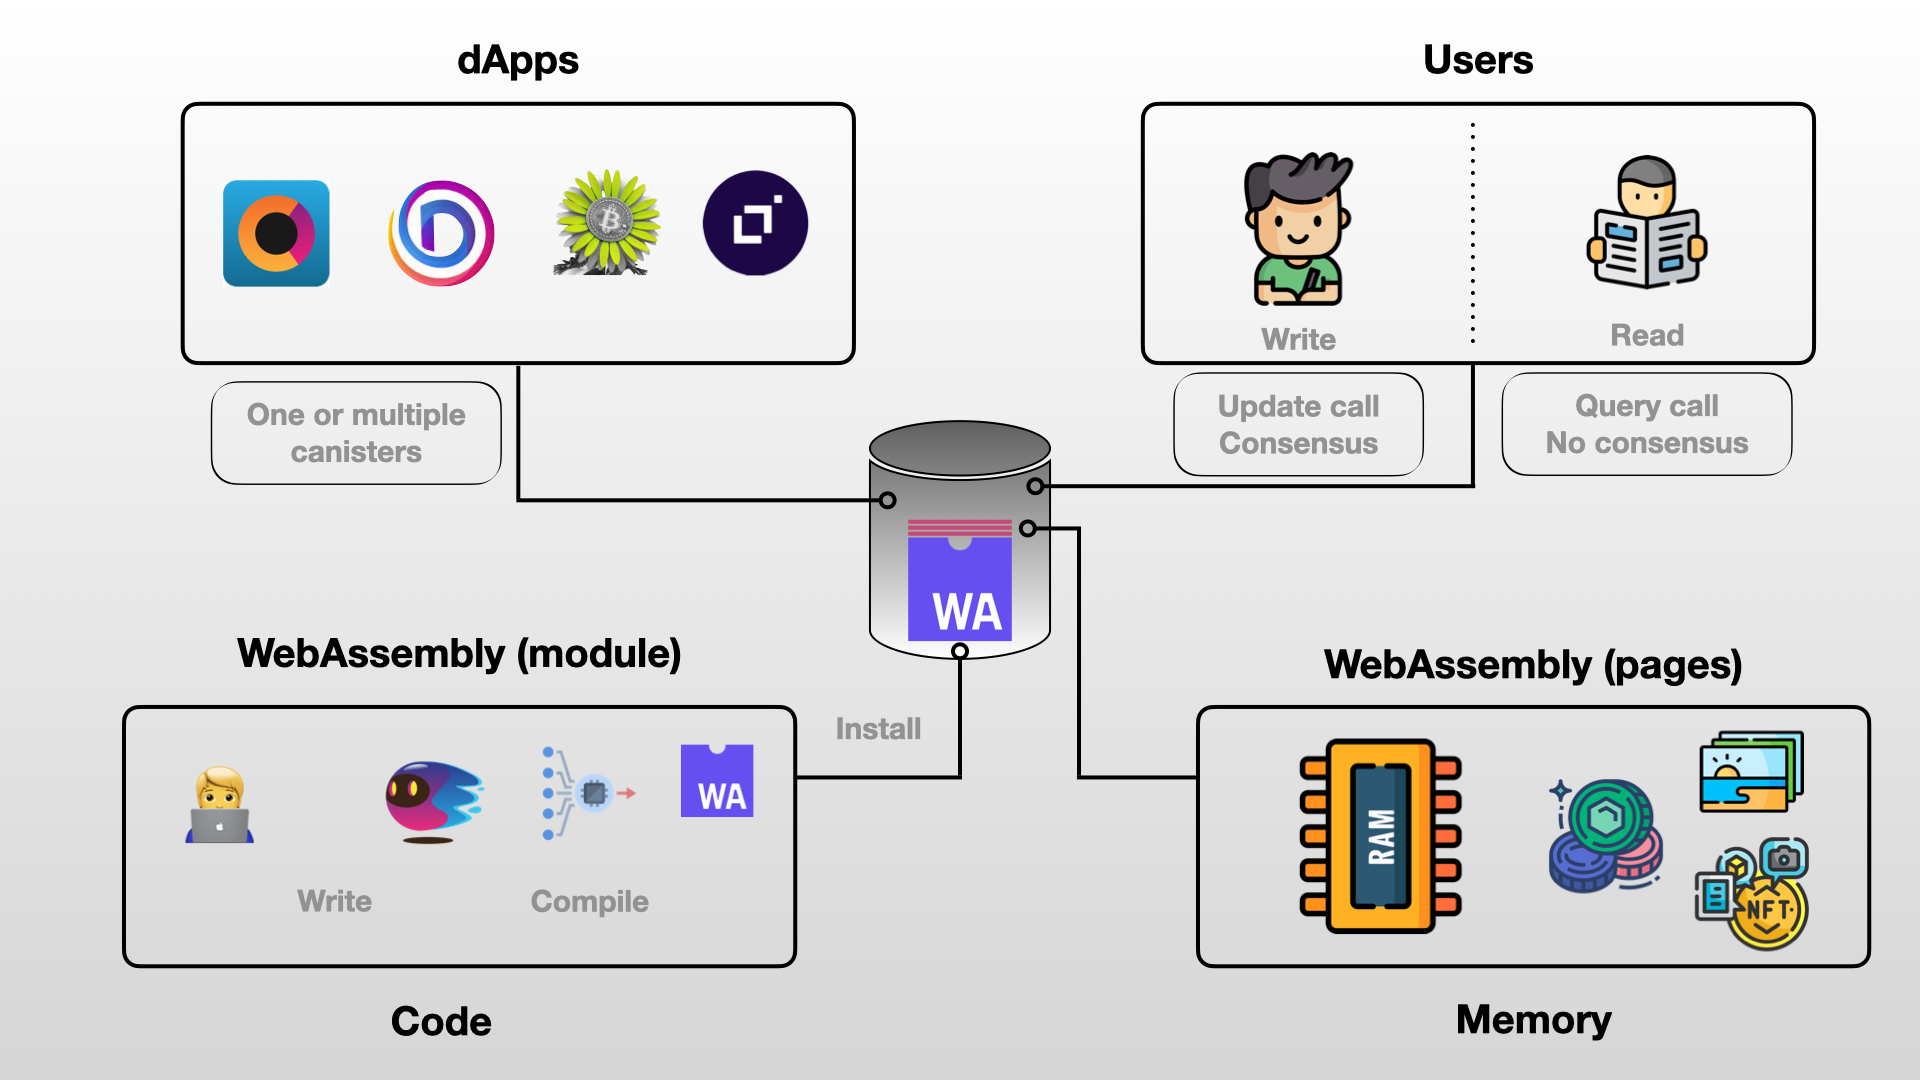
Overview of a canister.
If we zoom inside, a canister is composed of:
- A WebAssembly module which is a piece of compiled code from languages such as Rust or Motoko. This is the code that is installed in the canister and is ultimately running.
- A WebAssembly memory - also called memory pages. This is where the state of the canister is stored and files are stored (photos, videos, tokens...). Code ran by the WebAssembly module will modify the memory.
What is WebAssembly ?
WebAssembly is a low-level binary format for executing code in multiple environments (browsers, cloud platform, smart devices, virtual machine..). The main benefits of using WebAssembly are,
- WebAssembly supports code written in multiple languages (C, C++, Rust, Motoko) making it a versatile solution for developers.
- WebAssembly code is portable and can run on almost any device. You write it once and you can run it everywhere!
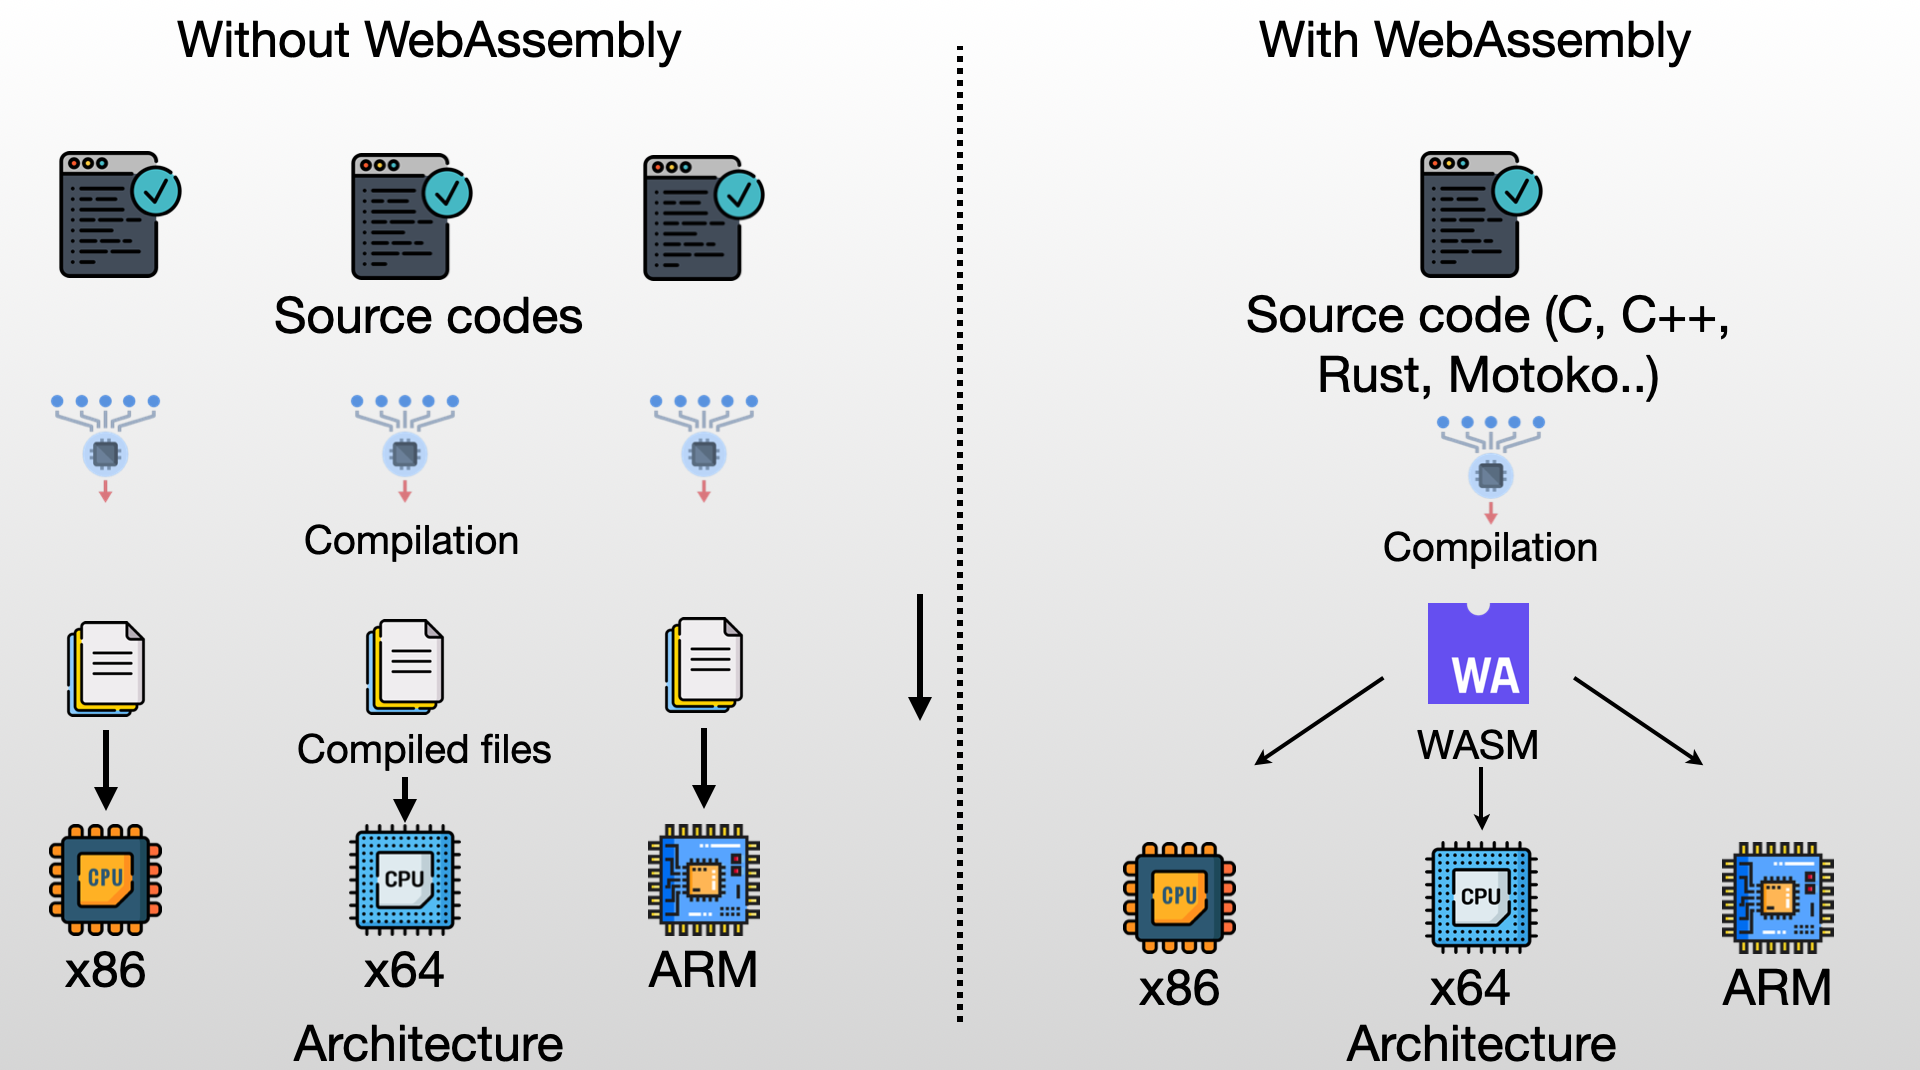
Write once and deploy on any platform.
- WebAssembly is fast. It's a language that is very close to machine language and has been optimised for speed and performance. You can use it for creating complex and intensive applications (Games, simulations, graphic)!
- WebAssembly provides a secure execution environment, by putting the code in a special area called a sandbox. The sandbox makes sure that the program is only able to do things and access resources that have been granted access to and doesn't allow it to access sensitive information. This helps a lot when trying to write secure code or for users to make sure they won't get harmed by the code running on their machine!
The only problem with WebAssembly is that it's a low-level language and it provides very little abstraction, making it difficult to use for writing complex applications like dApps (decentralized applications).
The Motoko language

That's why the DFINITY Foundation has introduced a new language called Motoko, which is a programming language specifically designed for creating decentralized applications (dApps) on the Internet Computer. Since Motoko code can directly be compiled into WebAssembly, it is an incredible language to build on the Internet Computer. Motoko is a high-level language, that is easy to use. You write in Motoko and then it compiles for you in WebAssembly.
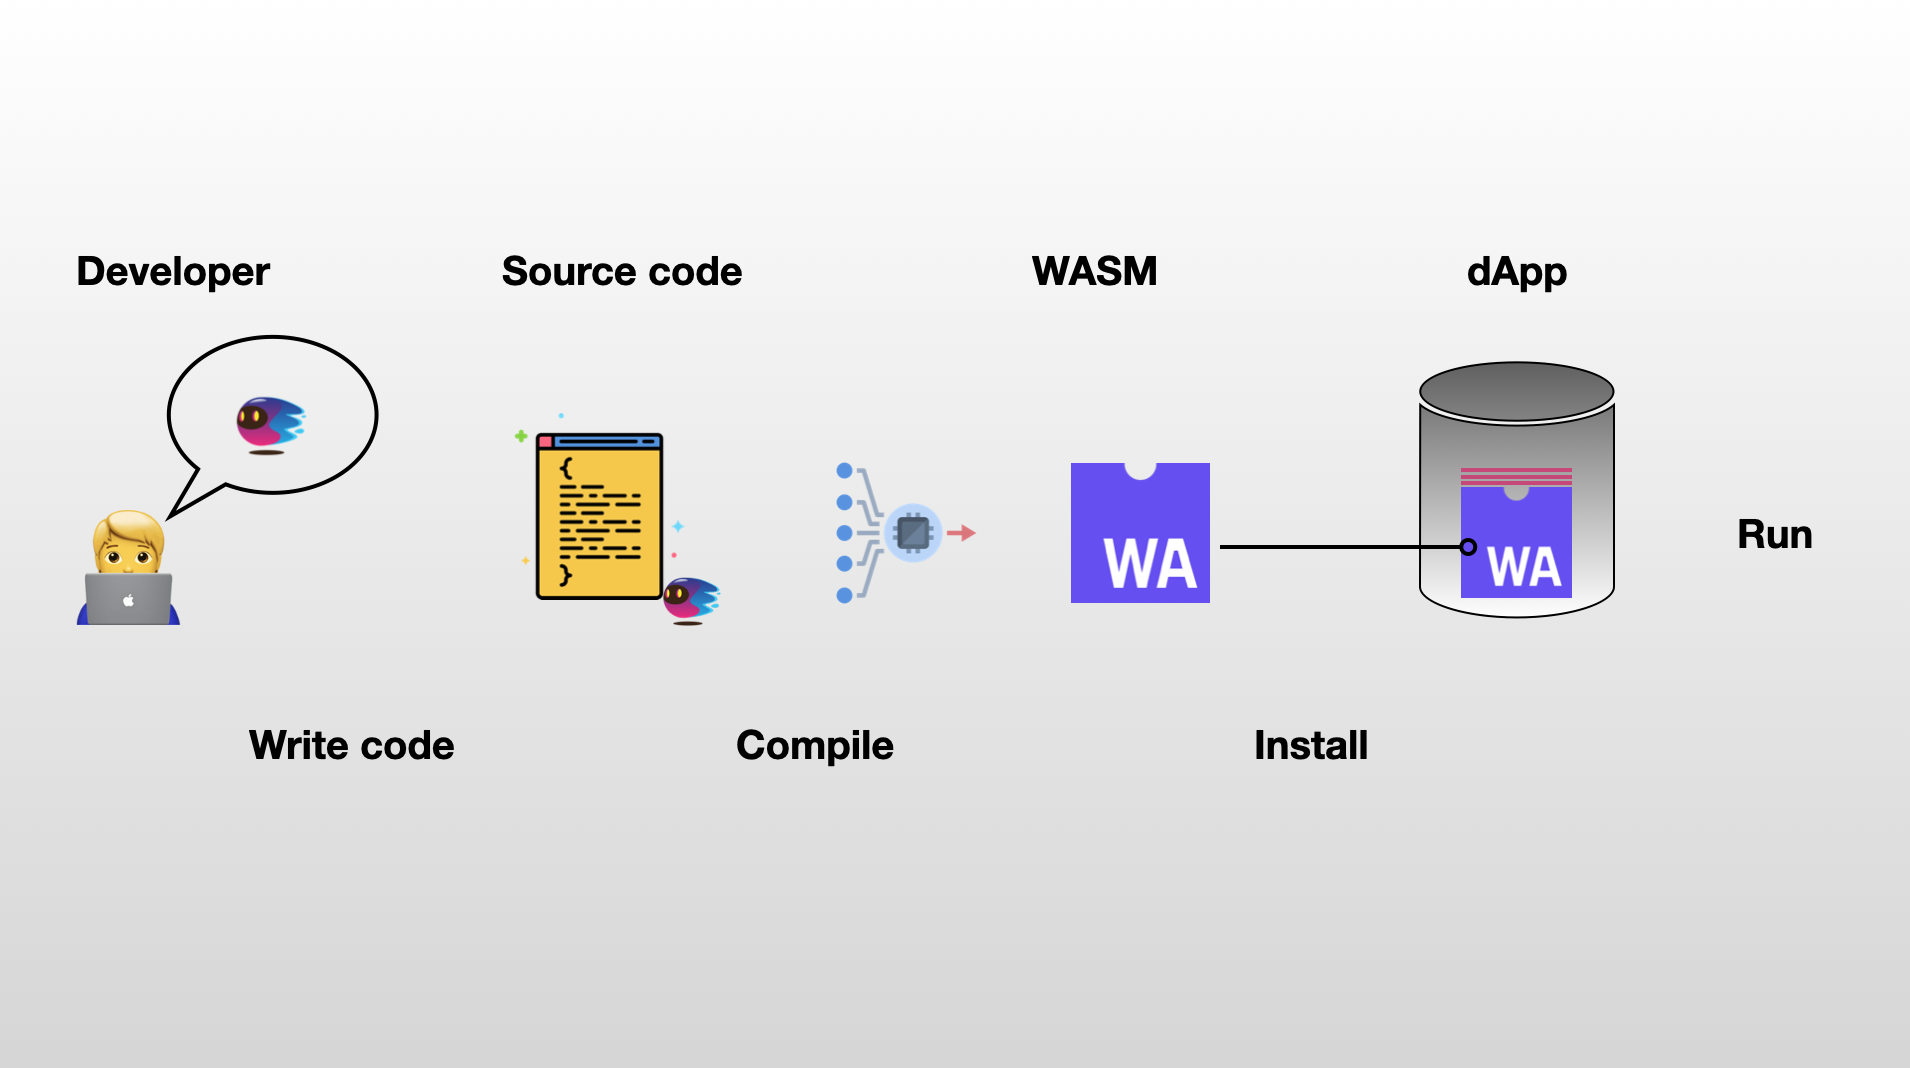
In Motoko the code is spun into WebAssembly.
It's worth noting that WebAssembly, was co-designed by Andreas Rossberg, who joined the DFINITY Foundation early in 2017 to work on its canister smart contract execution environment and is also the original designer of the Motoko language. The standard is maintained by the World Wide Web Consortium.
In the following example, here is a factorial function, illustrated in Motoko and WebAssembly.
Don't stress out if you don't understand anything - that's normal:
| Motoko | WebAssembly (Binary) |
func factorial(n : Nat) : Nat {
    if(n == 0) {
        return 1
    } else {
        return n * factorial(n - 1);
    }
};
|
20 00 42 00 51 04 7e 42 01 05 20 00 20 00 42 01 7d 10 00 7e 0b |
|---|
What do you think? Does writing this function seem easier with Motoko ?
A Motoko file is a file with the extension .mo.

Motoko is a high-level language such as JavaScript or Python. It is generally considered easier to learn than a lower level language like Rust or C.
Motoko has a cool mascot that has been intensively used and modified in the community, for all sort of purposes! So not only will you be able to build cutting-edge decentralized applications with Motoko, but you'll also have the coolest logo in the game. Don't believe us? Just check out the Motoko NFT market and see for yourself.
The actor model.
If you open a Motoko file, there is a high probability that the first word that you will read is actor:
actor {

    /// CODE

};
An actor is how a canister is represented and abstracted in Motoko. This term comes from the Actor model which is a way to write computer programs that can handle many tasks at the same time. It does this by treating actors as the basic building blocks of a program.
An actor is a small computer program that can receive messages, do some work and then send messages to other actors. Actors can also create new actors and control them. All the actors talk to each other by sending messages. Since all interaction between actors is done via message passing, this allows for very high levels of concurrency and parallelism, making it well-suited for distributed systems. In that regards, the Internet Computer is a distributed computer where each program is a canister !
Since canisters have been implemented to follow the actor model - you won't be surprised to learn that canisters:
- Have a private state (memory) & can run computations.
- Receive messages from users or other canisters.
- Can send messages to users or other canisters.
- Can create other canisters.
A canister receives a message, executes it, and possibilty send other messages to other canisters (or even create new ones) in response.
Let's now consider the following actor:
actor {
    var message : Text = "Hello Motoko Bootcamp!";

    public func changeMessage(t : Text) : async () {
        message := t;
    };

    public query func readMessage() : async Text {
        return message;
    };
};
We can see that this actor has:
- One variable called
message, that is initialized to a valueHello Motoko Bootcamp. - Two public functions:
changeMessagewhich updates the value ofmessageto whatever is provided as argument.readMessagewhich shows the value ofmessagewithout modifying it.
The public keyword indicates that both functions can be called from the outside by users or other canisters. The public functions of an actor represents the API of the canister.
Update vs Query
Have you noticed the query keyword in the previous example?
When an user calls a canister, it is important to distinguish two types of calls:
Update calls
Update calls are used when the user wants to modify the state of a canister. To ensure the integrity of the Internet Computer, these calls must be processed through consensus and by all nodes, which results in a delay of around 1-2 seconds. An update call would be used in the following situations:
- Posting on social media, such as DSCVR.
- Sending a message on a messaging application, such as OpenChat.
- Liking or sharing a content on Distrikt.
- Buying a NFT on Entrepot.

Query calls
This type of call is used when a user wants to read data without modifying the state. These calls can be answered by a single node, making them very fast (at around 200ms). The downside is that query calls are less secure as a malicious node could potentially provide false information. A query call would be used in the following situations:
- Reading an article on Nuance.
- Checking your user profile picture on
- Loading a video or a picture on any platform.
Since a query call bypasses consensus and relies on a single node, it's less secure than an update call.
| Update call | Query call | |
|---|---|---|
| Response Time | 2-5 seconds 🐢 | 200-400 ms ⚡️ |
| Consensus | Yes | No |
| Read | Yes | Yes |
| Write | Yes | No |
| Cost | Cost cycles | Free (for now) |
Let's go back to our previous actor
actor {
    var message : Text = "Hello Motoko Bootcamp!";

    public func changeMessage(t : Text) : async () {
        message := t;
    };

    public query func readMessage() : async Text {
        return message;
    };
};
The query keyword tells us that readMessage function is only for reading information. On the other hand, changeMessage can update the state (we don't need to add the update keyword as it is assumed by default).
We have deployed the previous actor on the Internet Computer - and you can access his API. Try the interface and test the speed difference between
changeMessage&readMessage. Have fun and leave a kind message for the next student.
Fuel on the Internet Computer: cycles.
To pay for computation & storage costs canisters have to be loaded with cycles. Each canister has it’s own cycle balance - this can be thought of as the battery life of a canister. Cycles can be obtained by burning ICPs.

When processing a new message, cycles are deducted from the canister's balance and burned.
Unlike gas on Ethereum, cycles on the Internet Computer are not paid by the user. This means you can interact with canisters and browse websites without paying anything. This is known as the reverse-gas model and is a major improvement for the user's experience as it eliminates the need for creating wallets, holding tokens, and paying high fees.
Cycles are measured in trillions (T), which is equivalent to 1,000,000,000,000 or 10^12. One trillion cycles always cost 1 XDR, which is a currency based on market exchange rates that represents a basket of major currencies. As of now, 1 XDR is equal to $1.34. The price of cycles is not affected by the price of ICP tokens. Instead, the conversion rate of ICP tokens to cycles is constantly adjusted by monitoring the price of ICP.
Each operation perfomed on the network has a cost attached to it:
- Creating a canister.
- Executing an update message.
- Executing an inter-canister call.
- Storing data.
- Performing an HTTPS outcall.
- Computing a threshold ECDSA signature.
The cost of those operations also depends on the subnet in which they are performed and the replication factor of this subnet. The replication factor corresponds to the number of nodes in a subnet, which can range from 13 to 40.
Lesson 2: Common programming concepts.
📦 Variables
A variable is a value that has an arbitrary name, defined by a declaration.
In Motoko, variables can be declared using either the let or var keyword, followed by the assignment operator =
- Variables declared with
letare immutable, meaning that their value cannot be changed once they are assigned.
let n = 1;
- Variables declared with
varare mutable, their value can be reassigned to a new value at any time using the reassignment operator:=.
var n = 1;
n := 2;
The syntax convention is to use lowerCamelCase for variable names and to use spaces around the = sign. Also, a variable declaration ends with a semicolon ; Whenever you declare a variable don't forget to end the declaration with ; otherwise Motoko will complain.
If we try the following code:
let n = 1;
n := 2;
An attempt is made to reassign a value to an immutable variable - that's why an error will occur. The specific error message will be type error [M0073], expected mutable assignment target. This message indicates that the variable being reassigned is immutable and cannot be changed.
🍎 Types
The Motoko language places a strong emphasis on types and is more strict in enforcing them compared to other general-purpose languages like JavaScript or Python. This strictness serves a purpose, as it helps prevent errors and issues.
Motoko has static types, this means that each variable is assigned a specific type, which is determined before the program runs. The compiler checks each use of the variable to avoid errors that may occur during runtime.
To assign a type to a variable we use the : symbol, this is called type annotation.
let age : Nat = 20;
let message : Text = "Of all the acts, the most complete is that of building";
let open : Bool = false;
You can generally omit the type declaration - the Motoko compiler will automatically guess the type to the variable based on the first value that you provide this is called type inference.
let age = 20; // Will be assigned type Nat
For the duration of the Bootcamp it is recommended to keep all type declarations to make things clearer, especially if you are new to typed languages.
💬 Comments.
A one-line comment is written by starting the line with //.
// Hello! It is recommended to use comments to make your code more readable.
A comment can span into multiple lines, in that case you'll need to add // on each line.
//  Sometimes you'll have a lot to say
//  In those cases
//  You can use more than one line
⚙️ Functions
This section focuses solely on functions that are defined within the body of an actor using the actor {} syntax. Any function that is outside the actor {} syntax will be covered in future lessons.
A simple example
To introduce functions - let's look at an example: here is an actor that is responsible to keep track of a counter.
actor Counter {
    var count : Nat = 0;

    public func setCount(n : Nat) : async Nat {
        count := n;
        return count;
    };

};
The keyword func is used to declare functions, followed by the name given to the function, in that case increaseCount. As for variables, the syntax convention is to use lowerCamelCase for function names.
Function type
When defining a function in Motoko, the typed arguments and return type are used to determine the type of the function as a whole. For example, the function setCount has the following type:
setCount : (n : Nat) -> async Nat;
To declare a function in Motoko, you must specify the types of the arguments and return values. Function arguments are enclosed in parentheses (), and in this case, the function takes an argument n of type Nat. After the function arguments, the return type is specified : async Nat.
You might be wondering why the return type for the
setCountfunction isasync Natinstead of simplyNat?
The termasyncstands for asynchronous, which means that in the Actor model we discussed earlier, canisters or actors communicate with each other asynchronously. When one canister sends a request to another (or when a user calls a function), there will be a brief waiting period before the caller receives a response.
Asynchronous programming allows you to run your code in a non-blocking manner. Theasync Natreturn type for thesetCountfunction indicates that the caller must wait for a few moments before receiving the return value. Eventually, the response will be a value of typeNat, but with a delay due to the asynchronous nature of the communication between canisters. All public functions declared in the body of an actor must be of return typeasync.
Body and return
- The curly brackets
{}are used for the function body. The body of the function is a set of instructions executed when the function is being called. In our example, forsetCountwe have 2 instructions:
- Assign the value of
countto the value ofn. - Return the current value of
count.
Motoko allows the return at the end of the body of a function to be omitted, because a block always evaluates to its last expression. Which means, we could rewrite the code in the following way and it would still be valid:
public func setCount(n : Nat) : async Nat {
    count := n;
    count;
};
Public vs Private
So far we've only seen public functions. However, in Motoko you can also define private functions.
private func add(n : Nat, m : Nat) : Nat {
    return (n + m)
};
The function is now marked private, this means that it can only be used by the actor himself and cannot be called directly by users or external canisters.
Usually private functions are used as helpers in other functions, that are generally defined as public. For instance we could write the following.
actor {
    var count : Nat = 0;

    private func add(n : Nat, m : Nat) : Nat {
        return (n + m)
    };

    public func addCount(n : Nat) : async Nat {
        let newCount = add(count,n);
        count := newCount;
        return count;
    };
}
We can remove the
privatekeyword , a function declaration defaults to a private function in Motoko unless declared otherwise (i.e unless declaredpublic).
🕹️ Control flow.
Control flow refers to the order in which a program is executed and the order that it follows. It decides which statements, instructions or function calls are executed and in what order, based on conditions or decisions made during the run time.
We discuss three common control flow constructs in Motoko: if else expressions, loops expressions and switch expressions.
If/else
The if statement allows the program to make a decision and execute a certain block of code only if a specific condition is met. The optional else statement provides an alternative if the condition is not met.
    func isEven(n : Nat) : Bool {
        if(n % 2 == 0){
            return true
        } else {
            return false
        };
    };
In this case, the condition n % 2 will be tested at runtime and depending on the value of n will returns true or false.
In many cases the else block can be removed without modyfing the behavior of the code block.
    func isEven(n : Nat) : Bool {
        if(n % 2 == 0){
            return true;
        };
        return false;
    };
In other cases, you can add else if blocks to check additional conditions.
    func checkNumber(i : Int) : Text {
        if(n < 0) {
            return ("The number is negative.");
        } else if (n == 0) {
            return("The number is zero.");
        } else if (n < 10) {
            return("The number is one digits.");
        } else if (n < 100) {
            return("The number is two digits.");
        } else {
            return ("The number is three or more digits.");
        }
    };
Note that else if statements are used after the initial if statement to check additional conditions, and only the code block associated with the first condition that evaluates to true will be executed.
Loops
Loops enable the repeated execution of a code block until a specific condition is fulfilled. There are various types of loops, such as for loops and while loops:
forloops in Motoko use an iterator of theItertype. We will delve into theItertype in a later lesson, but to summarize,Iterobjects facilitate looping through collections of data.
var count : Nat = 0;
for (x in Iter.range(0, 10)) {
    count += 1;
};
In this example, Iter.range(0, 10) iterates through all natural numbers between 0 and 10, inclusive of both boundaries.
Alternatively, you can use while loops, which executes as long as the specified conditions remains true.
var count : Nat = 0;
while (count < 10) {
    count += 1;
};
Here, the loop will continue to execute until the count variable is no longer less than 10.
Switch/case
The switch expression in Motoko is a control flow construct that matches patterns based on its input. It begins with the switch keyword, followed by the input expression enclosed in parentheses (), and a code block enclosed in curly braces {}.
let x = 3;
switch(x) {
    //
};
Within the code block, the case keyword is used to define patterns and expressions enclosed in curly braces {}. The input is compared to the patterns specified in each case, and if a match is found, the expression within the corresponding case block is executed.
let x = 3;
switch(x) {
    case(0) {
        // This corresponds to the case x == 0
        return ("x is equal to 0");
    };
    case (1) {
        // This corresponds to the case x == 1
        return ("x is equal to 1");
    };
    case (2) {
        // This corresponds to the case x == 2
        return ("x is equal to 2");
    };
    case (_) {
        // This corresponds to all other cases
        return ("x is above 2");
    };
};
In Motoko, switch expression must cover every possible outcome to ensure the code is valid. When we don't want to list all possible values we can use the special case(_) to match any value. By putting it at the end of our code it will match all the possible cases that arent specified before it. The underscore symbol (_) is a wildcard that matches any value, so the case(_) pattern will match any input value.
The switch/case expression is best used with variants.
type Day = {
    #Monday;
    #Tuesday;
    #Wednesday;
    #Thursday;
    #Friday;
    #Saturday;
    #Sunday;
};
let day = #Monday;

switch(day) {
    case(#Monday){
        return ("Today is Monday");
    };
    case(#Tuesday){
        return ("Today is Tuesday");
    };
    case(#Wednesday){
        return ("Today is Wednesday");
    };
    case(#Thursday){
        return ("Today is Thursday");
    };
    case(#Friday){
        return ("Today is Friday");
    };
    case(#Saturday){
        return ("Today is Saturday");
    };
    case(#Sunday){
        return ("Enjoy your Sunday");
    };
};
In this example, we defined a variant type Day, declared a variable day with that type, and then used it as input in our switch expression. The switch expression is a powerful control flow construct that allows for pattern matching, providing a concise and readable way to handle multiple cases based on the input value.
Lesson 3: Primitive Types in Motoko.
Primitive types are fundamental core data types that are not composed of more fundamental types.
Primitive types are all the types that do not need to be imported before they can be used in type annotation.
A few primitive types in Motoko
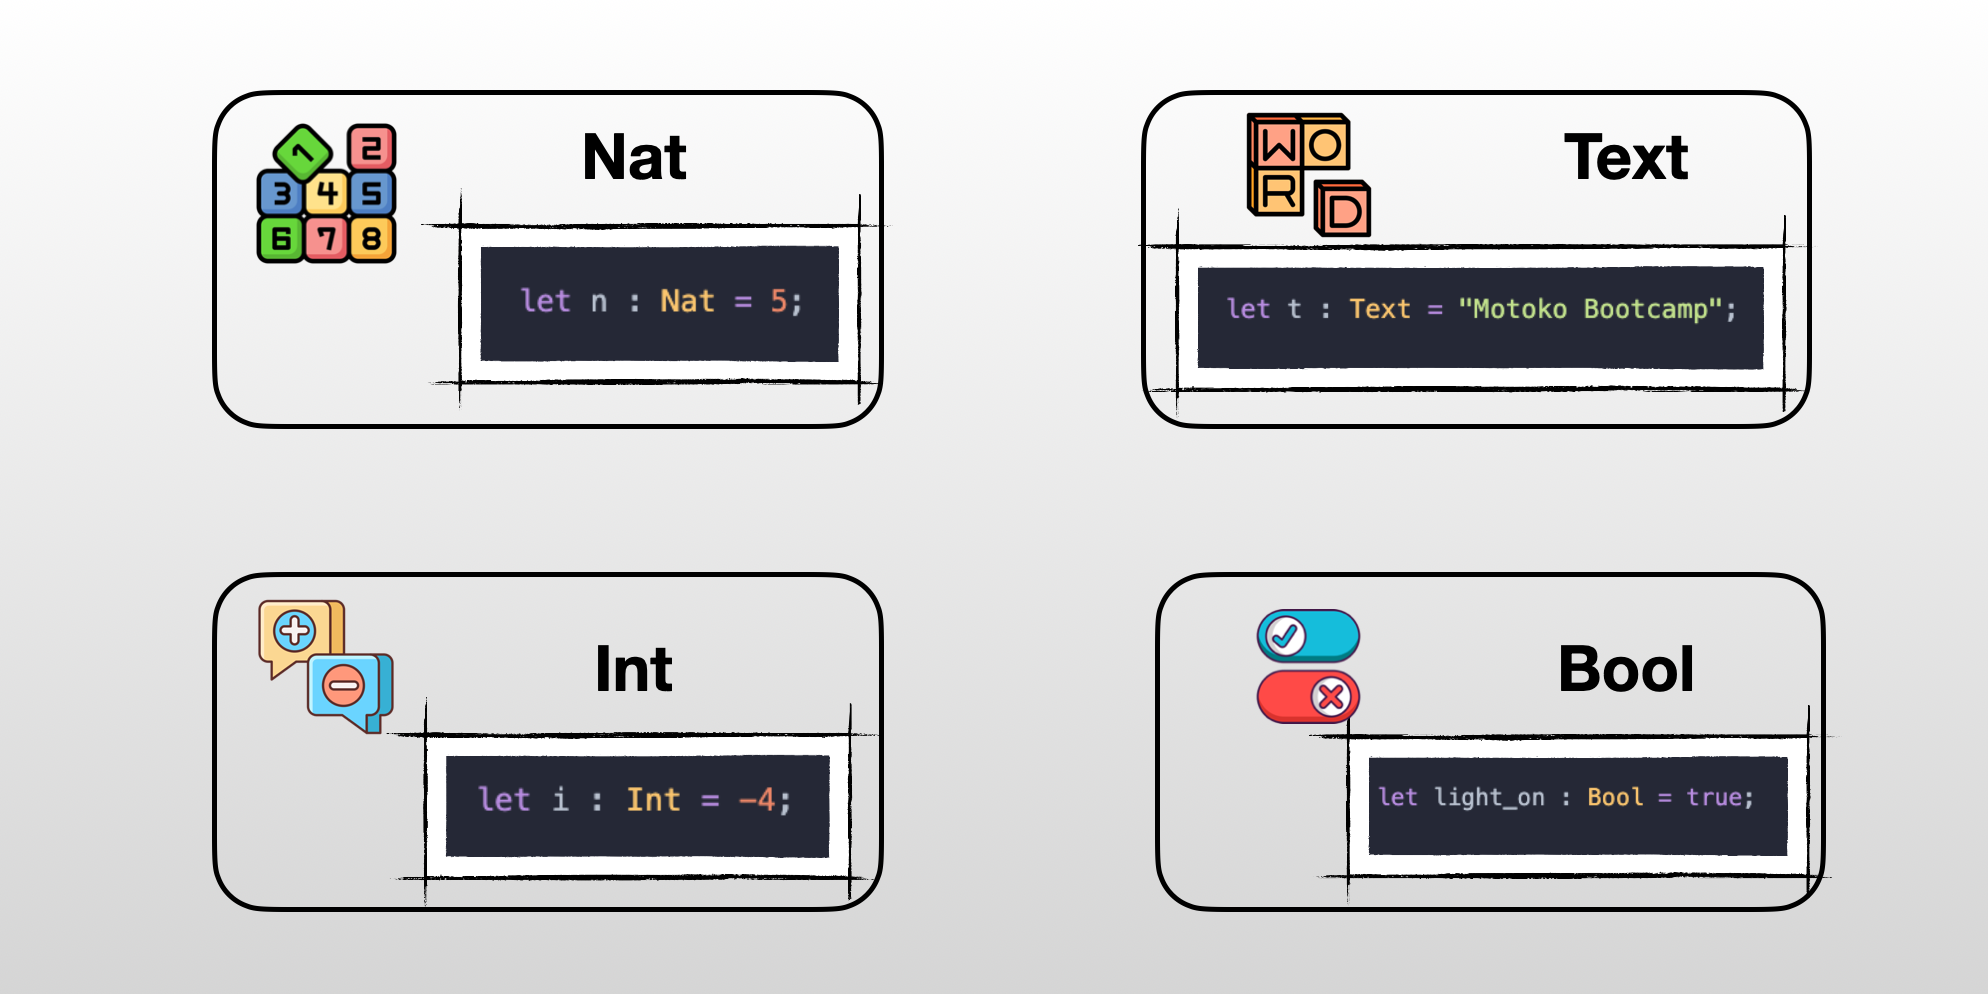
🔢 Nat
Nat is used for unbounded natural numbers (1,2,3,4,...♾️). By default all positive whole numbers are casted to Nat.
let n : Nat = 1;
Is equivalent to
let n = 1; // Will be casted to Nat automatically
Unbounded means that value of type Nat will never overflow. The memory representation used will grow to accommodate any finite number. Motoko also has the concept of bounded natural numbers (Nat8, Nat16, Nat32, Nat64) that we will cover later. If you try to assign a negative number to a Nat the program will trap.
let n : Nat = -1;
This line will return an error: literal of type Int does not have expected type Nat.
Nat supports usual operations:
- Addition: you can add two numbers using the addition operator
+
let a : Nat = 1 + 1; // 2
- Subtraction: you can subtract two numbers using the subtraction operator
-
let a : Nat = 10 - 2; // 8
Be careful with subtractions.
Natonly plays with the positive numbers. If the result of the subtraction is less than zero, it won't fit. The value will no longer be of theNattype and that could cause trouble if your program is expecting a value of theNattype.
- Multiplication: you can multiply two numbers using the multiplication operator
*
let a : Nat = 10 * 10; // 100
- Division and modulo: to divide two numbers, you can use the division operator
/and to find the remainder of a divided by b, you can use the modulo operator%
let a : Nat = 10 / 2;   // 5
let b : Nat = 3 % 2;    // 1
➖ Int.
Integers represent whole numbers that can be positive or negative. The same mathematical operations seen earlier (addition, multiplication, subtraction, division, and modulo) can be performed on both Int and Nat.
let i : Int = -3;
let j : Int = 5;
Since
Intincludes positive and negative whole numbers it includes all value of typeNat. We say thatNatis a subtype ofInt.Intis also an unbounded type and has bounded equivalents that we will cover later (Int8,Int16,Int32,Int64).
🚦 Bool.
A Bool is either true or false. Bool stands for boolean and this data type only contains two values.
let light_on : Bool = true;
let door_open : Bool = false;
Booleans can be used and combined with logical operators:
and
let result = false and false; //false
let result = true and false; //false
let result = false and true; //false
let result = true and true; //true
or
let result = false or false; //false
let result = true or false; //true
let result = false or true; //true
let result = true or true; //true
not
let result = not true; //false
let result = not false; //true
Nat and Int supports comparison operators, which compare two integers and returns a Bool:
- The
==(equality) operator which indicates if two values are equal. - The
!=(not equal) operator which indicates if two values are different. - The
<(less than) and>(more than) operators. - The
<=(less than or equal to) and>=(more than or equal to) operators.
3 < 5   // true
1 >= 1  // true
1 != 1  // false
2 == 10/5   // true
The
==operator is very different from the=operator. The first will test if two values are equal while the later will asign a value to a variable.
💬 Text
In Motoko, strings can be written surrounded by double quotes "
"Hello Motoko Bootcamp!"
The type for string is Text.
let welcomePhrase : Text = "Hello Motoko Bootcamp!";
We can use the concatenation operator # to join two Text together.
let firstName : Text = "Motoko";
let surname : Text = "Bootcamp";
let completeName : Text = firstName # surname;
We can access the size of a Text by calling the .size() method.
let name : Text = "Motoko";
let size = name.size()  // 6
🔤 Char
A value of type Text is actually composed of values from another type: Char. A Text is the concatenation of multiple characters. Characters are single-quote delimited '
let character_1 : Char = 'c';
let character_2 : Char = '8';
let character_3 : Char = '∏';
Char are represented by their Unicode code points. We can use the Char module from the Base library to check the unicode value.
import Char "mo:base/Char";
import Debug "mo:base/Debug";
actor {
    let a : Char = 'a';
    Debug.print(debug_show(Char.toNat32(a)));   // 97
}
We can easily iterate over all the characters in a Text, by calling the chars() method. We can then use this iterator to create a for loop.
import Debug "mo:base/Debug";
import Char "mo:base/Char";
actor {
    let name : Text = "Motoko";
    for (letter in name.chars()){
        Debug.print(Char.toText(letter));
    };
};
Notice how when we iterate
letteris aCharand we need to convert it back toTextto useDebug.print(learn more here). TheCharmodule also contains a few functions that can be used to test properties of characters:
isDigit
Char.isDigit('9'); // true
isWhitespace
Char.isWhitespace('a'); // false
isLowercase
Char.isLowercase('c'); // true
isUppercase
Char.isUppercase('D'); // true
isAlphabetic
Char.isAlphabetic('|'); // false
💥 Float.
Float are numbers that have a decimal part.
let pi = 3.14;
let e = 2.71;
If you want to use Float for whole numbers, you need to add the type descriptor otherwise they would automatically be casted to Int or Nat.
let f : Float = 2;
let n = 2;  // Automatically casted to type Nat
Float are implemented on 64-bits folowing the IEEE 754 representation. Due to the limited precision, operations may result in numerical errors.
0.1 + 0.1 + 0.1 == 0.3 // => false
1e16 + 1.0 != 1e16 // => false
🎛️ Bounded types
Motoko provides support for bounded types which are integer types with fixed precision. These bounded types can be useful for several reasons:
- Memory efficiency: Bounded types allow you to know exactly how much memory your data will occupy.
- Exact sizing: When you know that an API returns an exact number, you can use bounded types to ensure that the - returned number is represented accurately.
- Execution efficiency: If you know that your numbers require 64-bit arithmetic, using
Nat64is more efficient than usingNat. - Bitwise arithmetic: Bounded types make it easier to perform bitwise operations such as
<<orXORon binary data.
Nat8, Nat16, Nat32 and Nat64
There are four natural types supported in Motoko: Nat8, Nat16, Nat32, and Nat64.
The number in the type name specifies the number of bits in the type representation. For example, Nat32 represents a 32-bit natural number.
To declare a bounded variable, you must specify the type explicitly to avoid it being automatically cast to a regular Nat:
let n : Nat32 = 1;
In contrast, if you declare a variable without specifying its type, it will default to a regular Nat
let n = 1; // Will be casted to Nat automatically
Int8, Int16, Int32, and Int64
Motoko also supports integer types, including Int8, Int16, Int32, and Int64. Bounded integer types behave similarly to bounded natural types, except they support negative values. The number in the type name specifies the number of bits in the type representation. For example, Int32 represents a 32-bit integer:
let i : Int32 = -1;
🤖 Blob.
Blob stands for Binary Large Object. The Blob type represents an immutable sequence of bytes: they are immutable, iterable, but not indexable and can be empty.
Byte sequences are also often represented as [Nat8], i.e. an array of bytes, but this representation is currently much less compact than Blob, taking 4 physical bytes to represent each logical byte in the sequence.
If you would like to manipulate Blobs, it is recommended that you convert Blobs to [var Nat8] or Buffer<Nat8>, do the manipulation, then convert back.
🫙 Unit type
The last type we will mention in this lesson is the unit type (). This type is also called the empty tuple type. It's useful in several places, for example in functions to indicate that a function does not return any specific type.
import Debug "mo:base/Debug";
actor {
    public func printMessage(message : Text) : async () {
        Debug.print(message);
        return();
    };
}
Lesson 4: Candid the language of the Internet Computer.
Why do we need Candid?
Let's imagine the following situation:
- We are writing a canister in Motoko and we have defined a value
nof type Nat.
let n : Nat = 5;
- We know another canister that exposes a public function
squarethat returns thesquareof the number provided - this canister is written in Rust.
We want to compute the square of our value n, but we are very lazy and we don't want to implement the square function in the Motoko canister, instead we want to make use of the already existing function in the Rust canister. That's possible and it will make use of intercanister-calls (a more advanced concept that we will see in more details in another lesson).
The problem is the following: n is of type Nat and the square function only accepts value of type u128. But, in Motoko, the type u128 doesn't exist! It it is like trying to communicate in Spanish with someone that speaks Chinese.
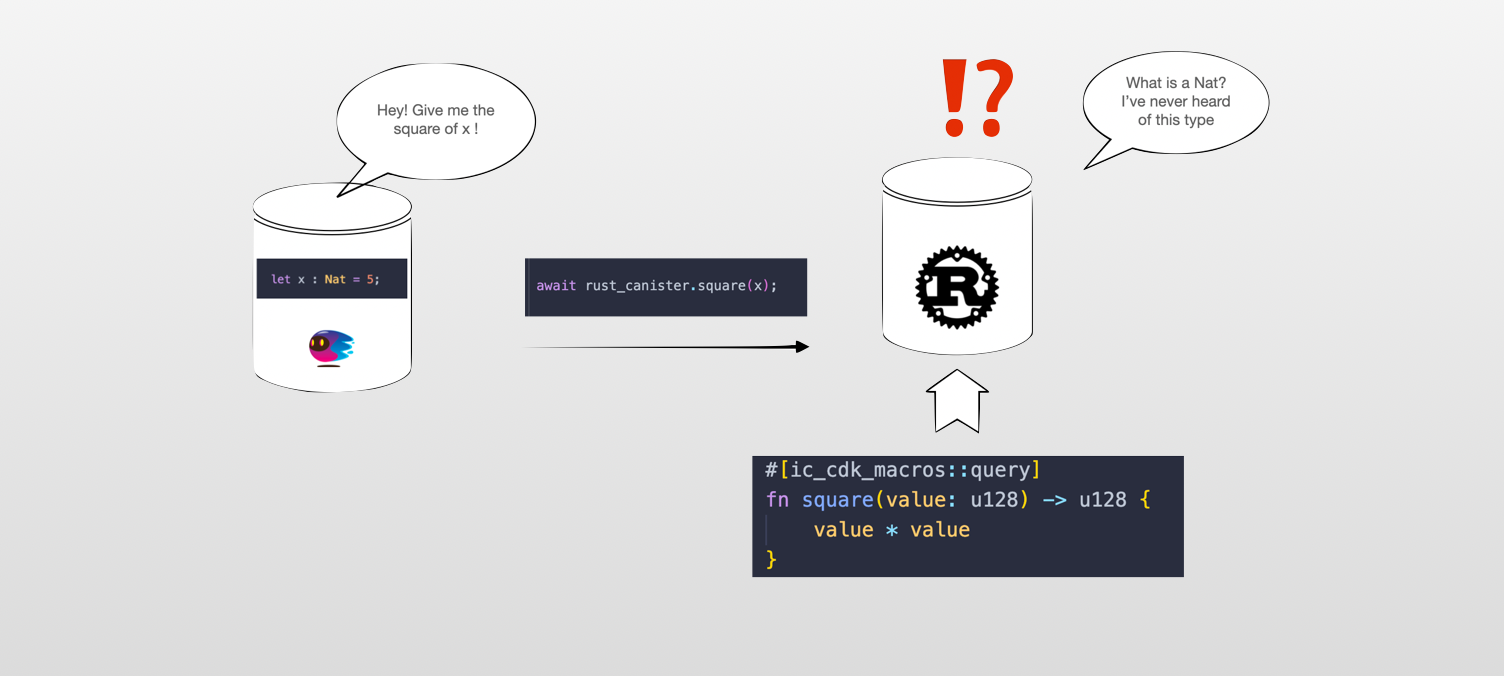
Communication can be hard sometimes...
Composing services (i.e canisters) written in different languages is central to the vision of the Internet Computer. How do we solve this fundamental communication issue between canisters?
What is an IDL?
We need to introduce an Interface Description Language (IDL). An interface description language (IDL) is a generic term for a language that lets a program written in one language communicate with another program written in another unknown language.
Candid is an IDL describing the public services deployed in canisters on the Internet Computer. The Candid interface allows inter-operation between services, and between services and frontends, independently of the programming language used.
Candid solves the problem we raised earlier by enabling a mapping between types in different languages.
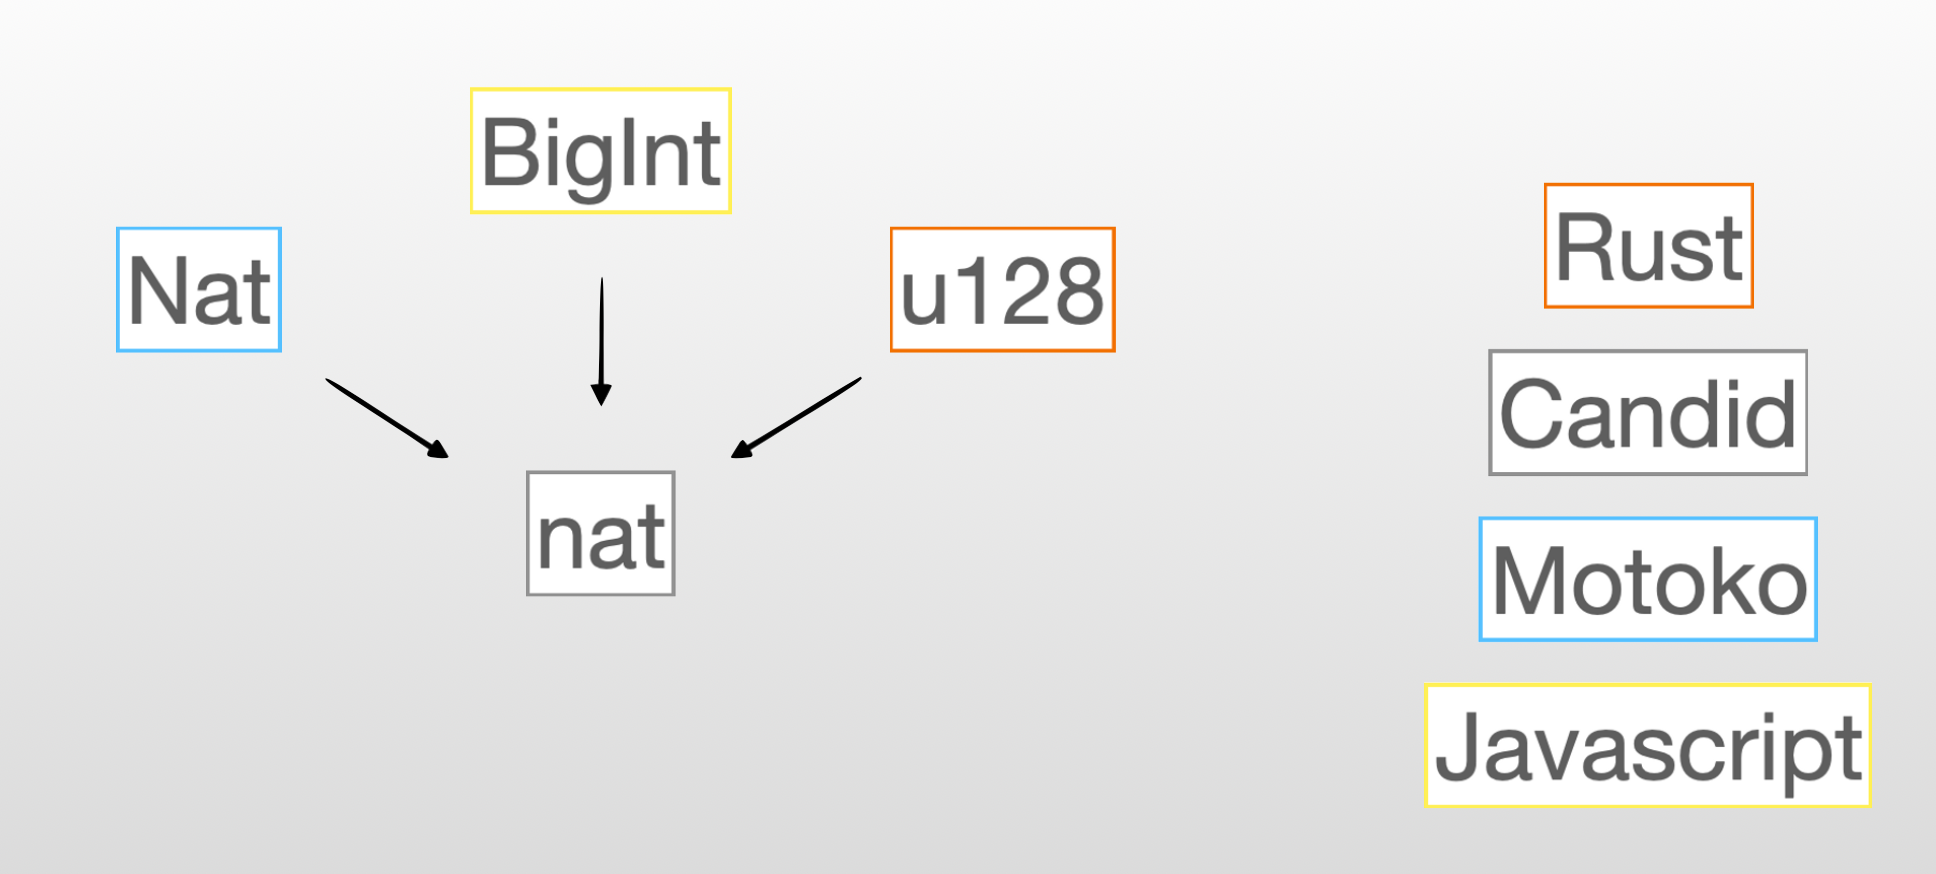
Candid file (.did)
A Candid file is a file with the .did extension - we can define the interface of the square canister with the following .did file:
service : {
  square: (nat) -> (nat) query;
}
In this case, our service has a unique function named square. This function takes a nat and returns a nat. Notice that we also used the keyword query.

Candid is the common ground for all canisters to solve their misunderstanding!
The nat used here is not the same as the Nat type in Motoko, or any type in Rust. If the square canister was written in Motoko the Candid interface would be exactly the same. The description of the service is independent of the language it was written in - this is key!
Candid solves the problem we've raised earlier by enabling a mapping between types in different languages.
The type u128 will be converted to nat which is then converted to Nat in the Motoko canister. This makes it possible to write the following code:
actor {
    let n : Nat = 5;

    //We define the other canister in our own code.
    let rustActor : actor = {
        square : Nat -> Nat;    // We use Motoko types here
    };

    public func getSquareOfN() : async Nat {
        await rustActor.square(n);  // This is how you can call another canister - pretty cool, right?!
    };

};
Candid is sometimes called "the language of the Internet Computer" as it how canisters communicate with each other. You will rarely have to write Candid but it's important to understand why Candid was created, how to read it, and how it works since you'll encounter Candid files in the projects you will work on.
Interacting with a canister
To follow along this part, it is strongly recommended that you deploy locally the sample greet application that is shipped with dfx.
- Generate the code for this project by running
$ dfx new greet
- Start your local replica.
$ dfx start --clean
- Open another terminal tab & deploy the project.
$ dfx deploy
The Candid interface is automatically generated when building a Motoko project, but it can also be written manually. In its simplest form, the Candid DID file contains a service description. When the project is deployed, the greet.did file will contain the following service description:
service : {
  greet: (text) -> (text) query;
}
You can find the .did file under .dfx/local/canisters/greet_backend. If you don't see it make sure that you have built & deployed the project.
The greet dApp has one public function: greet(text). From the service description we can see, that the greet() function takes a text and returns another text, and the service is a query function (faster execution).
You can see more advanced uses of Candid in the documentation or in other examples Motoko examples.
The Candid interface, as previously mentioned, allows inter-operation between services, and between services and frontends. Candid is also very useful for calling the canisters from different places:
- Using the terminal with
dfx. - Using the Candid UI.
- Using a frontend (webpage) with the JavaScript Agent.
Let's take a look at those different methods!
📺 Using the terminal (dfx)
The Candid interface allows you to call backend services or functions from the command line. This is useful for administrative tasks that do not require a front end or for testing the back end. In the example of the Greet dApp, you can call the greet() method by running the command:
$ dfx canister call greet_backend greet '("motoko")'
("Hello, motoko!")
The general structure for calling any method from any canister is as follows:
$ dfx canister call <CANISTER_NAME OR CANISTER_ID> <METHOD_NAME> '(ARGUMENT)'
If you want to call a canister on the main net, you need to add the --network ic flag:
$ dfx canister --network ic call <CANISTER_NAME OR CANISTER_ID> <METHOD_NAME> '(ARGUMENT)'
Note that when using dfx you should always put your arguments between "()". The format for the arguments is the Candid format.
For more information about how to call canisters from the command-line, see the documentation.
📲 Candid UI
While the command-line can be very practical, there's also an easier way to call the backend services, and that's by using the Candid UI. When a project is deployed, besides the Candid interfaces, an asset canister running the Candid UI is also deployed. The built process will show the URL in the console, but the URL can also be found in greet/.dfx/local/canister_ids.json:
{
  "__Candid_UI": {
    "local": "r7inp-6aaaa-aaaaa-aaabq-cai"
  },
  "greet_backend": {
    "local": "rrkah-fqaaa-aaaaa-aaaaq-cai"
  },
  "greet_frontend": {
    "local": "ryjl3-tyaaa-aaaaa-aaaba-cai"
  }
}
In this case the URL to the Candid UI is http://127.0.0.1:4943/?canisterId=r7inp-6aaaa-aaaaa-aaabq-cai&id=rrkah-fqaaa-aaaaa-aaaaq-cai
It's possible that the URL for the Candid UI may be different on your machine. Make sure to adjust the URL accordingly based on the canister IDs in your own file.
Simply click the Query buttons, and see the response in the Output Log.
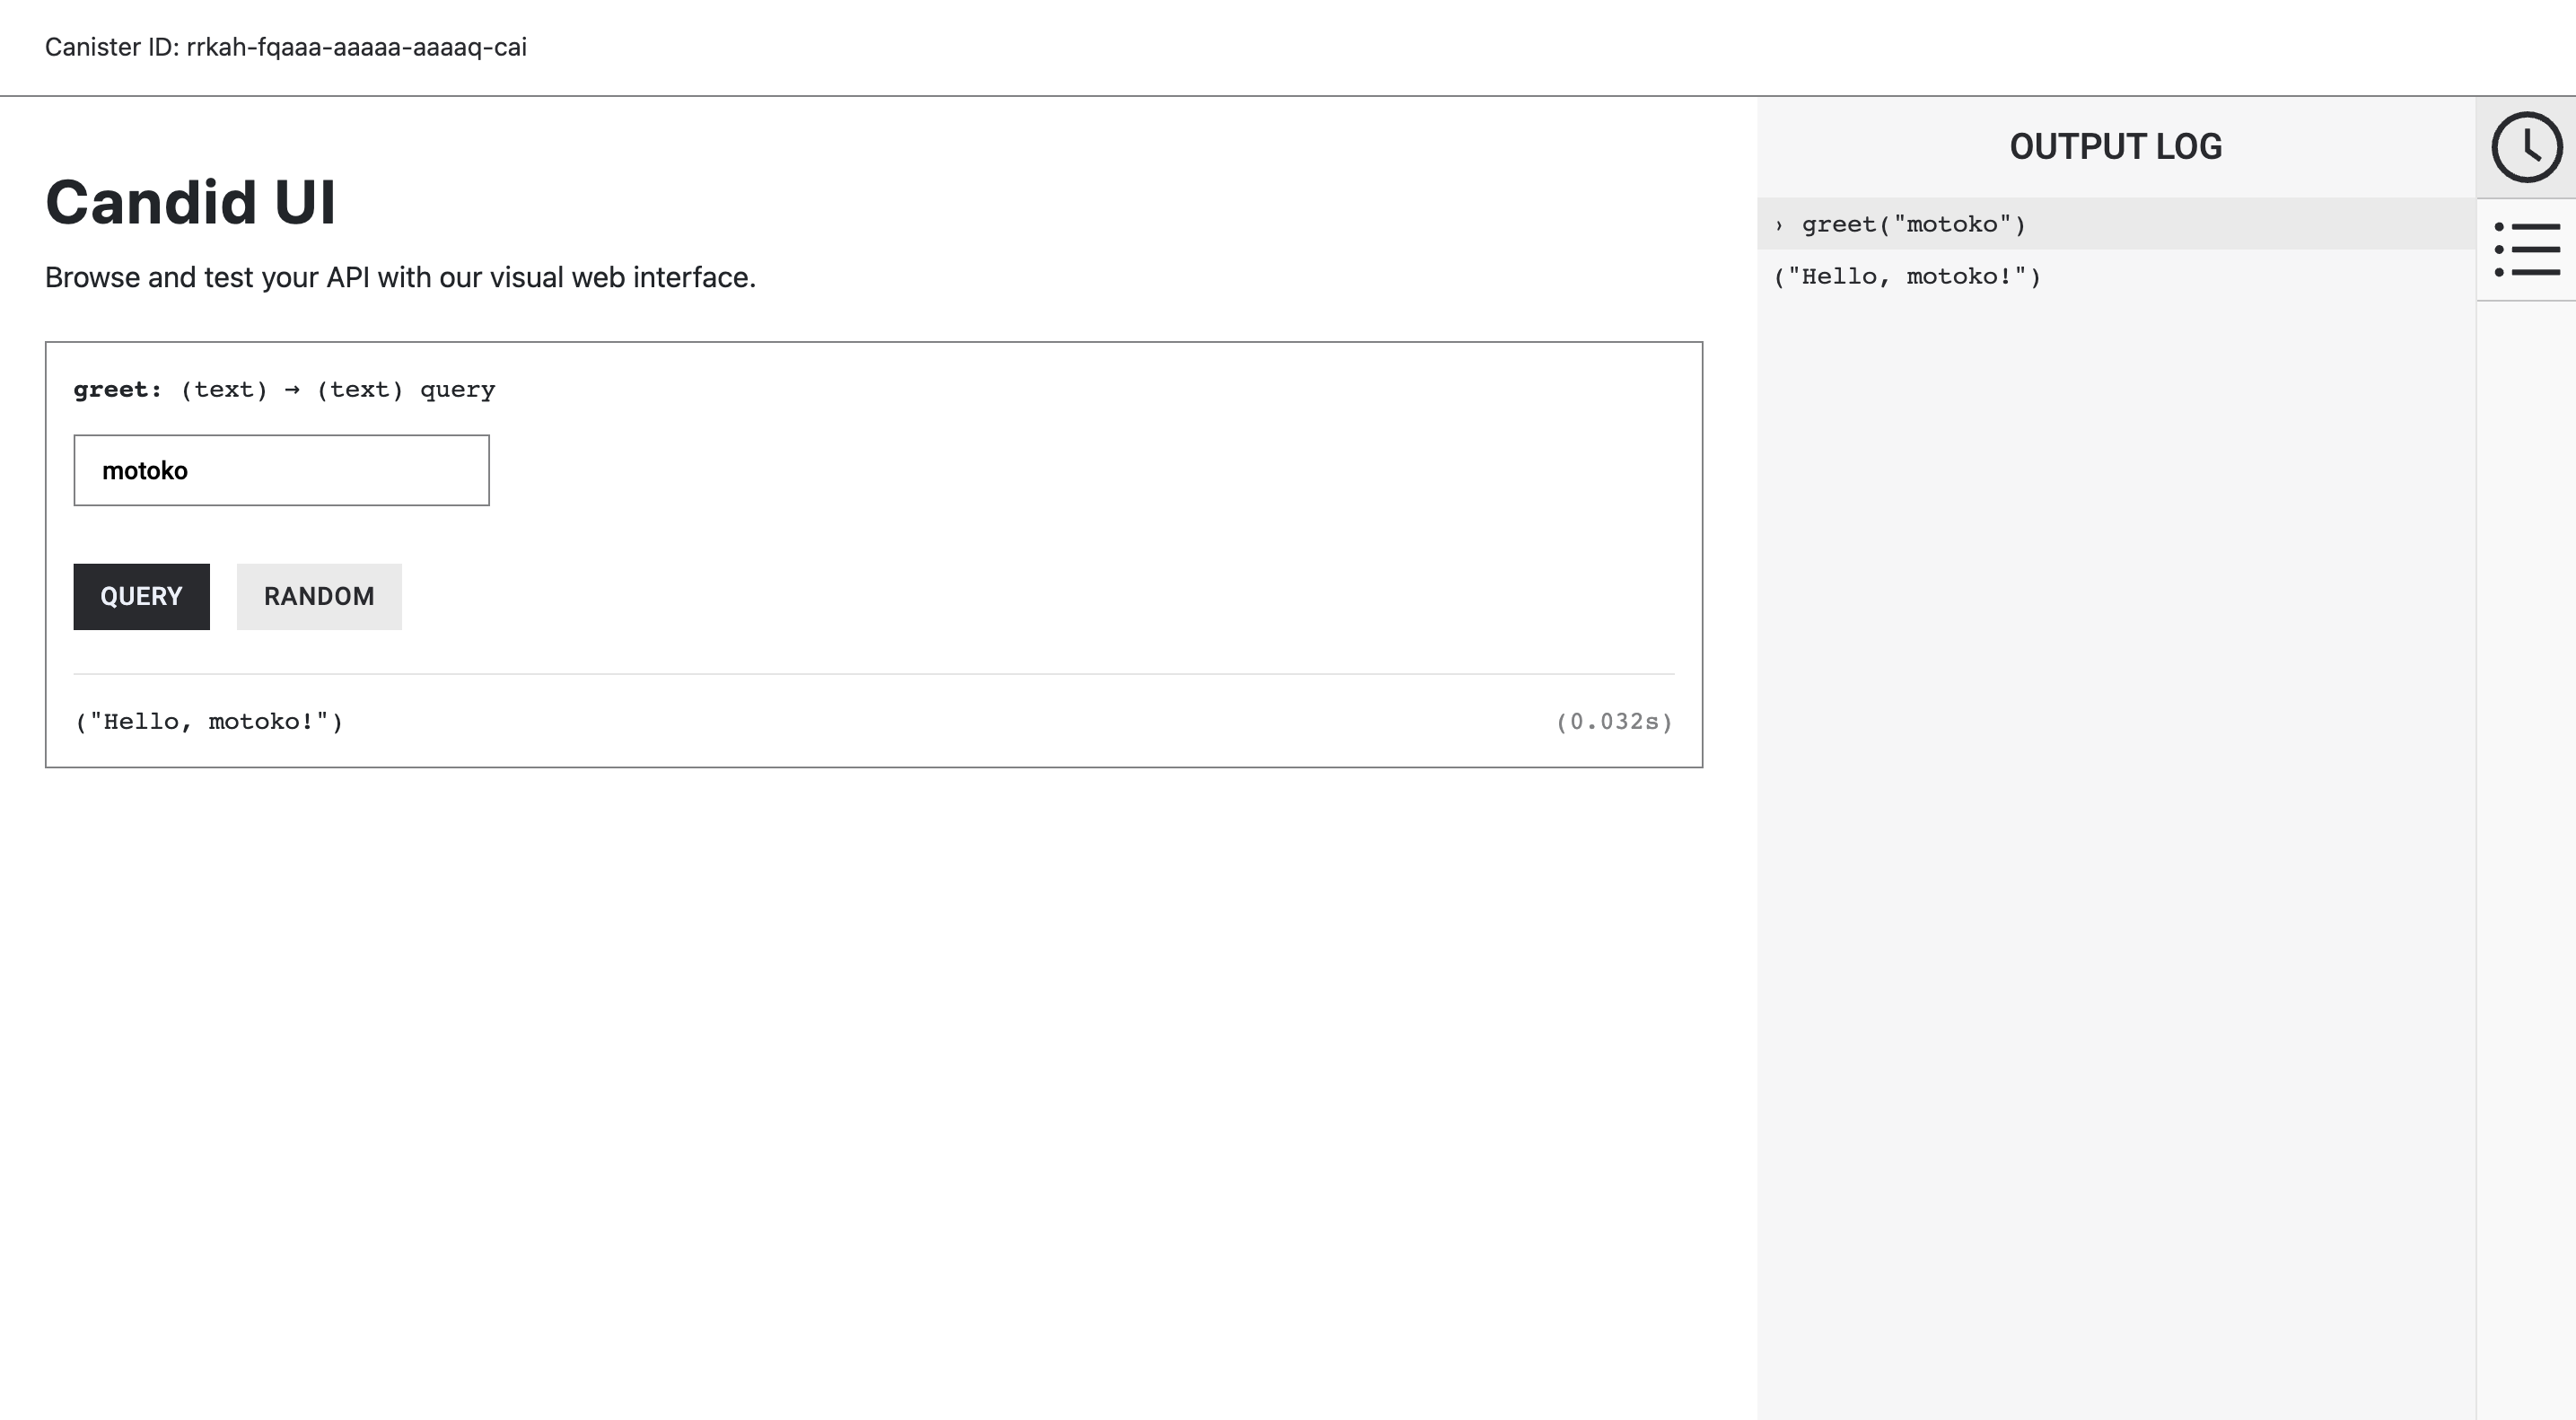
Local or Live?
One important confusion to avoid is the difference between the local & live Candid UIs:
-
The live Candid UI is unique for the entire Internet Computer - you can access the interface of any dApp (assuming that the candid file has been shipped). By using the live Candid UI you can directly modify the state of a canister.
-
The local Candid UI that we tried earlier is only deployed on your local replica. It can only give you access to the canister that you've deployed locally.
By the way - the Candid UI (live or local) is also deployed in a canister.
📑 Using Candid in the frontend
The greet dApp has both a backend and a frontend, and the frontend accesses the backend services through the Candid interface. The project's source code is organized in the following three folders:
- declarations
- greet_backend
- greet_frontend
Let's take a look at the frontend's JavaScript file located at src/greet_frontend/src/index.js. This file is responsible for handling the front-end logic of the greet dApp. The front-end and back-end are connected using the Candid interface which allows the front-end to access the back-end services.
import { greet_backend } from "../../declarations/greet_backend";

document.querySelector("form").addEventListener("submit", async (e) => {
  e.preventDefault();
  const button = e.target.querySelector("button");

  const name = document.getElementById("name").value.toString();

  button.setAttribute("disabled", true);

  // Interact with foo actor, calling the greet method
  const greeting = await greet_backend.greet(name);

  button.removeAttribute("disabled");

  document.getElementById("greeting").innerText = greeting;

  return false;
});
Two lines of code in this file are worth paying attention to. The first line is where the Candid service description is imported, and in this case, it's not the greet.did file but the index.js file. The Candid index.js is automatically generated when the project is built and imports the Motoko backend's services.
import { greet_backend } from "../../declarations/greet_backend";
After importing the Candid interface we can now use the public backend service, which is illustrated in this line:
const greeting = await greet_backend.greet(name);
The update function greet() is called with the name as a parameter, which will return the greeting message. The call is asynchronous so an await is added to make the front end wait for a response before moving on.
Several agents are developed by both DFINITY and the community to easily integrate the Candid interface in different programming languages. See the documentation for a list of the available agents.
Lesson 5: Modules
🧩 Modules
So far, we've explored the basics—operations like addition, subtraction, and string concatenation built directly into the language. To tackle more complex tasks, we'll need to delve into the world of modules.
Modules are collections of named variables, functions, and types, each designed for a specific purpose. They help us organize our code efficiently. Typically, a module resides in its own file, allowing us to import its contents into other Motoko files as needed.
Unlike the main.mo file, which begins with the actor keyword, a module starts with the module keyword.
module {
    public func Utils() : async () {
        // This utility function can be imported elsewhere
    };
}
Modules enable you to define types, classes, or utility functions, which you can then import into your main.mo file.
📚 Base library
The base library comprises a collection of modules that offer functions for working with common data types like Bool, Nat, Int, Text, and others.
This library's source code is hosted on GitHub, with contributions from DFINITY foundation engineers and the wider community. Each module comes with its documentation page, detailing the functions it provides. For instance, you can find the documentation page for the Nat module.
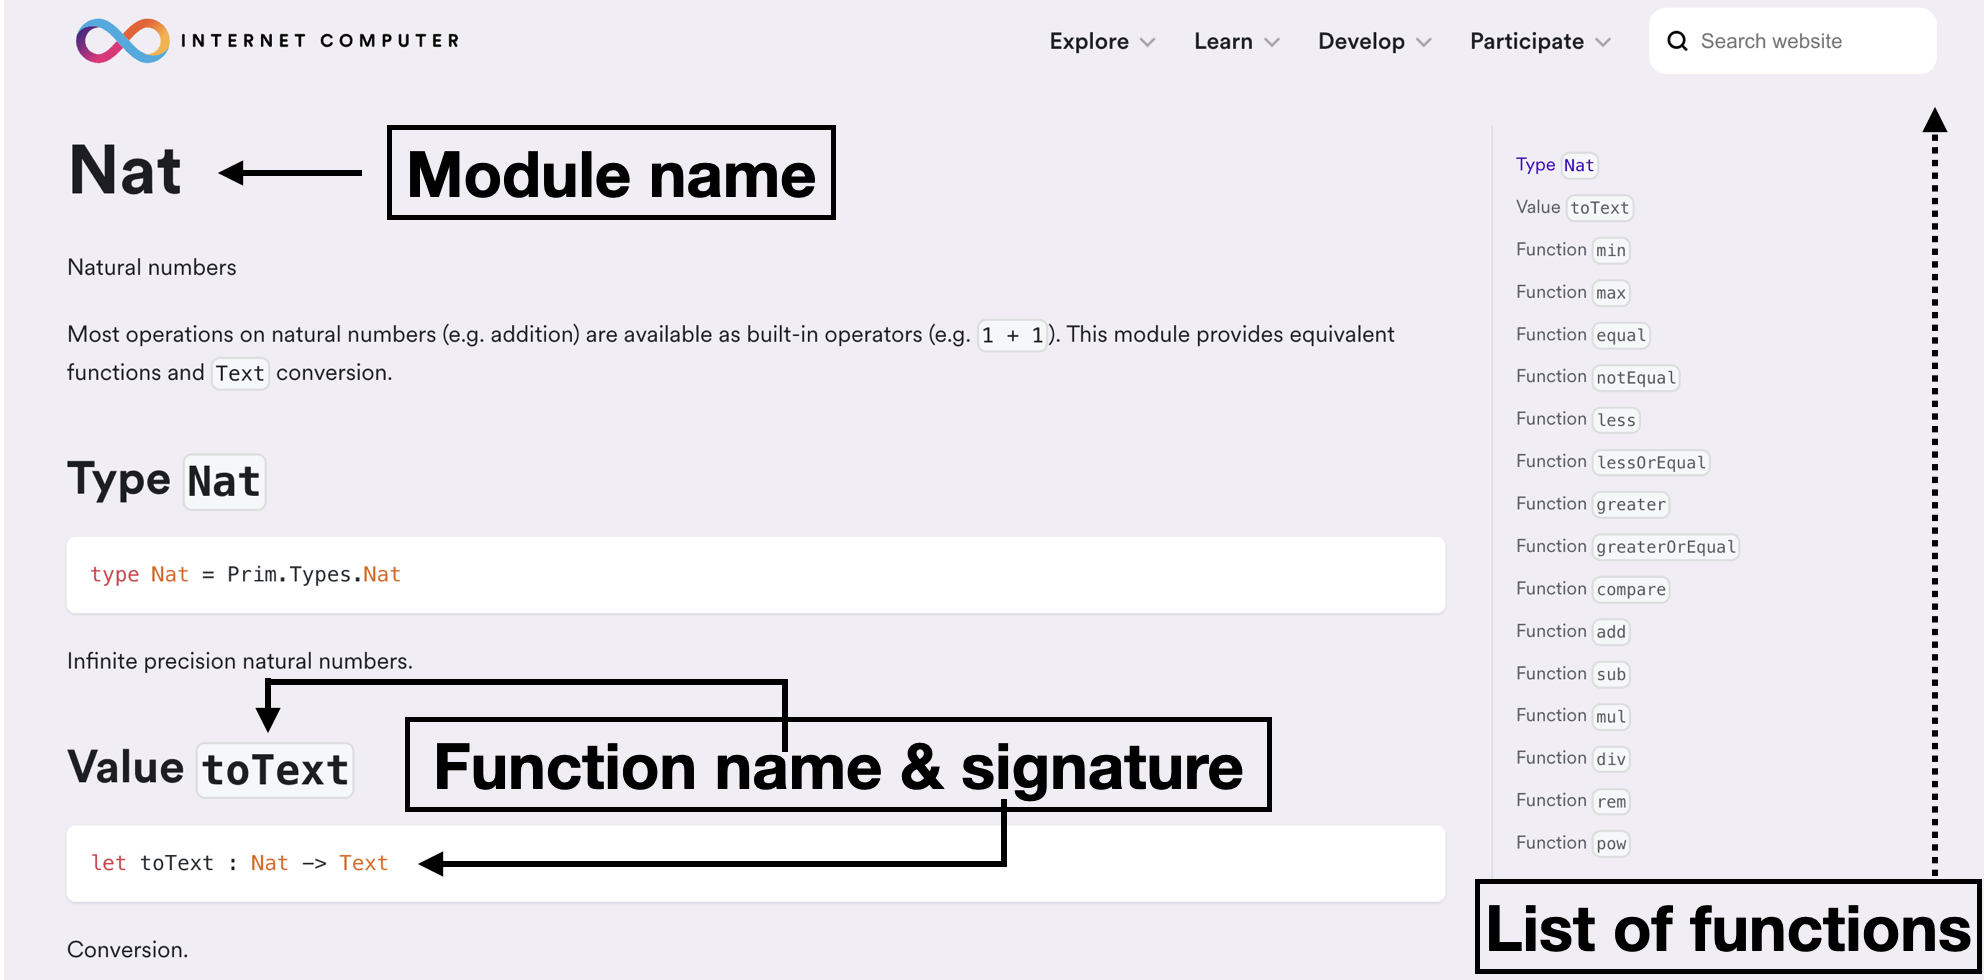
To import from the base library, you use the import keyword, followed by the module's local name and a URL pointing to the module's location.
import Buffer "mo:base/Buffer";
actor {
    let buffer = Buffer.Buffer<Text>(0);
};
Additionally, you can import Motoko code and other modules using relative paths. For instance, if you've created a program named types.mo in the same directory as your main program, you could include it with an import declaration like this:
import Types "types";
actor {
    public type ExternalType = Types.ExternalType;
};
🐶 MOPS
MOPS is a Motoko package manager featuring a fully on-chain package registry. It allows you to install packages from the Motoko community in your projects.
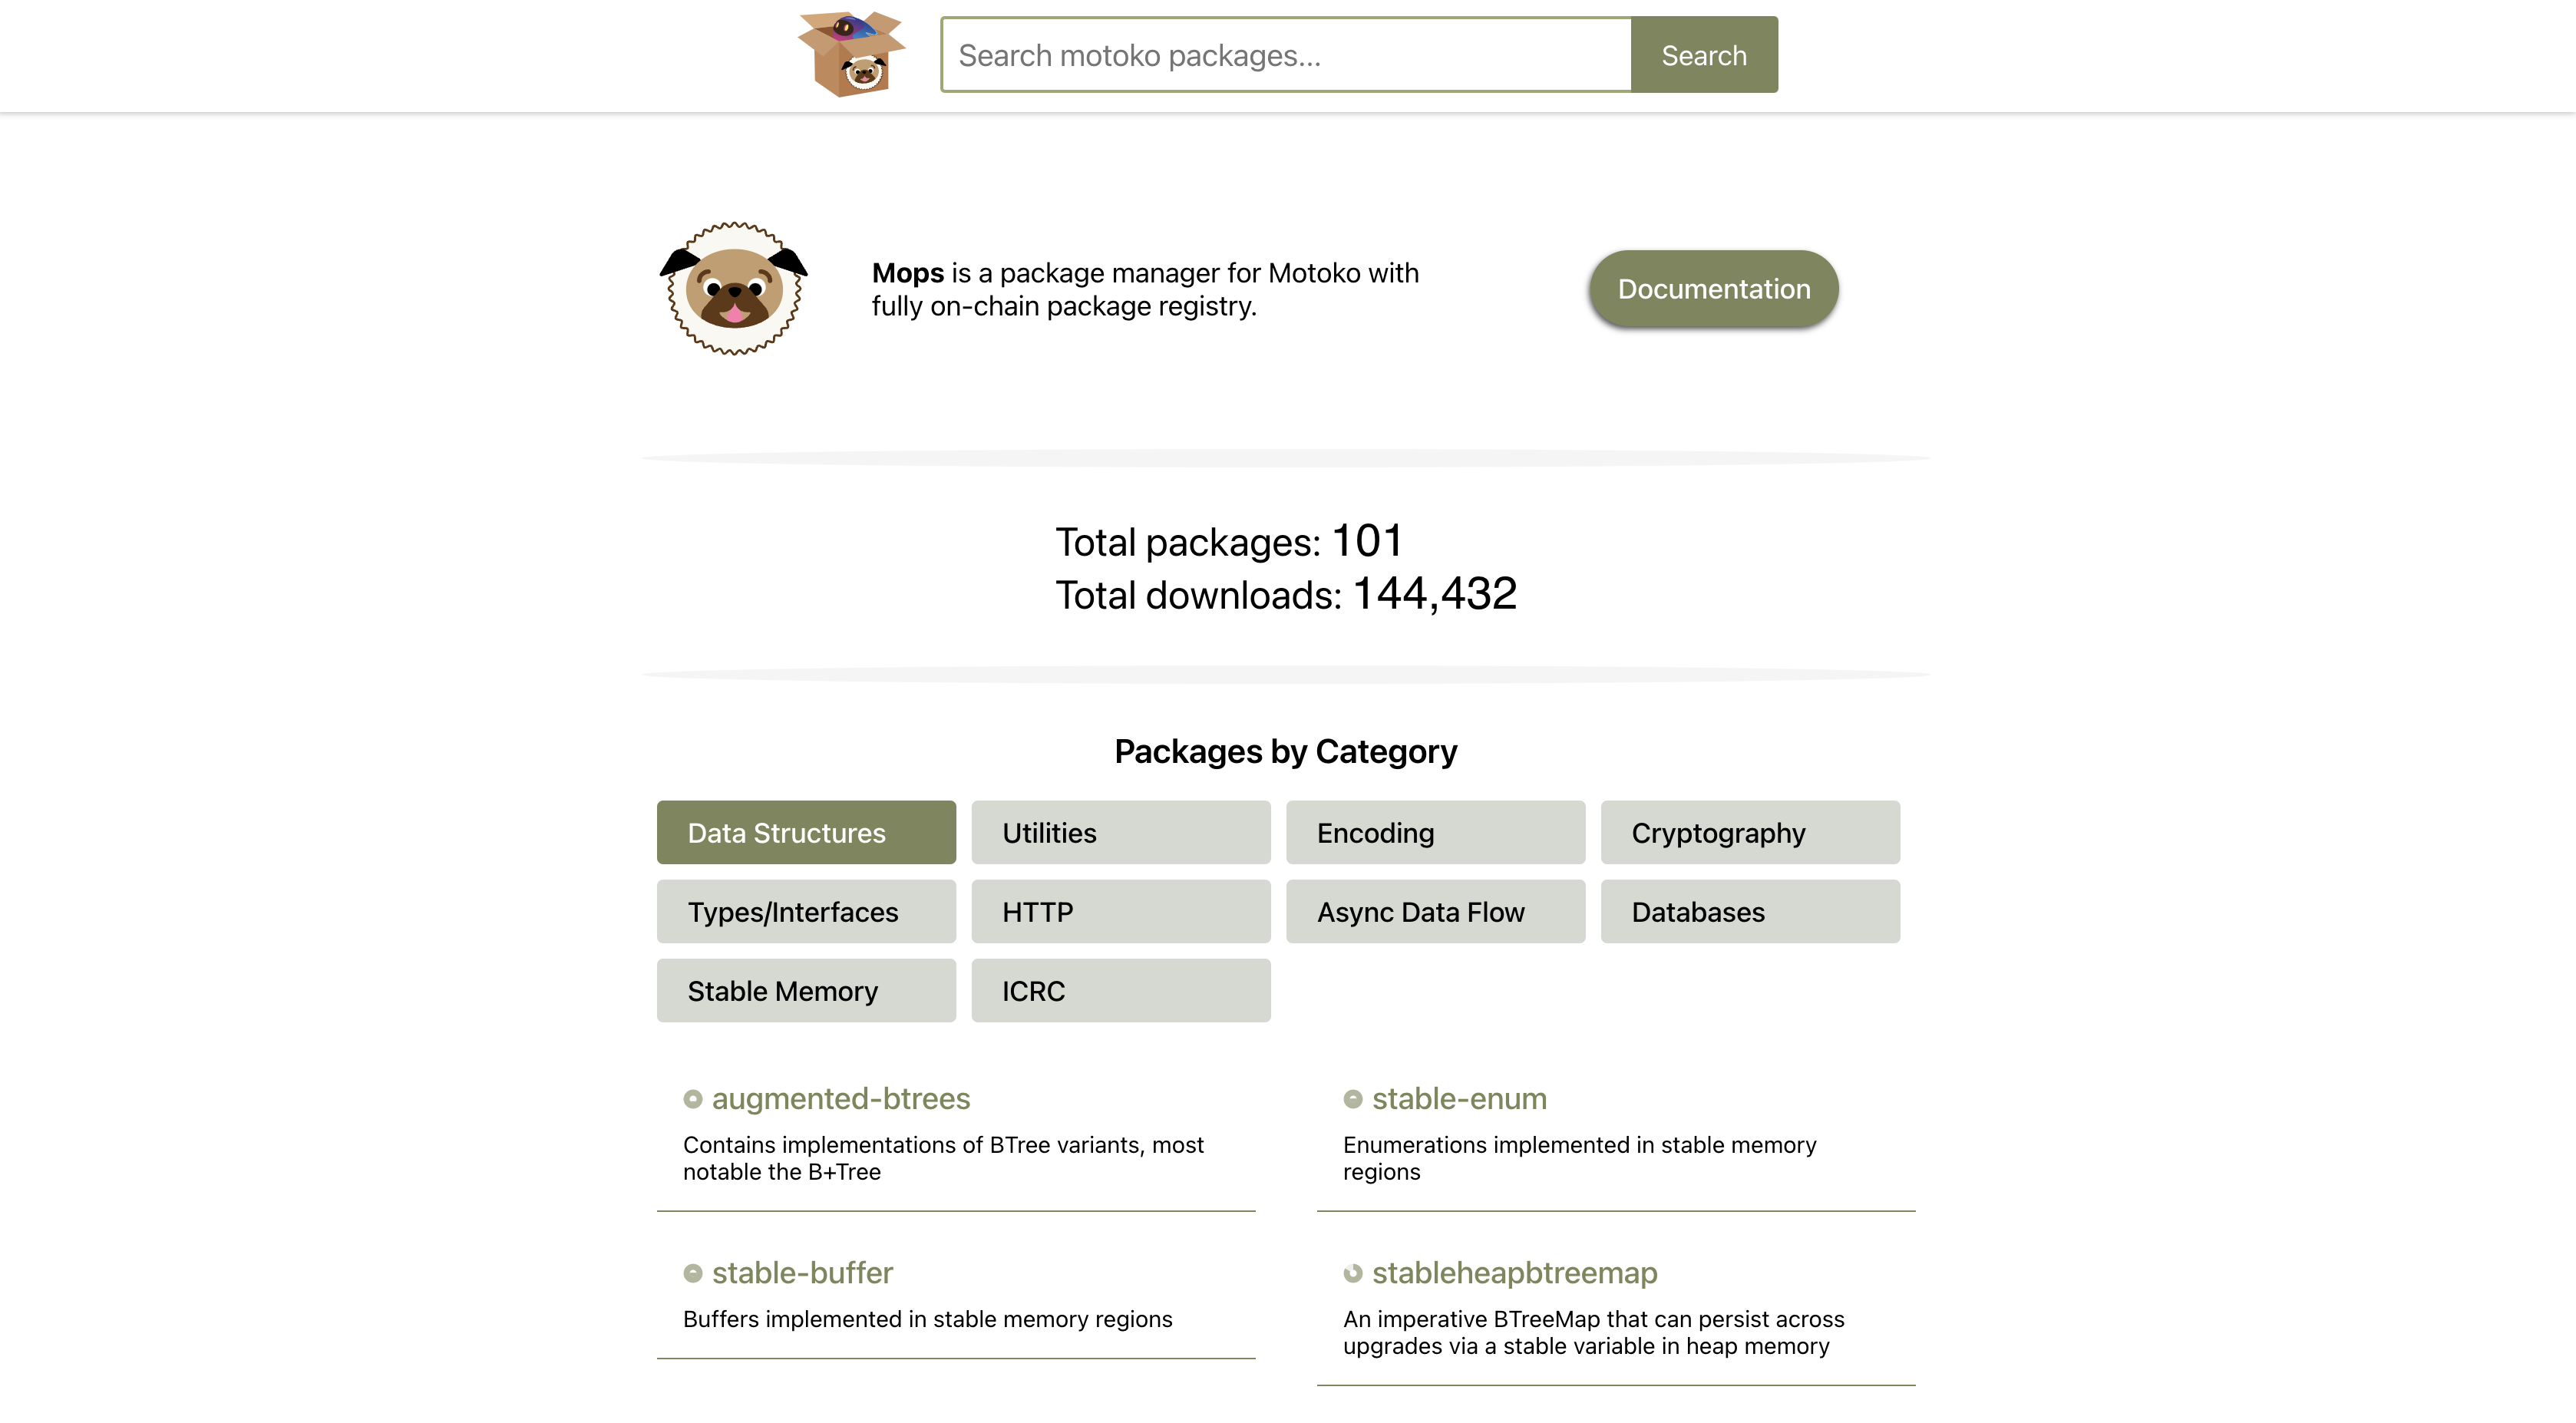
Here is the quick start guide from MOPS.
Lesson 6: Storing data in data structures.
🗃️ Array
In Motoko, an array of type Array is a group of similar elements (i.e same type) that are stored together. To create an array, one must specify the types of elements that the array will contain.
For instance, here is how to create an array that will hold Nat.
let ages : [Nat] = [16, 32, 25, 8, 89];
An array that will hold values of type Text.
let words : [Text] = ["Motoko", "is", "the", "best", "language"];
Contrary to other programming languages which might be more flexible in that regard, in Motoko we can't mix elements of different types in the same array.
The following code will throw an error: literal of type Text does not have expected type Nat.
let array : [Nat] = [14, 16, 32, 25, "Motoko"];
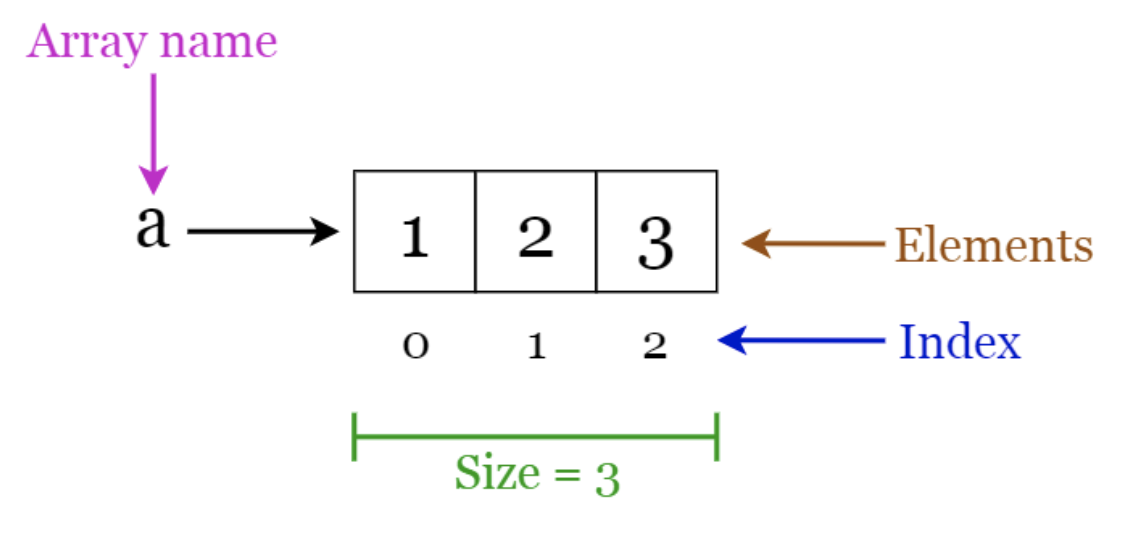
let myArray : [Nat] = [23, 16, 32, 25];
let a = myArray[0]  // 23
let b = myArray[3]  // 25
We can access the size of an array using the .size() method.
let names : [Text] = ["Emma Smith", "Olivia Johnson", "Ava Brown", "Isabella Davis"];
let size = names.size();    // 4
To loop over an array we can use the .vals() iterator. Here is an example that would give us the sum of an array.
actor {
    let array : [Nat] = [1, 2, 3, 4, 5];
    var sum : Nat = 0;

    public func somme_array() : async Nat {
        for (value in array.vals()){
          sum := sum + value;
        };
       return sum;
    };
};
In Motoko, arrays have a fixed size that is determined when the array is created. This means that the size cannot be increased later on. To add a new element to an array, a new array must be created and all of the existing elements must be transferred to the new array manually. This makes Array not really suitable for data structures that need to be constantly updated.
Concatenating two arrays to one Array can be done using Array.append() - a function from the Array module.
let array1 = [1, 2, 3];
let array2 = [4, 5, 6];
Array.append<Nat>(array1, array2) // [1, 2, 3, 4, 5, 6];
However, this function is deprecated. It is recommended to avoid it in production code. That's because as we've said before it is impossible to simply add elements to an array. Under the hood, Array.append() will create a new array and copy the values of the two existing arrays which is not efficient.
🥞 Buffer
A more adapted structure to dynamically add new elements is the type Buffer.
A Buffer can be instantiated using the Buffer library.
One needs to provide the types of elements stored inside and the initial capacity.
The initial capacity represents the length of the underyling array that backs this list. In most cases, you will not have to worry about the capacity since the Buffer will automatically grow or resize the underlying array that holds the elements.
import Buffer "mo:base/Buffer";
actor {
    let b = Buffer.Buffer<Nat>(2);
}
In this case, the types of elements in the buffer is Nat and the initial capacity of the buffer is 2.
To add an element use the .add() method.
b.add(0);   // add 0 to buffer
b.add(10);   // add 10 to buffer
b.add(100)    // causes underlying arrray to increase in capacity since the capacity was set to 2
To get the number of elements in the buffer use the .size() method. The size is different than the capacity we've mentionned earlier since it represents the number of elements that are actually stored in the buffer.
let b = Buffer.Buffer<Nat>(2);
b.add(0);
b.add(10);
b.add(100);
b.size();   // 3
To access an elements in the buffer, use the .get() method and provides the index. Traps if index >= size. Indexing is zero-based like with Array.
let b = Buffer.Buffer<Nat>(2);
b.add(0);
b.add(10);
b.add(100);
b.get(2);   // 100
A buffer can easily be converted to an array using the toArray() function from the Buffer library.
let b = Buffer.Buffer<Nat>(2);
b.add(0);
b.add(10);
Buffer.toArray<Nat>(b); // [0, 10];
🔗 List
Purely-functional, singly-linked lists. A list of type List
type List<T> = ?(T, List<T>);
"The difference between a list and an array is that an array is stored as one contiguous block of bytes in memory and a list is 'scattered' around without the elements having to be adjacent to each other. The advantage is that we can use memory more efficiently by filling the memory more flexibly. The downside is that for operations on the whole list, we have to visit each element one by one which may be computationally expensive." source
Read about Lists and Recursive types here.
Here is an example of a function that retrieves the last element of a particular list.
func last<T>(l : List<T>) : ?T {
    switch l {
        case null { null };
        case (?(x, null)) { ?x };
        case (?(_, t)) { last<T>(t) };
    };
};
💿 HashMap & TrieMap
In Motoko, HashMap and TrieMap are both implemented as a Class and have the same interface. The only difference is that TrieMap is represented internaly by a Trie while HashMap is using AssocList. All examples that will follow use HashMap but it would be similar for TrieMap.
- K is the type of the key (
Nat,Text,Principal...) - V is type of the value that will be stored (User data, Token balance...)
class HashMap<K, V>(initCapacity : Nat, keyEq : (K, K) -> Bool, keyHash : K -> Hash.Hash)
To instantiate a value from the class, we need to provide:
- An initial capacity of type
Nat.initCapacity : Nat - A function that can be used for testing equality of the keys.
keyEq : (K, K) -> Bool - A function that can be used for hashing the keys.
keyHash : K -> Hash.Hash
Let's imagine that we want to store a Student associated with his Principal. Where Student is defined as
type Student = {
    name : Text;
    age : Nat;
    favoriteLanguage : Text;
    graduate : Bool;
};
In that case:
- K is of type
Principaland represents the key of the HashMap. - V is of type
Studentand represents the stored value.
To initiate our HashMap
import HashMap "mo:base/HashMap";
import Principal "mo:base/Principal";
actor {
    type Student = {
        name : Text;
        age : Nat;
        favoriteLanguage : Text;
        graduate : Bool;
    };

    let map = HashMap.HashMap<Principal, Student>(1, Principal.equal, Principal.hash);
}
To add a new entry to the map we can use the .put() method.
map.put(principal, student);
This will insert the value student with key principal and overwrite any previous value. We can use this method to create a register function that students would need to call and provide all their relevant information.
public shared ({ caller }) func register(name : Text, age : Nat, favoriteLanguage : Text) : async () {
    if(Principal.isAnonymous(caller)){
        // We don't want to register the anonymous identity
        return;
    };
    let student : Student = {
        name;
        age;
        favoriteLanguage;
        graduate = false;
    };
    map.put(caller, student);
};
Once a value has been inserted in the map, we can access it using the .get() method.
map.get(principal);
This will return an optional value ?Student associated with the provided principal. We can use this method to create a getStudent query function that returns information about students.
public query func getStudent(p : Principal) : async ?Student {
map.get(p);
};
We can delete a value from the map by using the .delete() or remove() methods.
map.delete(principal);   // Delete but doesn't return the value
let oldValue = map.remove(principal);   // Delete but returns the value
It is possible to iterate over the map:
- You can iterate over the keys with
.keys(). - You can iterate over the values with
.vals(). - You can iterate over both with
.entries().
Lesson 7: Non-primitives Types.
👯 Tuples
Tuples are basic units that can encompass multiple elements. While the elements can vary in data type, once declared, the number and type of elements in a tuple cannot be altered. For instance, you could make a tuple that holds a student's name, age & favorite programming language.
type Student = (Text, Nat, Text);
let me : Student  = ("Bob Smith", 25, "Motoko");
In more complex situations, we would create our own object with named fields, making it more readable.
The empty tuple type () is called the unit type. It is usually used as return type for function that returns nothing.
public func print(t : Text) : async () {
    Debug.print(t);
};
🎨 Objects
Objects are more readable than tuples since each field has a name. The different fields are also each assigned a type which cannot be modified once declared.
Let's define an object called student, which contains 4 fields:
- name which is a
Textindicating the name of the student. - age which is a
Natindicating the age of the student. - favoriteLanguage which is a
Textindicating the favorite programming language of the student. - graduate which is a
Boolindicating whether the student graduated from the Motoko Bootcamp.
let student = {
    name = "John";
    age = 35;
    favoriteLanguage = "Motoko";
    graduate = true;
};
Similar to other variables in Motoko, objects can be mutable or immutable. The object we've just defined is immutable, once the fields have been assigned a value they cannot be modified.
let student = {
    name = "John";
    age = 35;
    favoriteLanguage = "Motoko";
    graduate = true;
};
student.age += 1;
This code will throw an error expected mutable assignment target.
To create an object that can be modified, we must use the var keyword in the field definition. Let's modify the previous example so that only the student's age can be changed, while the other fields remain constant.
let student = {
    name = "John";
    var age = 35;
    favoriteLanguage = "Motoko";
    graduate = true;
};
student.age += 1;
Objects are often assigned types. In this case we need to create a custom type. Let's define a type called Student which corresponds to the object we've previously created.
type Student = {
    name : Text;
    age : Nat;
    favoriteLanguage : Text;
    graduate : Bool;
};
🌈 Variants
A variant allows you to create a type that contains different cases. A value from the variant type represents one value that is exactly one of the given cases, or tags. Let's define a variant type for a Vehicle which can be either a car, a moto or a plane.
type Vehicle = {
    #Car;
    #Moto;
    #Plane;
};
Each tag can be associated it's own custom type.
type Car = { make : Text; model : Text; year : Nat; color: Text };
type Moto = { make : Text; model : Text; year : Nat; maneuverability : Text };
type Plane = { make : Text; model : Text; year : Nat; seats : Nat };

type Vehicle = {
    #Car : Car;
    #Moto : Moto;
    #Plane : Plane;
};
Variants are often used with switch/case, which allows to perform control flow on a variant object.
public func start(v : Vehicle) : async Text {
    switch(v){
        case(#Car(car)){
            // We can access the car object. For instance we can access the make field by using car.make
            let make = car.make;
            return("Vroom 🏎️");
        };
        case(#Moto(m)){
            // We can give the object any name that is convenient. In this case we can access the type by using m.type.
            let type = m.type;
              return("Roar 🏍️");
        };
        case(#Plane(x)){
            // Here we go again.. we can access the number of seats by using x.seats
            let seats = x.seats;
             return("Whoosh 🛫");
        };
    };
};
Lesson 8: Advanced Types.
❓ Optional types
In Motoko, as in many other programming languages, there is a special value called null used to represent the absence of a result. This is helpful when indicating that a function returns nothing. The value null is of type Null, which only contains one value: null.
Consider an array of names called names and a function called find_name that takes a list of names as input and returns the index of the first occurrence of the name in the array. If the name is not found, the function should return null instead of an index. This way, the function indicates that it did not find the name without producing an error.
The following code is not valid in Motoko:
let names : [Text] = ["Motoko", "Rust", "JavaScript", "TypeScript"];
public func find_name(name : Text) : async Nat {
    var index : Nat = 0;
    for(language in names.vals()){
        if (language == name){
            return index;
        };
        index +=1;
    };
    return null; // We haven't found any match so we return null.
};
Motoko throws an error because null is not of type Nat. To indicate that a function may return either a Nat value or null, we need a way to express that the function's return type can be one of two possibilities. The specific return value of the function depends on the input, which is unknown in advance, so we cannot predict if the function will return a Nat or null until it is executed.
We can use an optional type, ?T, to express this. In our case, we would use ?Nat. We can rewrite our code using this notation:
let names : [Text] = ["Motoko", "Rust", "JavaScript", "TypeScript"];
public func find_name(name : Text) : async ?Nat {
    var index : Nat = 0;
    for(language in names.vals()){
        if (language == name){
            return ?index;
        };
        index +=1;
    };
    return null; // We haven't found any match so we return null.
};
The optional type, indicated by ?, can be used with any other type, such as ?Text, ?Int, ?Bool, and more.
Also, the optional type is often used with the switch/case pattern in Motoko. This pattern allows you to handle an optional value and execute different parts of your code depending on whether the input value is null or not. You can use the switch/case pattern to check if an optional value is present and perform different actions based on that, resulting in more elegant and safer code.
public func handle_null_value(n : ?Nat) : async Text {
    switch(n) {
        // Check if n is null
        case(null){
            return ("The argument is null");
        };
        case(? something){
            return ("The argument is : " # Nat.toText(something));
        };
    };
};
Lastly, the Base library provides an Option module for operating on optional values. For example, you can use the Option.get() function to unwrap an optional value with a default value:
import Option "mo:base/Option";
actor {
    public func always_return_a_nat(n : ?Nat) : async Nat {
        return(Option.get(n, 0))
    };
}
This function takes a ?Nat as input and returns a Nat. If you provide a Nat as input, it will return the same value. However, if you provide null, it will return the default value, set to 0.
👤 Generic Type
A generic type, usually written as T, allows you to write functions and code that can adapt to different types. When we talk about T, it refers to whatever type you want. This means that you can create a single function or class that can handle multiple types of inputs or data, without having to write separate code for each type.
Let's imagine that we have a task at hand - to determine if the size of an array is even or not. We're going to write a function called isArrayEven that takes an array as an input and returns a Bool value indicating whether the size of that array is even or not.
public func isArrayEven(array : [Nat]) : async Bool {
    let size = array.size();
    if(size % 2 == 0){
        return true;
    } else {
        return false;
    };
};
This function works as intended, but is limited to arrays filled with Nat. So, what if we want to check the size of an array filled with Text or Int?
One approach would be to create a separate function for each possible type:
isArrayEvenNatisArrayEvenTextisArrayEvenInt
As you can imagine, this quickly becomes hard to manage and maintain. A better solution is to utilize the power of generics. With generics, we can write a single function that works for any type of array. It's a more elegant and efficient way to solve the problem. So, let's embrace our new friend - generics - and make our code more dynamic and flexible!
func isArrayEven<T>(array : [T]) : Bool {
    let size = array.size();
    if(size % 2 == 0){
        return true;
    } else {
        return false;
    };
};
Notice <T> following the name of the function. It means that this function now depends on the type of T. We need to specify the type of T when we want to use the function.
let array : [Nat] = [1,2,3,4];
let bool : Boolean = isArrayEvent<Nat>(array); // Replace T with the actual type when you use the function.
We've already used generics when playing with Buffer & Array without talking about it.
-
The type
Buffer<T>is a generic class and we need to provide a type when creating a new buffer.let b = Buffer.Buffer<Nat>(2); -
Array.append<T>is a generic function and we need to provide the type of the elements of the arrays we are concatening.let array1 = [1, 2, 3]; let array2 = [4, 5, 6]; Array.append<Nat>(array1, array2) // [1, 2, 3, 4, 5, 6];
🤫 Shared types
When information is sent to or received from an actor in Motoko, it uses specific data types called shared types. These shared types are used in public functions that can be accessed by other actors. So, shared types are the kinds of data that can be used as input or output for these public functions, allowing different actors to communicate with each other.
If we try to deploy the following actor:
actor {
  var mutableArray : [var Nat] = [var 1, 3, 5, 7];

  public func showArray() : async [var Nat] {
    return mutableArray
  };
}
We will encounter the following error: Error in file Main.mo:3:28 shared function has non-shared return type [var Nat] type [var Nat] is or contains non-shared type var Nat.
This happens because of a fundamental rule in actor systems: mutable variables (var) must remain private to their actor.
To understand why this rule exists, let's imagine a system without it:
- Actor A creates a mutable variable and shares it with Actor B
- Both Actor A and Actor B can now modify the same variable simultaneously
- If a bug occurs, it would be nearly impossible to track which actor changed the value and when
- This would lead to race conditions and unpredictable behavior.
======= To put it short - anything that you can modify in your the state of your canister should be consider private and you won't be able to share it with other actors.
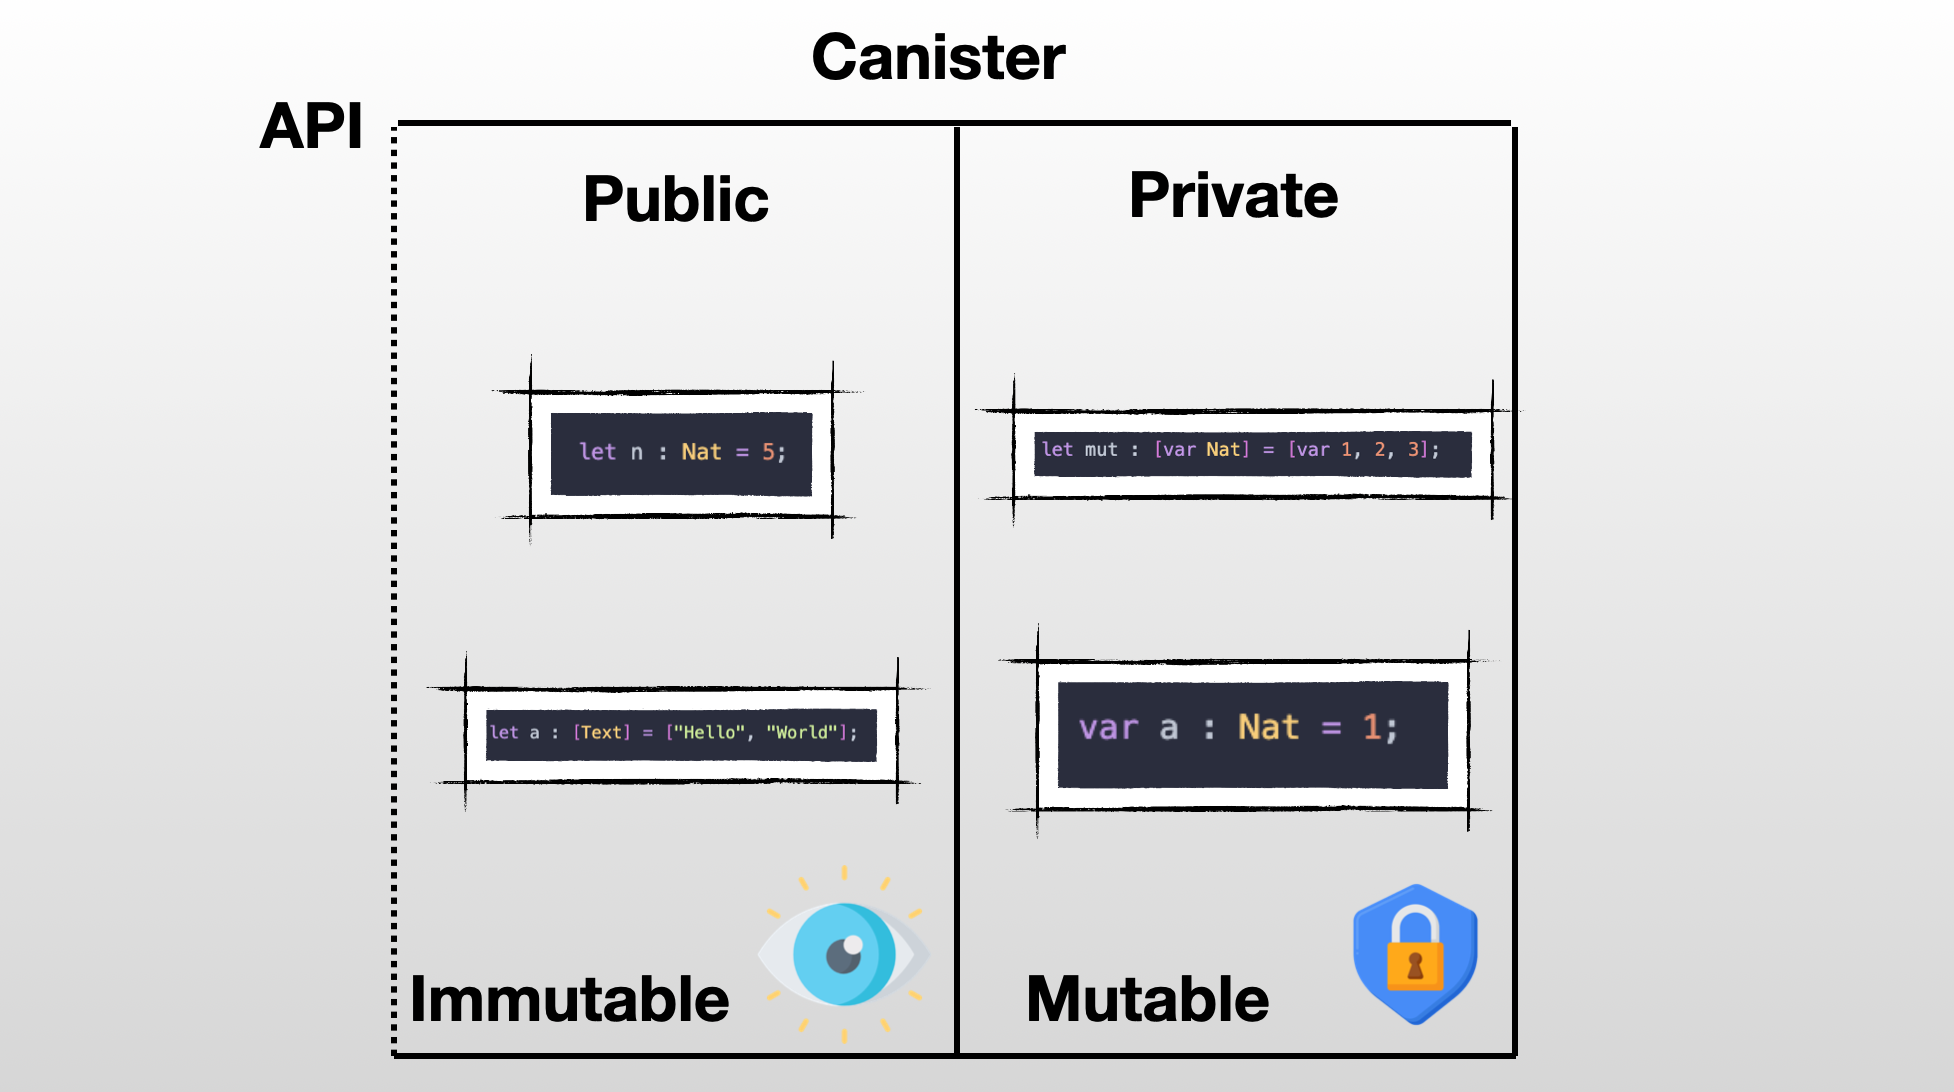
If it's a var you can't share it outside!
For a complete overview of all the shared types, refer to the Motoko Book.
Lesson 9: Handling errors.
In Motoko, when something doesn't work as expected, there are various ways to show that an error has occurred. Some methods include:
- Using the
Resulttype. - Trapping the program.
- Throwing error with the
throwkeyword or theErrorlibrary.
In this section we will see different options and learn when to use each one for managing errors effectively.
🚥 The Result type.
The Result type is extremly useful in Motoko to handle errors, it is defined as a variant type.
type Result<Ok, Err> = {#ok : Ok; #err : Err}
With Ok and Err, you can specify the types to return based on success or failure. For example, when creating a Result type for student graduation:
type Score = Nat; // The score of a student.
type ExamFailed = {
    #ScoreTooLow : Nat;     //  The score of the student.
    #Absent;    //  One reason for not passing an exam.
    #Cheated;   //  Another reason for not passing an exam.
};
- If a student graduates, their score is returned. The score is of type
Score, which is an alias forNat. - If a student fails, a variant indicating the reason for failure is returned. The variant is of type
ExamFailed.
Now we can use those new types to replace Ok and Err.
type ExamResult = Result.Result<Score, ExamFailed>;
In cases like our example, using a variant type for Err is quite common. It allows for better management of different error types and makes pattern matching easier. This means anyone reviewing the error can better understand its specific cause!
func sendMessageToStudent(result : ExamResult) : Text {
    switch(result) {
        case(#ok(score)){
            return ("Congrats 🎉 - you have graduated with a score of : " # Nat.toText(score));
        };
        case(#err(failure)){
            switch(failure){
                (#ScoreTooLow(score)){
                    return ("Unfortunately your score is below requirements. Next time you'll graduate! You had a score of : " # Nat.toText(score));
                };
                case(#Absent){
                    return ("You were absent at the exam. Please schedule another time.");
                };
                case(#Cheated){
                    return("Cheating is a short-term gain that leads to long-term pain");
                };
            };
        };
    };
};
When should I use the Result type?
Using Result to report errors in your API offers a significant benefit: it allows other developers and programs to handle errors predictably. That's why Result is often used for expected errors in your program when you want to return a value. Result will not impact the normal behavior of the program.
🪤 Trap & assertions.
A trap is a type of error that occurs during the execution of a message and cannot be resolved. The most common causes of traps are:
- Division by zero
let a : Nat = 5;
let b : Nat = 0;
let c = a / b;
- Index out of bounds
let names : [Text] = [];
- Assertion failure
assert(false);
In some situations, it can be useful to trap on purpose, with a defined message.
The best way to do so is to use the Debug.trap() method from the Debug library which allows you to pass an error message along the trap.
func trap(errorMessage : Text) : None
Assertions
Using the assert keyword to construct assertions lets you check if a certain condition is met. If the condition inside assert() is false, the program will stop running. If it's true, the program will continue as normal.
assert(2 == 1); // always traps
assert n % 2 == 0; // traps only when n not even
assert(true); // never traps
When should I use a Trap?
Traps immediately stop the current task (i.e message) being executed by a canister, but they don't prevent the canister from handling future requests. Traps should be used for unexpected situations. For example, the unwrap function below:
/// Unwraps the value of the option.
public func unwrap<T>(option : ?T) : T {
    switch option {
        case (?value)
            value;
        case null
            Debug.trap("Value is null - impossible to unwrap");
    }
};
Traps have a very useful feature: if a function traps, the canister's state will be reverted. This will be discussed further in the context of inter-canister calls.
🔀 Handling asynchronous errors with the Error type and try/catch.
In this section the term error refers specifically to any value of type
Error.
In Motoko, error handling can be a bit confusing, especially if you are used to error handling in other programming languages. Here are some key points to keep in mind:
- Errors can be thrown using the
throwkeyword. - Errors can be handled using the
try/catchpattern. - An error is of type
Error, which can also be manipulated using the Error library.
However, error handling in Motoko can only be done in an asynchronous context. This means that you can only throw or catch errors in the body of a shared function.
In this example, we define an actor that contains two functions: throwErrorSync and throwErrorAsync.
import Error "mo:base/Error";
actor {
  // Misplaced throw
  func throwErrorSync() : () {
    throw Error.reject("This will not work");
  };

  // Can throw an error in a shared/public function - this error will be consumed by another canister/user calling this function.
  public func throwErrorAsync() : async () {
    throw Error.reject("This will not work");
  };
}
You can see this example in the Motoko Playground - note the
misplaced throwmessage in the body ofthrowErrorSync.
The try/catch pattern in Motoko is particularly useful when you are attempting to call another canister and want to handle any possible errors that may occur during the call. This can include situations such as:
- The target canister is not live or cannot be reached.
- The function being called does not exist on the target canister.
- The function being called traps, either due to a programming error or because it has run out of resources.
- The function being called throws an error that needs to be handled.
Assuming this is our canister A - deployed with the canister id xxx
actor {
    public func foo() : async Text {
        return "foo";
    };
}
Assuming this is our canister B
actor {

    let canisterA = actor("xxx") : actor {
        foo : shared () -> async Text;
    };

    public func fooFromCanisterA() : async Text {
        try {
            let foo = await canisterA.foo()
            return foo;
        } catch (e) {
            return "An error occured when calling canister A";
        }
    };
}
In the provided example, we have two canisters: Canister A and Canister B.
- Canister A has a single public function
foothat returns the text "foo". - Canister B has a public function
fooFromCanisterAthat attempts to call thefoofunction on Canister A using thetry/catchpattern. If the call tocanisterA.foo()is successful, the function returns the value offoo. If an error occurs during the call, it is caught by the catch block, and the function returns the text"An error occurred when calling canister A".
This example illustrates how the try/catch pattern can be used to handle errors when calling functions on other canisters, ensuring that your program continues to execute gracefully even if an error occurs during the call.
🤔 Final words
Dealing with all these different situations and ways of handling unexpected issues can be confusing at first, especially when it comes to the actor model and asynchronous contexts. But don't stress if you don't get it all right away. The best way to understand it is to get some practice and as you'll encounter different situations your understanding will strengthen!
Lesson 10: Identity on the Internet Computer.
Your keys = Your identity
Whether you are interacting with the Internet Computer using Internet Identity, dfx, or even Plug wallet, your identity is represented by a key pair consisting of:
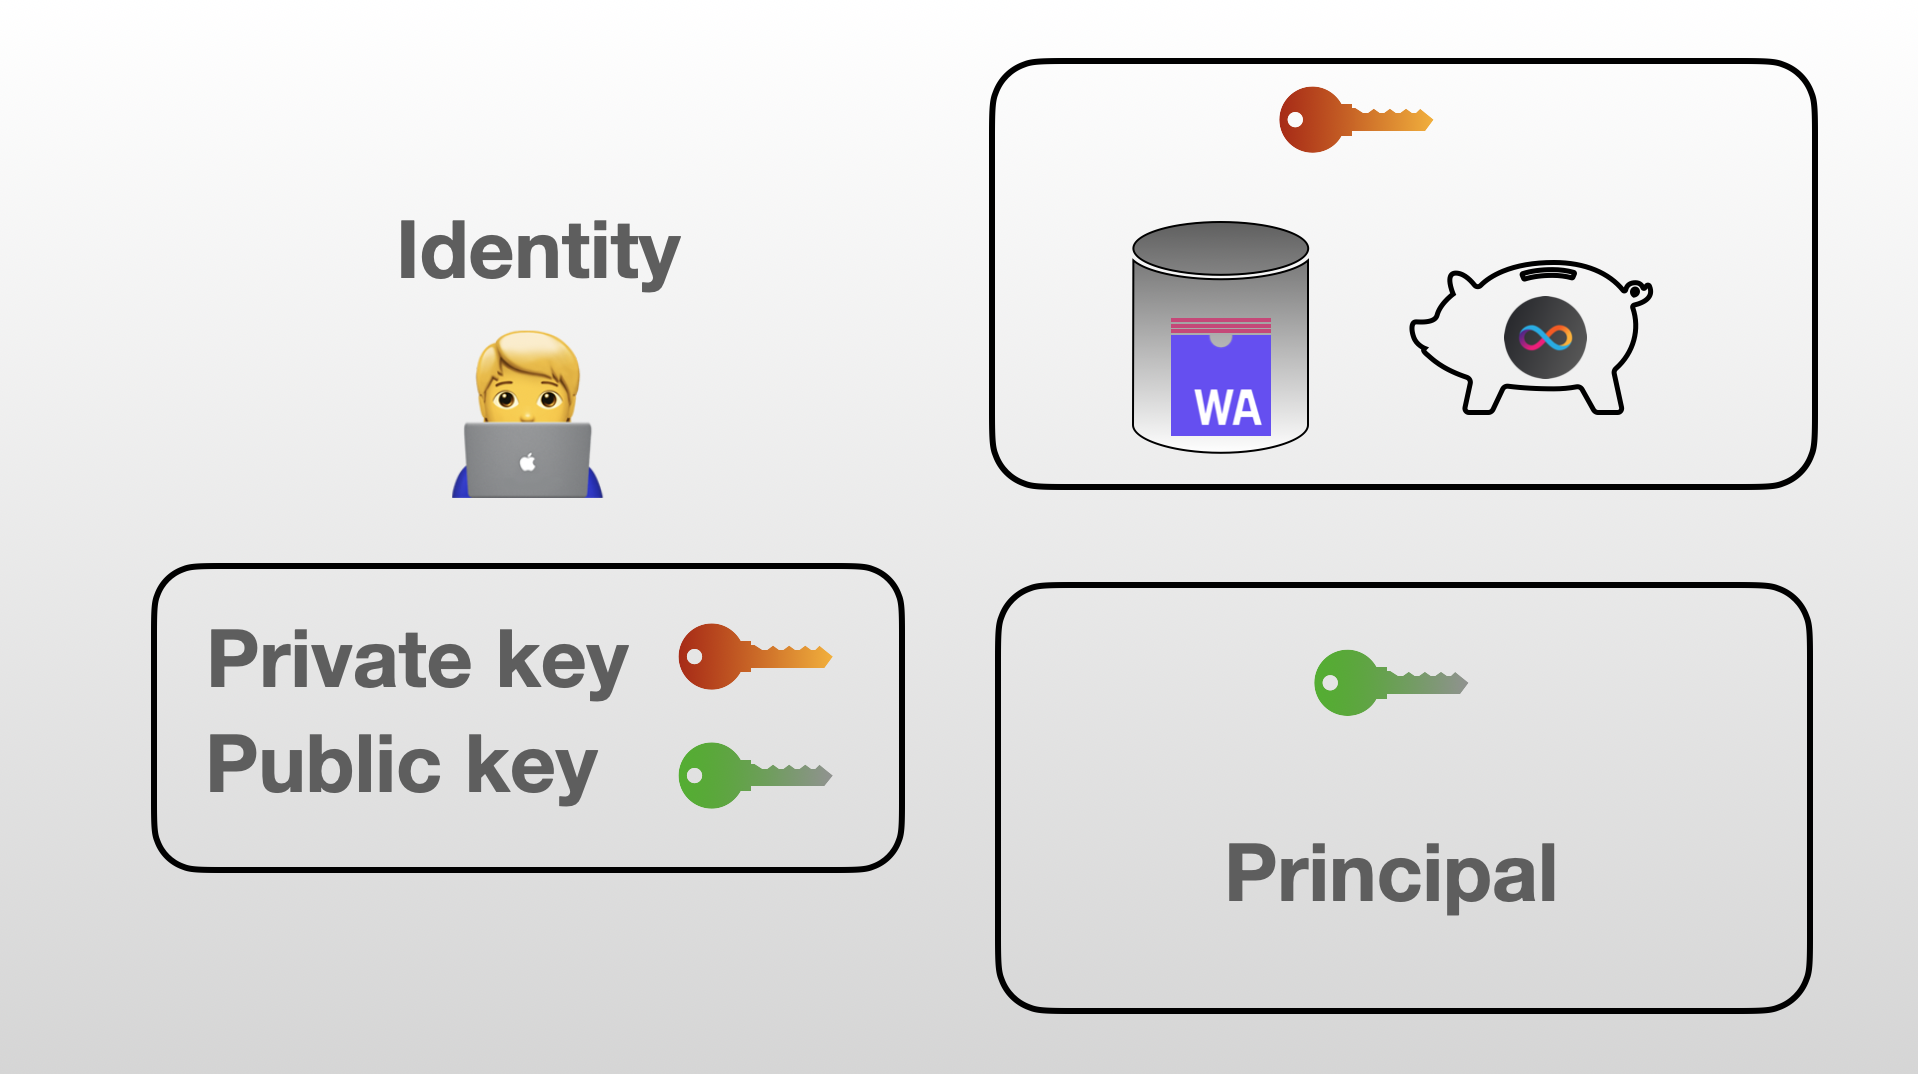
- A private key, which grants you access to all the ICP tokens you own, allows you to manage canisters, and enables you to access your identity across various applications.
- A public key, from which your principal is derived.
Managing identities with dfx
We can use dfx to create, delete and manage our identities, those identities are used to deploy, manage and interact with the canisters we deploy.
Creating an identity
To generate a new identity you can run the following command
$ dfx new identity <NAME>
You can include the --disable-encryption flag when executing the command to prevent encryption of the file containing your private key. Otherwise, the file will be encrypted, and you will be prompted for a password every time a command requiring a signature is used.
The private key generated for this identity will be automatically saved in the .config/dfx/identity/<NAME> directory. This private key is stored as a PEM file, a specific format used for storing keys. The file may be encrypted or unencrypted, based on the flag you choose.
For example, the PEM file corresponding to the default identity, which is an identity automatically created when you install dfx, has a private key stored within that resembles the following:
-----BEGIN EC PRIVATE KEY-----
MHQCAQEEIPkmcU+rvYCcvylnVClTrleDyWqmelhQmigzMvq8zFC3oAcGBSuBBAAK
oUQDQgAE5knNEHs+kzvCteeu4e650NzqGvLhlzoWXXKupjCreV1dhuH5oIHIVyoM
ldnRBAE39QwyGwkQoxWhmo+Sl9F4zA==
-----END EC PRIVATE KEY-----
Switching between identities
To check the current used identity, execute:
$ dfx identity whoami
To view other available identities, run:
$ dfx identity list
Finally, switch the active identity using:
$ dfx identity use <NAME>
From Public Key to Principal
With dfx, you can access a unique identifier for each identity called principal:
$ dfx identity get-principal
2ujkt-fujau-bunuv-gt4b6-2s27j-cv5qi-kddkp-jl7m4-wdj3e-bqdrt-qqe
A principal identifies entities interacting with the Internet Computer and is directly derived from the public key. These entities can be users or canisters. We distinguish different types of principals:
- Self-authenticating IDs (User): Derived directly from a user's public key, such as your dfx identity's principal. These principals are 29 bytes long.
- Opaque IDs (Canister): A canister's principal is its canister ID, determined automatically based on its subnet and the number of deployed canisters.
- Anonymous ID (Anonymous): The default caller when an unauthenticated user calls functions, such as fetching information from a canister before logging in. The canister recognizes the caller as the Anonymous ID since the user's principal is unknown until login.
Two additional principal types exist but are rarely encountered. They are used internally by the protocol or reserved for future use.
Principal in Motoko
In Motoko, principals are a primitive type called Principal.
Within an actor, access the principal of a function caller using the shared (message) syntax placed between the public and func keywords. This enables message inspection, where message.caller represents the principal of the calling entity (user or canister).
actor {
    public shared (message) func whoIsCalling() : async Principal {
        let p = message.caller;
        return p;
    };
};
Message is a special object that is available to all
public shared functions. As of today, it is only used for accessing thecallerproperty but it might have other use cases in the future.
Use object destructuring to access the caller directly for shorter syntax:
actor {
    public shared ({ caller }) func returnCallerPrincipal() : async Principal {
        return caller;
    };
};
Use Principal.toText() and Principal.fromText() from the Principal module to convert between Principal and its textual representation.
let p : Principal = message.caller;
let textualRepresentation : Text = Principal.toText(p); // => "un4fu-tqaaa-aaaab-qadjq-cai"
let standardRepresentation : Principal = Principal.fromText(textualRepresentation);
The Anonymous identity
As mentioned earlier, the anonymous identity is associated with a specific principal and is used for unauthenticated calls to the Internet Computer. To determine if a caller is authenticated, use the Principal.isAnonymous() function, which returns a Bool indicating the user's anonymity.
let p : Principal = message.caller;
let isAnonymous : Bool = Principal.isAnonymous(p);
if(isAnonymous){
    return ("Sorry only authenticated users can access this app!");
};
The textual representation of the anonymous principal is
2vxsx-fae. Make sure to remember it as you will often come accross it.
Lesson 11: Intercanister calls.
To achieve the vision of the Internet Computer, services (i.e canisters) needs to be able to call each other and run in an interoperable way. This capability is achieved through inter-canister calls. In this lesson, we will see how we can realize such calls and the potential issues to avoid.
A simple example
To illustrate inter-canister calls we will use the following example, with 2 canisters:
- Secret canister: This canister stores a secret password and this password should be divulgated only to users that paid. To verify payments, a mechanism of invoices is used.
actor Secret {
    getPassword : shared () -> async Result.Result<Text, Text>;
};
- Invoice canister: This canister is responsible for creating, storing and checking the status of invoices.
actor Invoice {
    createInvoice : shared () -> async InvoiceId;
    checkStatus : shared (id : InvoiceId) -> async ?InvoiceStatus;
    payInvoice : shared (id : InvoiceId) -> async Result.Result<(), Text>;
};
Where invoices are defined as follows:
public type InvoiceId = Nat;
public type InvoiceStatus = {
    #Paid;
    #Unpaid;
};
public type Invoice = {
    status : InvoiceStatus;
    id : InvoiceId;
};
For the purpose of this lesson, this example is oversimplied. If you are interested in how a real invoice canister looks like, check the invoice canister from DFINITY.
Calling an actor by reference.
The most straighforward way to call another canister is by reference. This technique will always work, whether you are working locally or on mainnet but it requires two things about the canister you want to call:
- The canister id.
- The interface of the canister (at least partially).
For the sake of this example, we will assume that the Invoice canister is deployed with the following canister id: rrkah-fqaaa-aaaaa-aaaaq-cai. To call this canister from the Secret canister we use the following syntax in secret.mo. Any type used in the interface needs to be imported or defined previously in secret.mo.
let invoiceCanister = actor("rrkah-fqaaa-aaaaa-aaaaq-ca") : actor {
    createInvoice : shared () -> async InvoiceId;
    checkStatus : shared (id : InvoiceId) -> async ?InvoiceStatus;
    payInvoice : shared (id : InvoiceId) -> async Result.Result<(), Text>;
};
Once invoiceCanister is defined, any function can be called. For instance, that's how you would call createInvoice.
let invoiceId = await invoiceCanister.createInvoice();
When you import an actor by reference, you only need to specify the interface that you plan to use. For instance, if you take a look at secret.mo we never use the payInvoice function. That's why we could simplify the actor declaration.
let invoiceCanister = actor("rrkah-fqaaa-aaaaa-aaaaq-ca") : actor {
    createInvoice : shared () -> async InvoiceId;
    checkStatus : shared (id : InvoiceId) -> async ?InvoiceStatus;
};
Importing locally
For this section, check the source code in [ADD LINK]. When you are working locally, assuming that your canister is defined in
dfx.jsonas follows.
{
  "canisters": {
    "invoice": {
      "main": "invoice.mo",
      "type": "motoko"
    },
    "secret": {
      "main": "secret.mo",
      "type": "motoko"
    }
  }
}
You can the following syntax at the top of your main file.
import invoiceCanister "canister:invoice"
actor Secret  {

    let invoiceId = await invoiceCanister.createInvoice();

};
Generally, to import a canister locally, you use the following syntax at the top of your main motoko file:
import Y "canister:X"
X is the name given in dfx.json to the canister you are tring to import. Y is how you want to reference the import in the following code.
Importing on the mainnet
This syntax is currently not available due to tooling limitations but will be available at some point.
Finding the interface of a canister
Before calling another canisters, you might want to check its interface. To find the interface of any canister, you can use the Internet Computer Dashboard.
- Navigate to the the dashboard.

- In the search bar, enter the ID of the canister you want to examine.

- Scroll down through the list of methods until you reach the Canister Interface section.
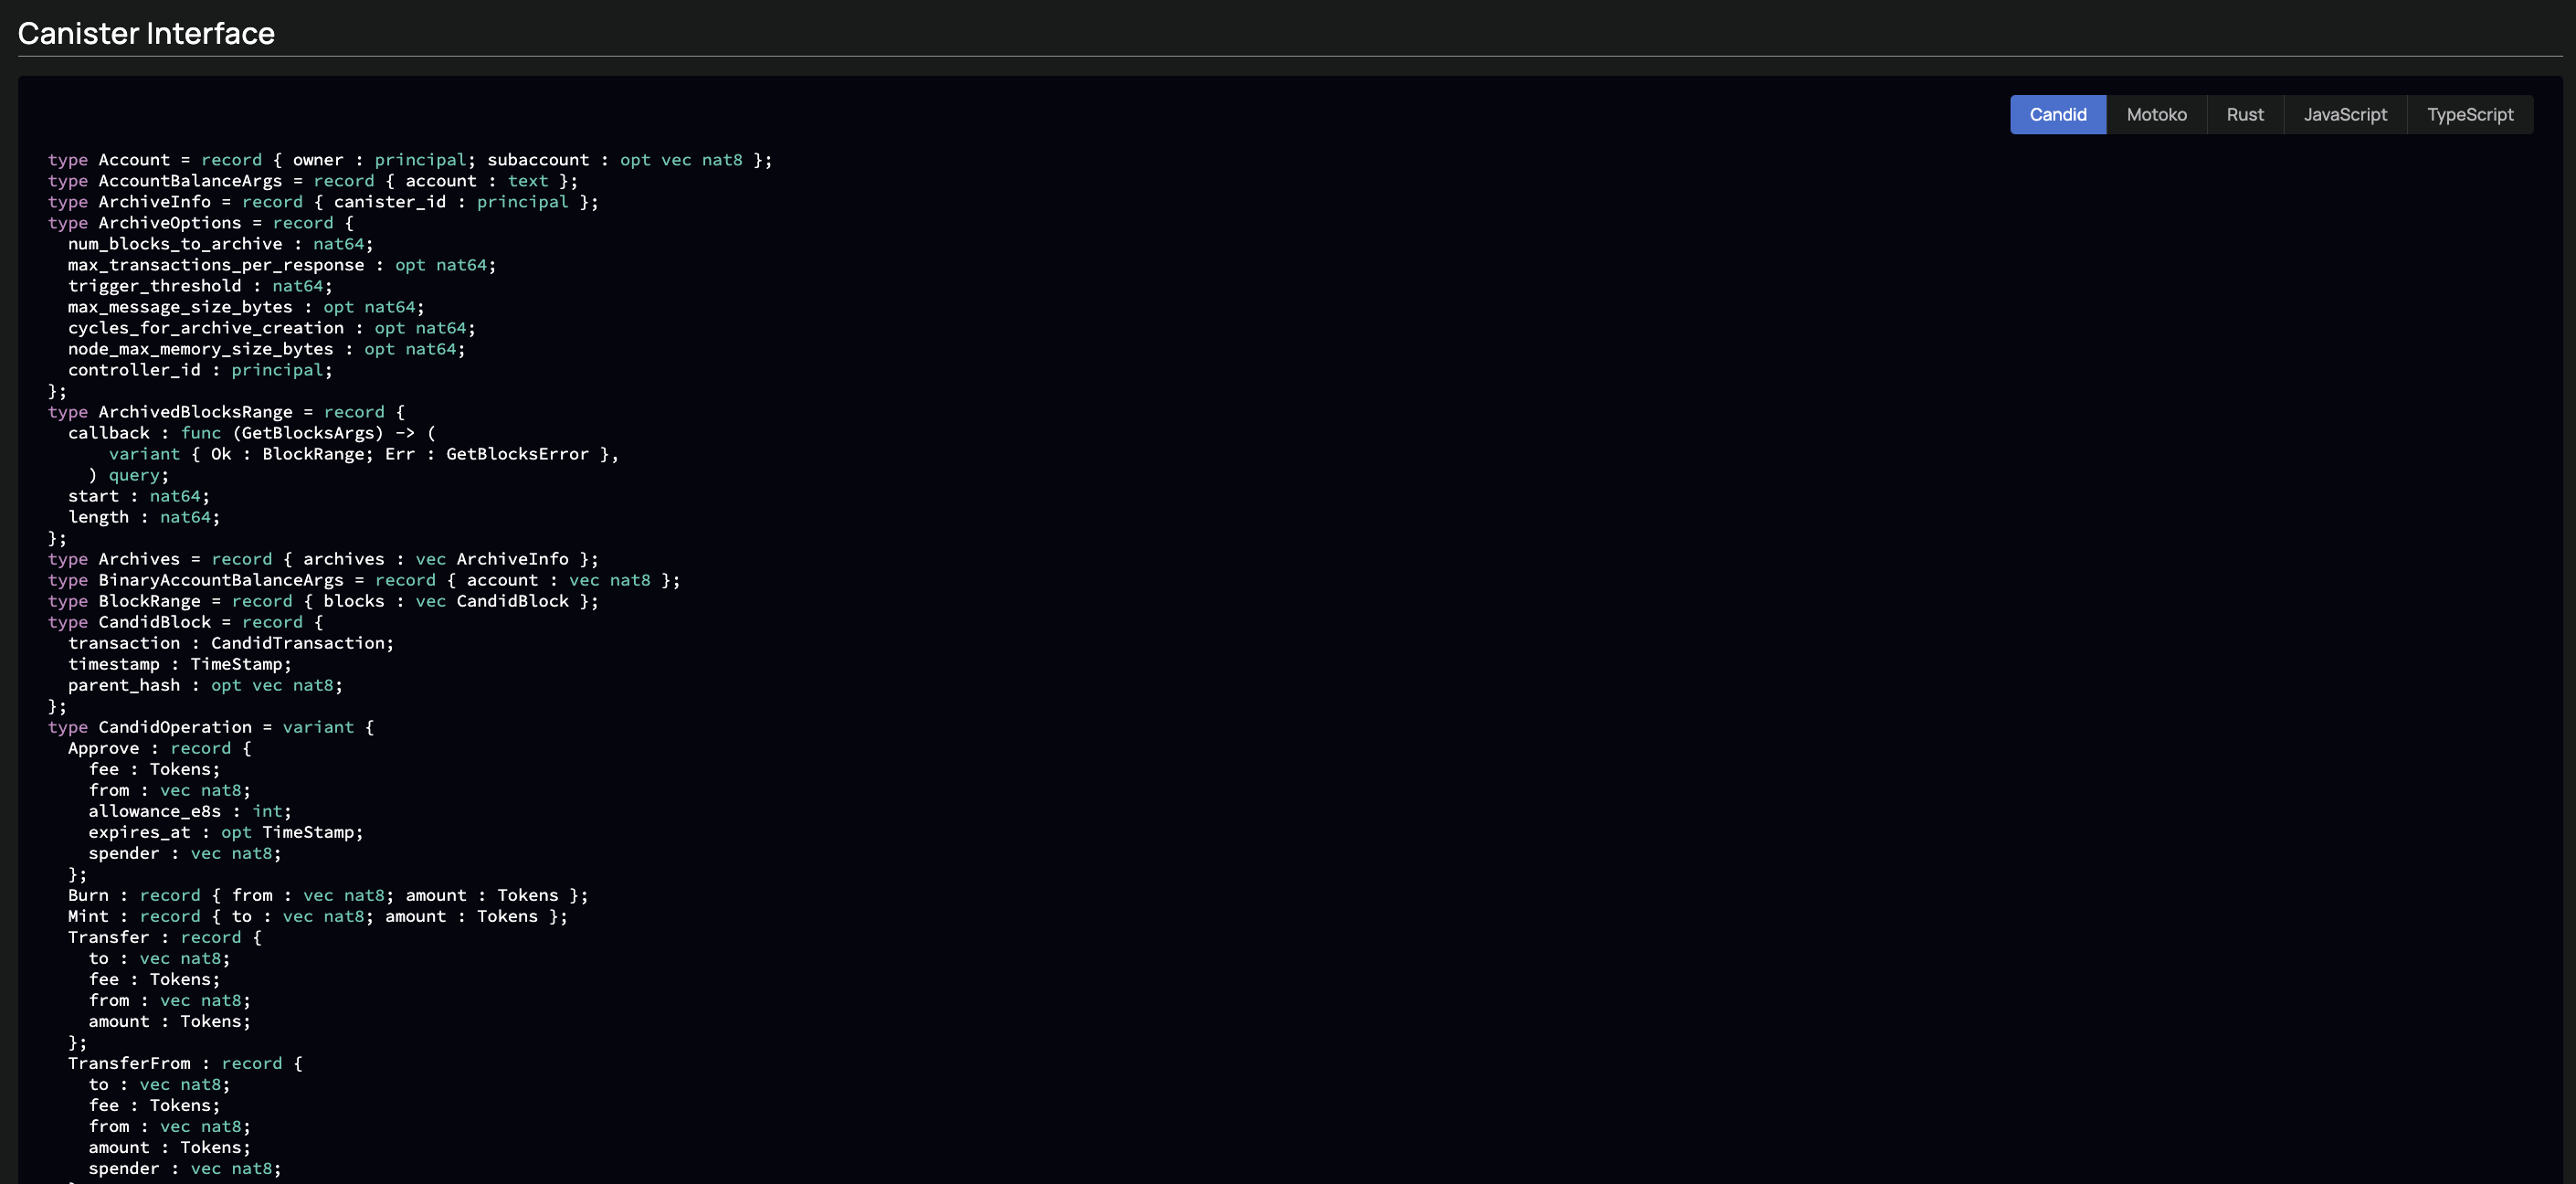
- Here, you can view a list of all public types used and the interface of the service, that lists all public methods.
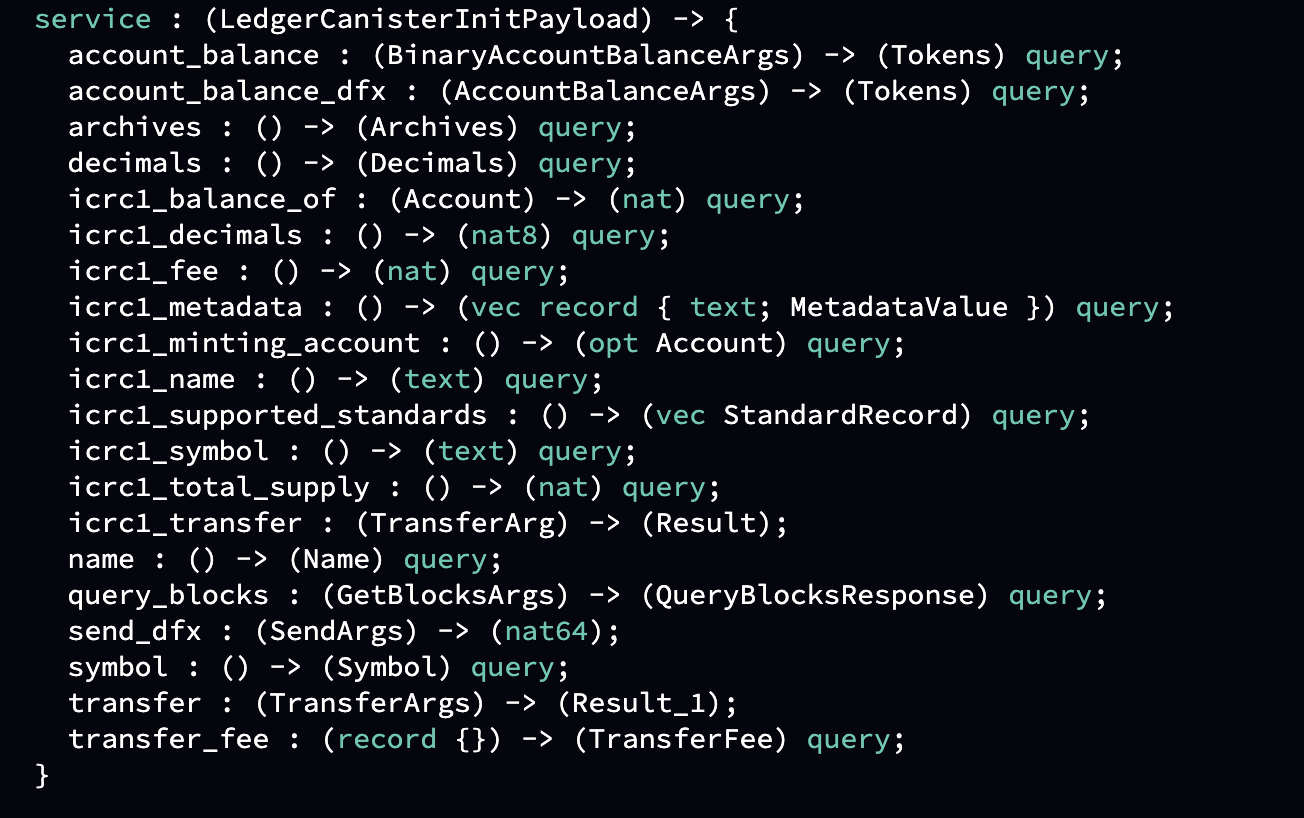
- You can use the different tabs to see the interface in different languages (Candid, Motoko, Rust, JavaScript, Typescript).
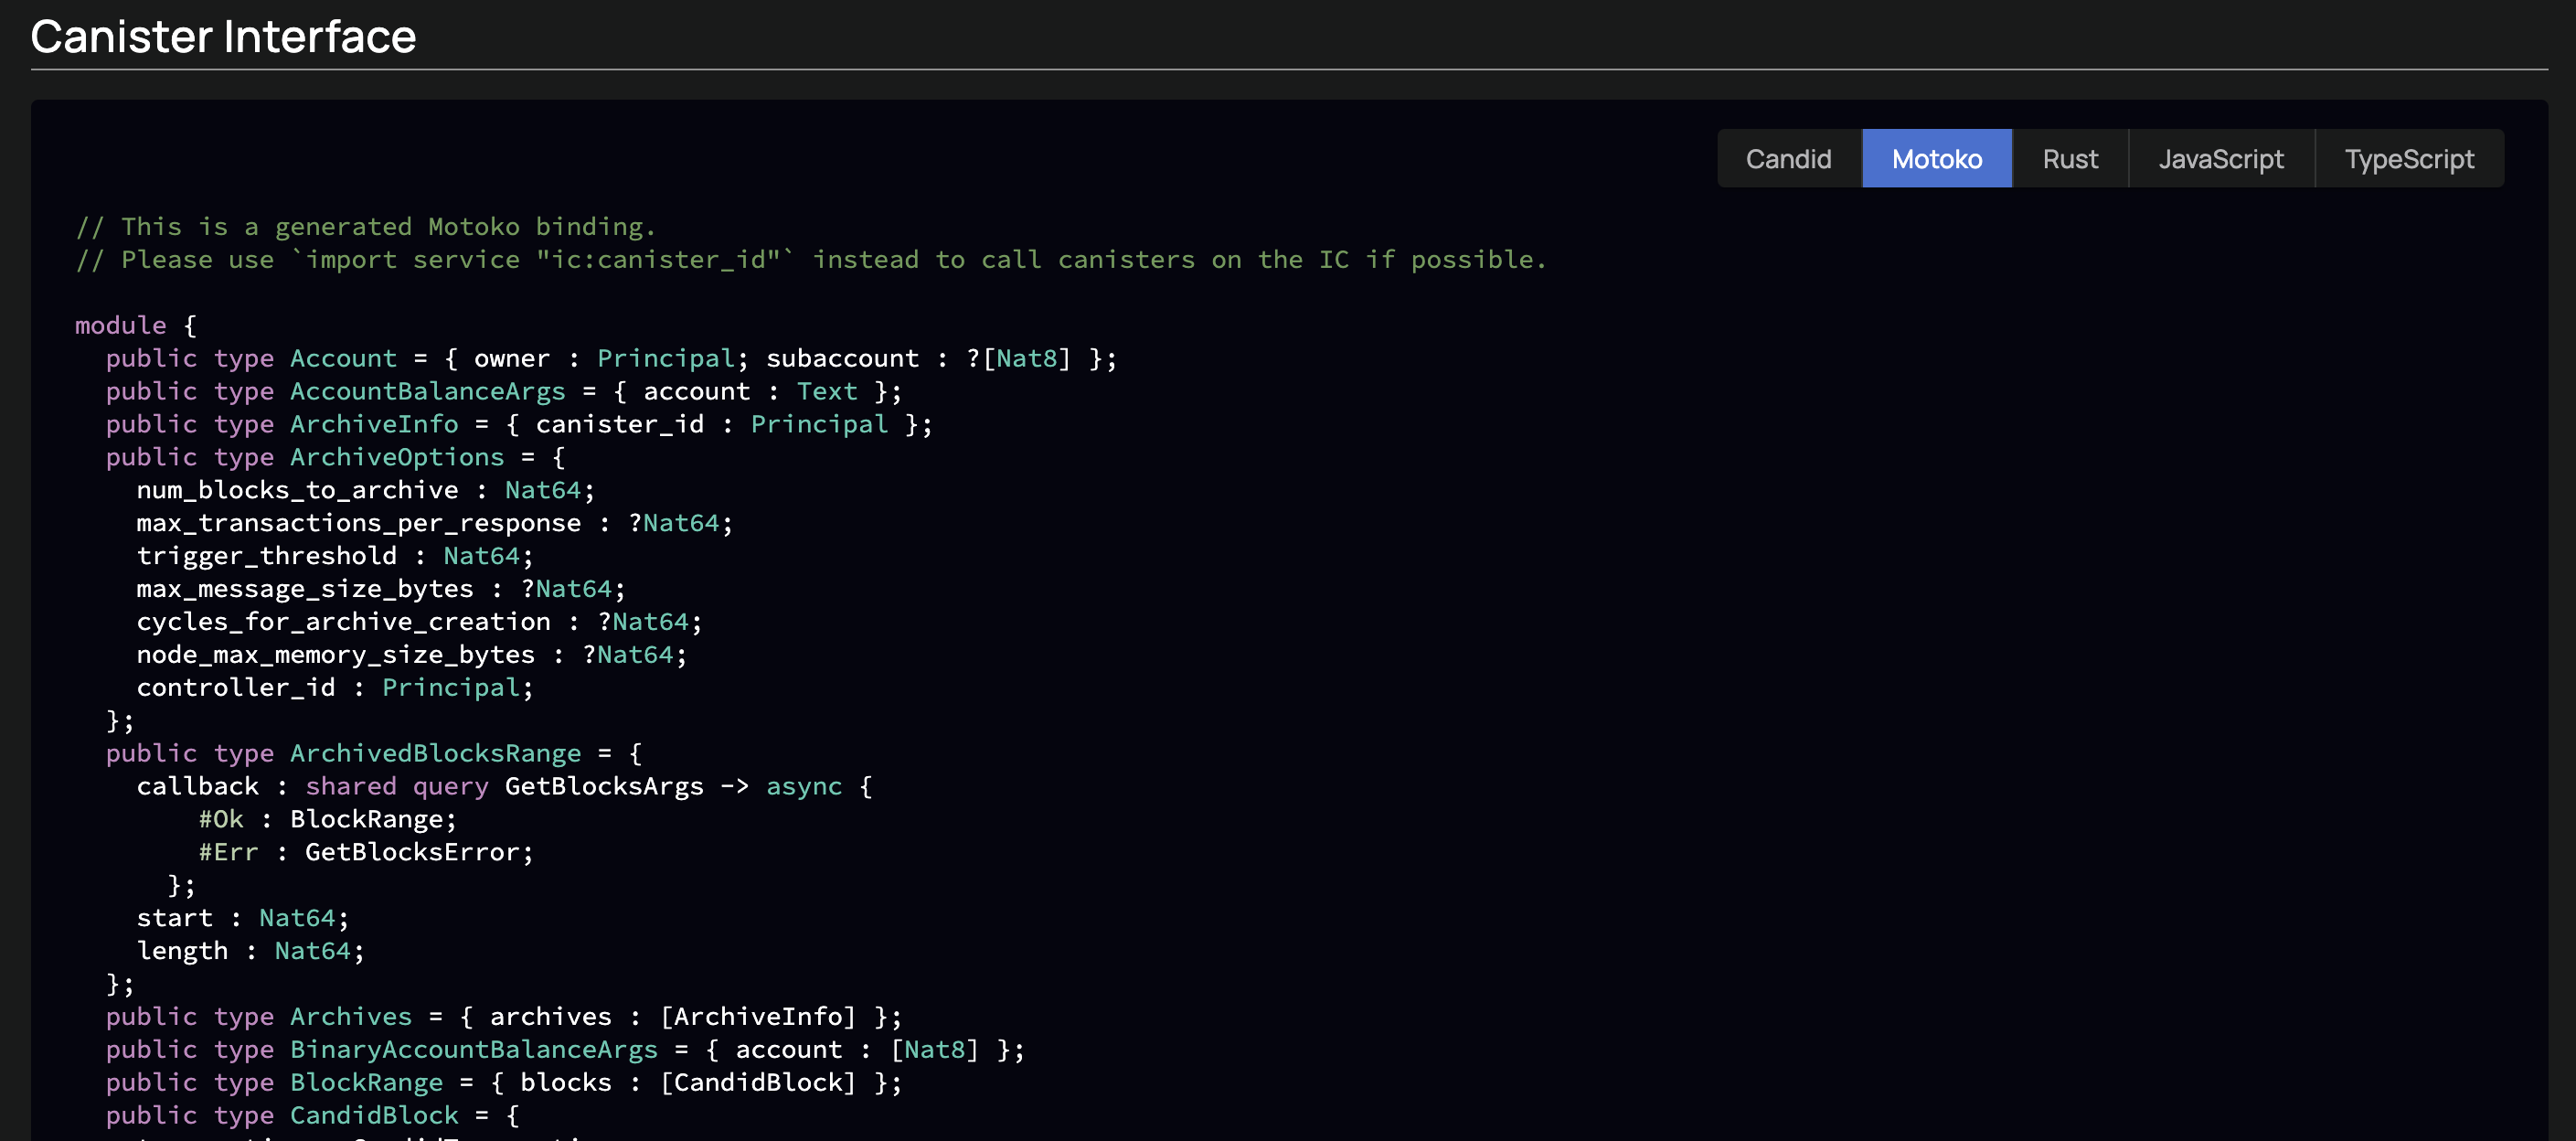
Async values.
A canister processes its messages sequentially (one at-a-time), with each message representing a call to a public function.
Suppose you are canister A and you are calling canister B. The following sequence of events occurs:
- Canister A receives a message, which triggers a function. This function then initiates an inter-canister call which results in canister A sending a message to canister B.
- Canister B already has a queue of 2 messages, so the new message is added to the end of the queue.
- Canister A continues to receive and process additional messages, while canister B processes it's messages one-at-a time.
- Canister B eventually sends a response to canister A. The message is added to the queue of canister A.
As you can see, between the instant you call a canister and the moment you receive a response, various events can happen, such as a user calling a function, an answer from a previous message returning, or another canister calling one of the public functions. These events can result in the internal state of the canister being significantly different from what you initially anticipated. Always keep that in mind!
Intra-Subnet vs Inter-Subnet
Intra-Subnet
When canister A and canister B belong to the same subnet, consensus is not required for inter-canister calls. This is because the inter-canister call results from a message being processed that had already been agreed upon during the previous consensus round. There is an upper limit to the amount of computation that can be handled within a single consensus round; however, assuming this limit is not surpassed, canister A will receive its response in the same round.
Inter-Subnet
When canister A and canister B are on different subnets, things get a bit trickier.
In such scenarios, messages need to travel via the XNet messaging system. This system is a protocol specifically designed to facilitate interactions across different subnets. It operates using a structure known as subnet streams.
Let's illustrate this with an example: Assume canister A resides in subnet A and it wants to send a message to canister B located in subnet B. In this case, the message would travel through the subnet stream from subnet A to subnet B. This subnet stream is consistently verified by the subnet each round. This is a crucial step as it allows subnet B to confirm the authenticity of the incoming messages. Since subnet B has access to the public key of subnet A, it can validate the signature on the certification, ensuring the integrity of the communication.
Here’s what happens, step by step:
- Message Reception at Canister A: A user sends a message to canister A. This message initially requires one consensus round to be processed by the subnet.
- Processing and Triggering Inter-Canister Call: Canister A takes over, processing the received message. During this process, it triggers an inter-canister call. This, in turn, generates a message in the subnet stream of subnet A aimed at subnet B. It’s important to note that this stream must be certified by the subnet, a process that typically occurs at the end of the execution cycle.
- Message Reception at Subnet B: Now, subnet B comes into play. It receives the message as a part of the subnet stream originating from subnet A. Here, it conducts a verification check to authenticate the message. Once verified, it adds the message to a block for processing.
- Processing at Canister B: Finally, canister B gets the message and processes it accordingly.
Lesson 12: Upgrading a canister.
Upgrading a canister is a common task. However, there are a few things to consider before doing so, notably:
- Could the upgrade cause data loss?
- Could the upgrade break the dApp due to interface changes?
Stable memory vs Heap memory.
A canister has access to two types of memories:
-
A wasm heap which is constrained to 4 GiB because currently the runtime of canisters wasmtime has only 32 bit addressing. This limit will be increased when wasm64 is supported by the runtime. The heap is a “pile" of memory, it is space available to the canister to allocate and de-allocate as needed. The heap is wiped during upgrades. The heap is the fastest memory available to the canister.
-
A stable memory that can currently store up to 48GiB of storage. Everything in stable memory will survive upgrades. Accessing data in stable memory is slower compared to accessing memory in the heap because stable memory is not directly accessible within the runtime environment. Instead, accessing stable memory requires calling an external API.
Developers who are new to the IC often ask the question: which memory should I use? Unfortunately, there is no one-size-fits-all answer to this question. The optimal choice depends on the requirements of your application (safety during upgrade over performances) and the amount of memory you'll need. If you are interested, read & join the discussion over this topic that is constantly evolving.
Stable variables.
When a canister is upgraded, the state is lost by default. This means all data application data will be lost, unless it's handled to persist when the canister is upgraded.
This can be achieved by storing the data in stable variables, which will persist during upgrades. To declare a variable as stable we use the stable keyword.
stable var m : Int = 0;
The value of m will persist upgrades and not be lost.
A stable variable is stored in the stable memory.
Stable types.
Unfortunately, not all variables can be declared as stables.
stable let map = HashMap.HashMap<Principal, Student>(1, Principal.equal, Principal.hash);
If we try with the HashMap type that we've seen earlier we will encounter an error: variable map is declared stable but has non-stable type.
All primitives types are stable:
NatTextInt- All bounded numbers:
Nat8,Nat16,Nat32,Nat64,Int8,Int16,Int32,Int64. FloatCharBoolArray
An object that contains methods (i.e a Class) cannot be stable. That's why HashMap & TrieMap cannot be declared as stable structures.
It is possible to rewrite some libraries to convert them to stable types. For instance, StableBuffer is a remake of the
Buffertype allowing it to be called stable.
Interface changes.
Another challenge when upgrading a canister in a distributed environment like the Internet Computer is that other canisters might be relying on the interface of the canister being upgraded.
Let's imagine that we have two canisters:
- Canister A is the canister that we want to upgrade. It contains many public functions but we will just focus on
getDiploma.
import HashMap "mo:base/HashMap";
import Principal "mo:base/Principal";
import Time "mo:base/Time";
actor School {

    type Diploma = {
        delivery_time : Time.Time;
        teacher : Principal;
        promotion : Nat;
    };

    let diplomas = HashMap.HashMap<Principal, HashMap>(0, Principal.equal, Principal.hash);

    public func getDiploma(p : Principal) : async ?Diploma {
        return diplomas.get(p);
    };

};
- Canister B is the client canister that is relying on the interface of Canister A. We have to imagine that somewhere in the code of Canister B the
getDiplomafunction of Canister A is called. [TODO : Change canister ID];
actor dApp {
    type Diploma = {
        delivery_time : Time.Time;
        teacher : Principal;
        promotion : Nat;
    };

    // We define the other canister in the code here.
    let schoolActor : actor {
        getDiploma(p : Principal) -> async ?Diploma;
    } =  actor("3db6u-aiaaa-aaaah-qbjbq-cai");

    public func shared ({ caller }) isAuthorized() :  async Bool {
        let answer = await schoolActor.getDiploma(caller);
        switch(answer){
            case(null){
                return false;
            };
            case(? some){
                return true;
            };
        };
    };
};
Suppose we're upgrading canister A and we decide to remove the getDiploma function. If we do that, it will cause problems for canister B because it relies on that function. But it's not just removing the function that could cause issues. If we modify the function's signature to something like this:
getDiploma(p : Principal) -> async Result.Result<Diploma, Text>;
That change alone would also break canister B's code.
Whenever a canister on the IC is upgraded, it causes a risk to all relying canisters, we have to find a way to not break things!
That's where the magic of Candid comes into play!
Candid defines a formalism and precise rules to make sure that any modification of the interface (adding new methods, changing function signatures, expecting additional arguments...) doesn't break existing clients.
For instance, evolving the signature of the getDiploma function from
getDiploma(p : Principal) -> async ?Diploma;
to
getDiploma(p : Principal, bootcampYear: ?Nat) -> async ?Diploma;
Would not cause an issue. When reading messages from old clients, who do not pass that argument, a null value is assumed.
In the following examples, all types and interfaces are expressed in Candid format.
Let's look at more examples of what can and can't be done. Imagine the following service
service counter : {
  add : (nat) -> ();
  subtract : (nat) -> ();
  get : () -> (int) query;
}
The function add could evolve from
add : (nat) -> ();
to
add : (int) -> ();
This is possible because every nat is also an int. If a client provides a Nat it will be compatible with the new expected type. We say that int is a supertype of nat. However evolving the other way wouldn't be possible since all int are not nat.
Additionally the function add and subtract could evolve from
add : (nat) -> ();
subtract : (nat) -> ();
to
add : (nat) -> (new_val : nat);
subtract : (nat) -> (new_val : nat);
This is possible because any new returned value that is not expected by old clients will simply be ignored. However, adding new (non-optional) parameters wouldn't be possible.
To safely upgrade a canister, follow those rules:
- New methods can freely be added.
- Existing methods can return additional values. Old clients will simply ignore additional values.
- Existing methods can shorten their parameter list. Old clients will send the extra argument(s) but they will be ignored.
- Existing methods can only add optional types as new parameters (type
opt). When reading messages from old clients, who do not pass that argument, anullvalue is assumed. - Existing parameter types may be changed, but only to a
supertypeof the previous type. For instance anatparameter can be changed to aint. - Existing result types may be changed, but only to a
subtypeof the previous type. For instance anintresult can be changed to anat.
If you want more information on Candid, supertypes and subtypes, check the reference guide.
Data structure changes.
Another example of how data can be lost, is by changing the data types.
stable var state : Int
In this example the variable state is Int, but let's imagine that during an update the type is changed to Text
stable var state : Text
In this case the the current Int value will be lost. One way to avoid the data loss when changing the data types is to keep the original variable, and create a new variable for the new data type. This way the original data will not be lost due to canister upgrades.
Stable type signature.
The list of all stable variables of an actor is called the stable signature. The textual representation of the stable signature looks similar to an actor declaration.
actor {
  stable x : Nat;
  stable var y : Int;
  stable z : [var Nat];
};
The stable signature of an actor can be generated using the Motoko compiler: moc.
The stable signature is used to automatically check type compatibility before an upgrade. This is possible by comparing the signature of the new actor with the old one and using some rules based on Candid. For more information, see the reference section on stable signatures.
Metadata section.
The Motoko compiler embeds the Candid interface and stable signature of a canister as canister metadata, recorded in additional Wasm custom sections of a compiled binary.
This metadata can be selectively exposed by the IC and used by tools such as dfx to verify the upgrade.
$ dfx canister metadata [OPTIONS] <CANISTER_NAME> <METADATA_NAME>
Checking upgrade compatibility
When you upgrade a canister, dfx will automatically download the metadata of the old module and compare it with the new module:
- Compare the Candid interface to make sure there is no breaking change.
- Compare the stable signatures to make sure there won't be data loss.
If you are making a breaking change you will receive a warning.
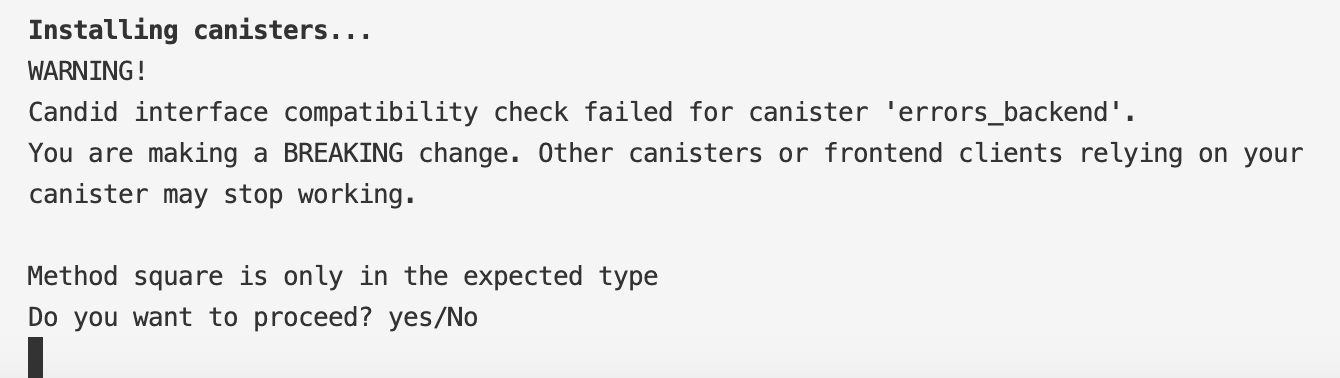
The type of warning you will encounter.
This verification doesn't guarantee that the upgrade will go through. A problem can still happen during the upgrade process. However, it does guarantee that if the upgrade goes through you won't break existing cliens or lose data that was marked as stable.
Lesson 13: Accessing to a canister through our browser.
Difference between HTTP request & HTTP outcalls.
In this lesson, we will cover how canisters can be accessed through HTTP requests. This is a separate topic from HTTP Outcalls:
- HTTP Request: Canisters can handle incoming requests and serve web pages.
- HTTP Outcalls: Canisters can send requests and communicate with the Web 2.0 world. This can be used for various use cases, such as querying an exchange for token prices, getting the latest weather information, and sending notifications to users.
Whenever you access a canister through your browser there are a few steps involved. Let's go through all of them.
You will notice that URLs on the Internet Computer are of the following form: <CANISTER_ID>.ic0.app.
.ic0.app indicates that you are reaching out to boundary nodes.
What are boundary nodes?
Canisters are hosted and executed by nodes that participate in the IC consensus However, those nodes are not directly accessible by end users. To protect the consensus nodes & improve performance there is a layer of boundary nodes which serve different useful purposes:
- Translate the HTTP request of the user's browser to canister call. This part is called the HTTP Gateway protocol. When canisters send their response the gateway will convert it back to an HTTP request.
- Route the calls to the correct subnet running the canister. To properly route those calls the boundary nodes have to keep track of the entire configuration of the Internet Computer:
- List of subnets.
- List of nodes and which subnet they belong to.
- The canisters run by each subnet.
- Load balancing among the subnet's replica nodes (i.e if a replica is lagging behind and has already a lot of work on its plate - boundary nodes will send the request to another replica).
- Protect subnets from DDoS attacks.
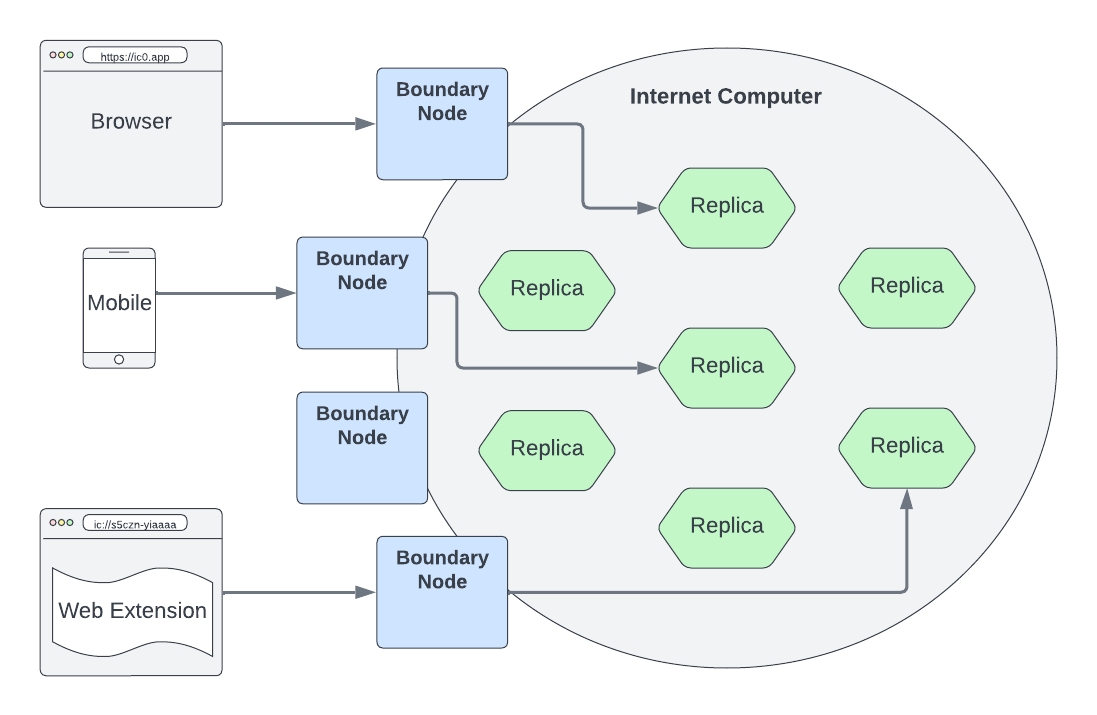
Currently, boundary nodes are run by the DFINITY Foundation. However, the objective (as part of the roadmap) is to have anyone able to set up and run a boundary nodes. This will make interaction with the Internet Computer more reactive for end users and this will make the platform more robust to censorship.
The asset canister
To serve web content on the Internet Computer, a canister should have a method that can handle an http_request, which includes the URL, HTTP method, and headers, and produce an HTTP response, consisting of a status, headers, and body. There are two ways to go about that:
- Implement the http_request method and all associated logic yourself.
- Use the provided asset canister: this is a special canister whose code has been already implemented by DFINITY. You need to specify the type of this canister in
dfx.json& add the source folder of your web app. Once the asset canister is deployed on the Internet Computer the website can be accessed athttp://<canister id>.ic0.appandhttp://<canister id>.raw.ic0.app(the raw domain without certification). The frontend canister that is shipped when you deploy a project withdfx new <project>is an asset canister (as you can confirm by looking atdfx.json).
You can access the source code for this canister written in Rust under the DFINITY organization.
The http_request query method
Once the boundary node has received the request. It will encode it into Candid and automatically call the http_request method of the canister, reachable by browsers. You need to implement an http_request query method as part of the public interface of your actor.
import Text "mo:base/Text";
import Http "http";
actor {
    public type HttpRequest = Http.HttpRequest;
    public type HttpResponse = Http.HttpResponse;

    public query func http_request(req : HttpRequest) : async HttpResponse {
        return({
            body = Text.encodeUtf8("Hello World");
            headers = [];
            status_code = 200;
            streaming_strategy = null;
        });
    };
};
Here is the content of the HTTP module, the file name is http.mo.
module Http {
    public type HeaderField = (Text, Text);

    public type HttpRequest = {
        body: Blob;
        headers: [HeaderField];
        method: Text;
        url: Text;
    };

    public type HttpResponse = {
        body: Blob;
        headers: [HeaderField];
        status_code: Nat16;
        streaming_strategy: ?StreamingStrategy;
    };

    public type StreamingStrategy = {
        #Callback: {
            callback : StreamingCallback;
            token    : StreamingCallbackToken;
        };
    };

    public type StreamingCallback = query (StreamingCallbackToken) -> async (StreamingCallbackResponse);

    public type StreamingCallbackToken =  {
        content_encoding : Text;
        index            : Nat;
        key              : Text;
    };

    public type StreamingCallbackResponse = {
        body  : Blob;
        token : ?StreamingCallbackToken;
    };
}
Once the method is implemented, you can access the webpage served by the canister.
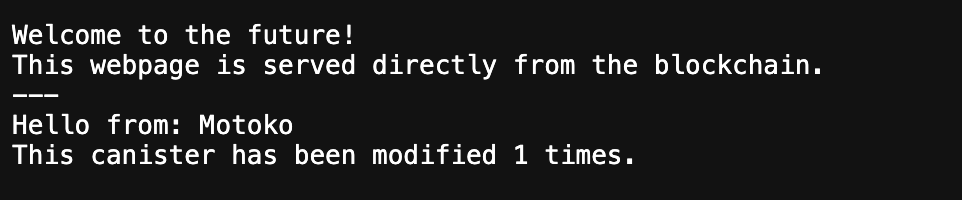
If you access the canister, through the Candid UI you will notice that the http_request is indeed present.
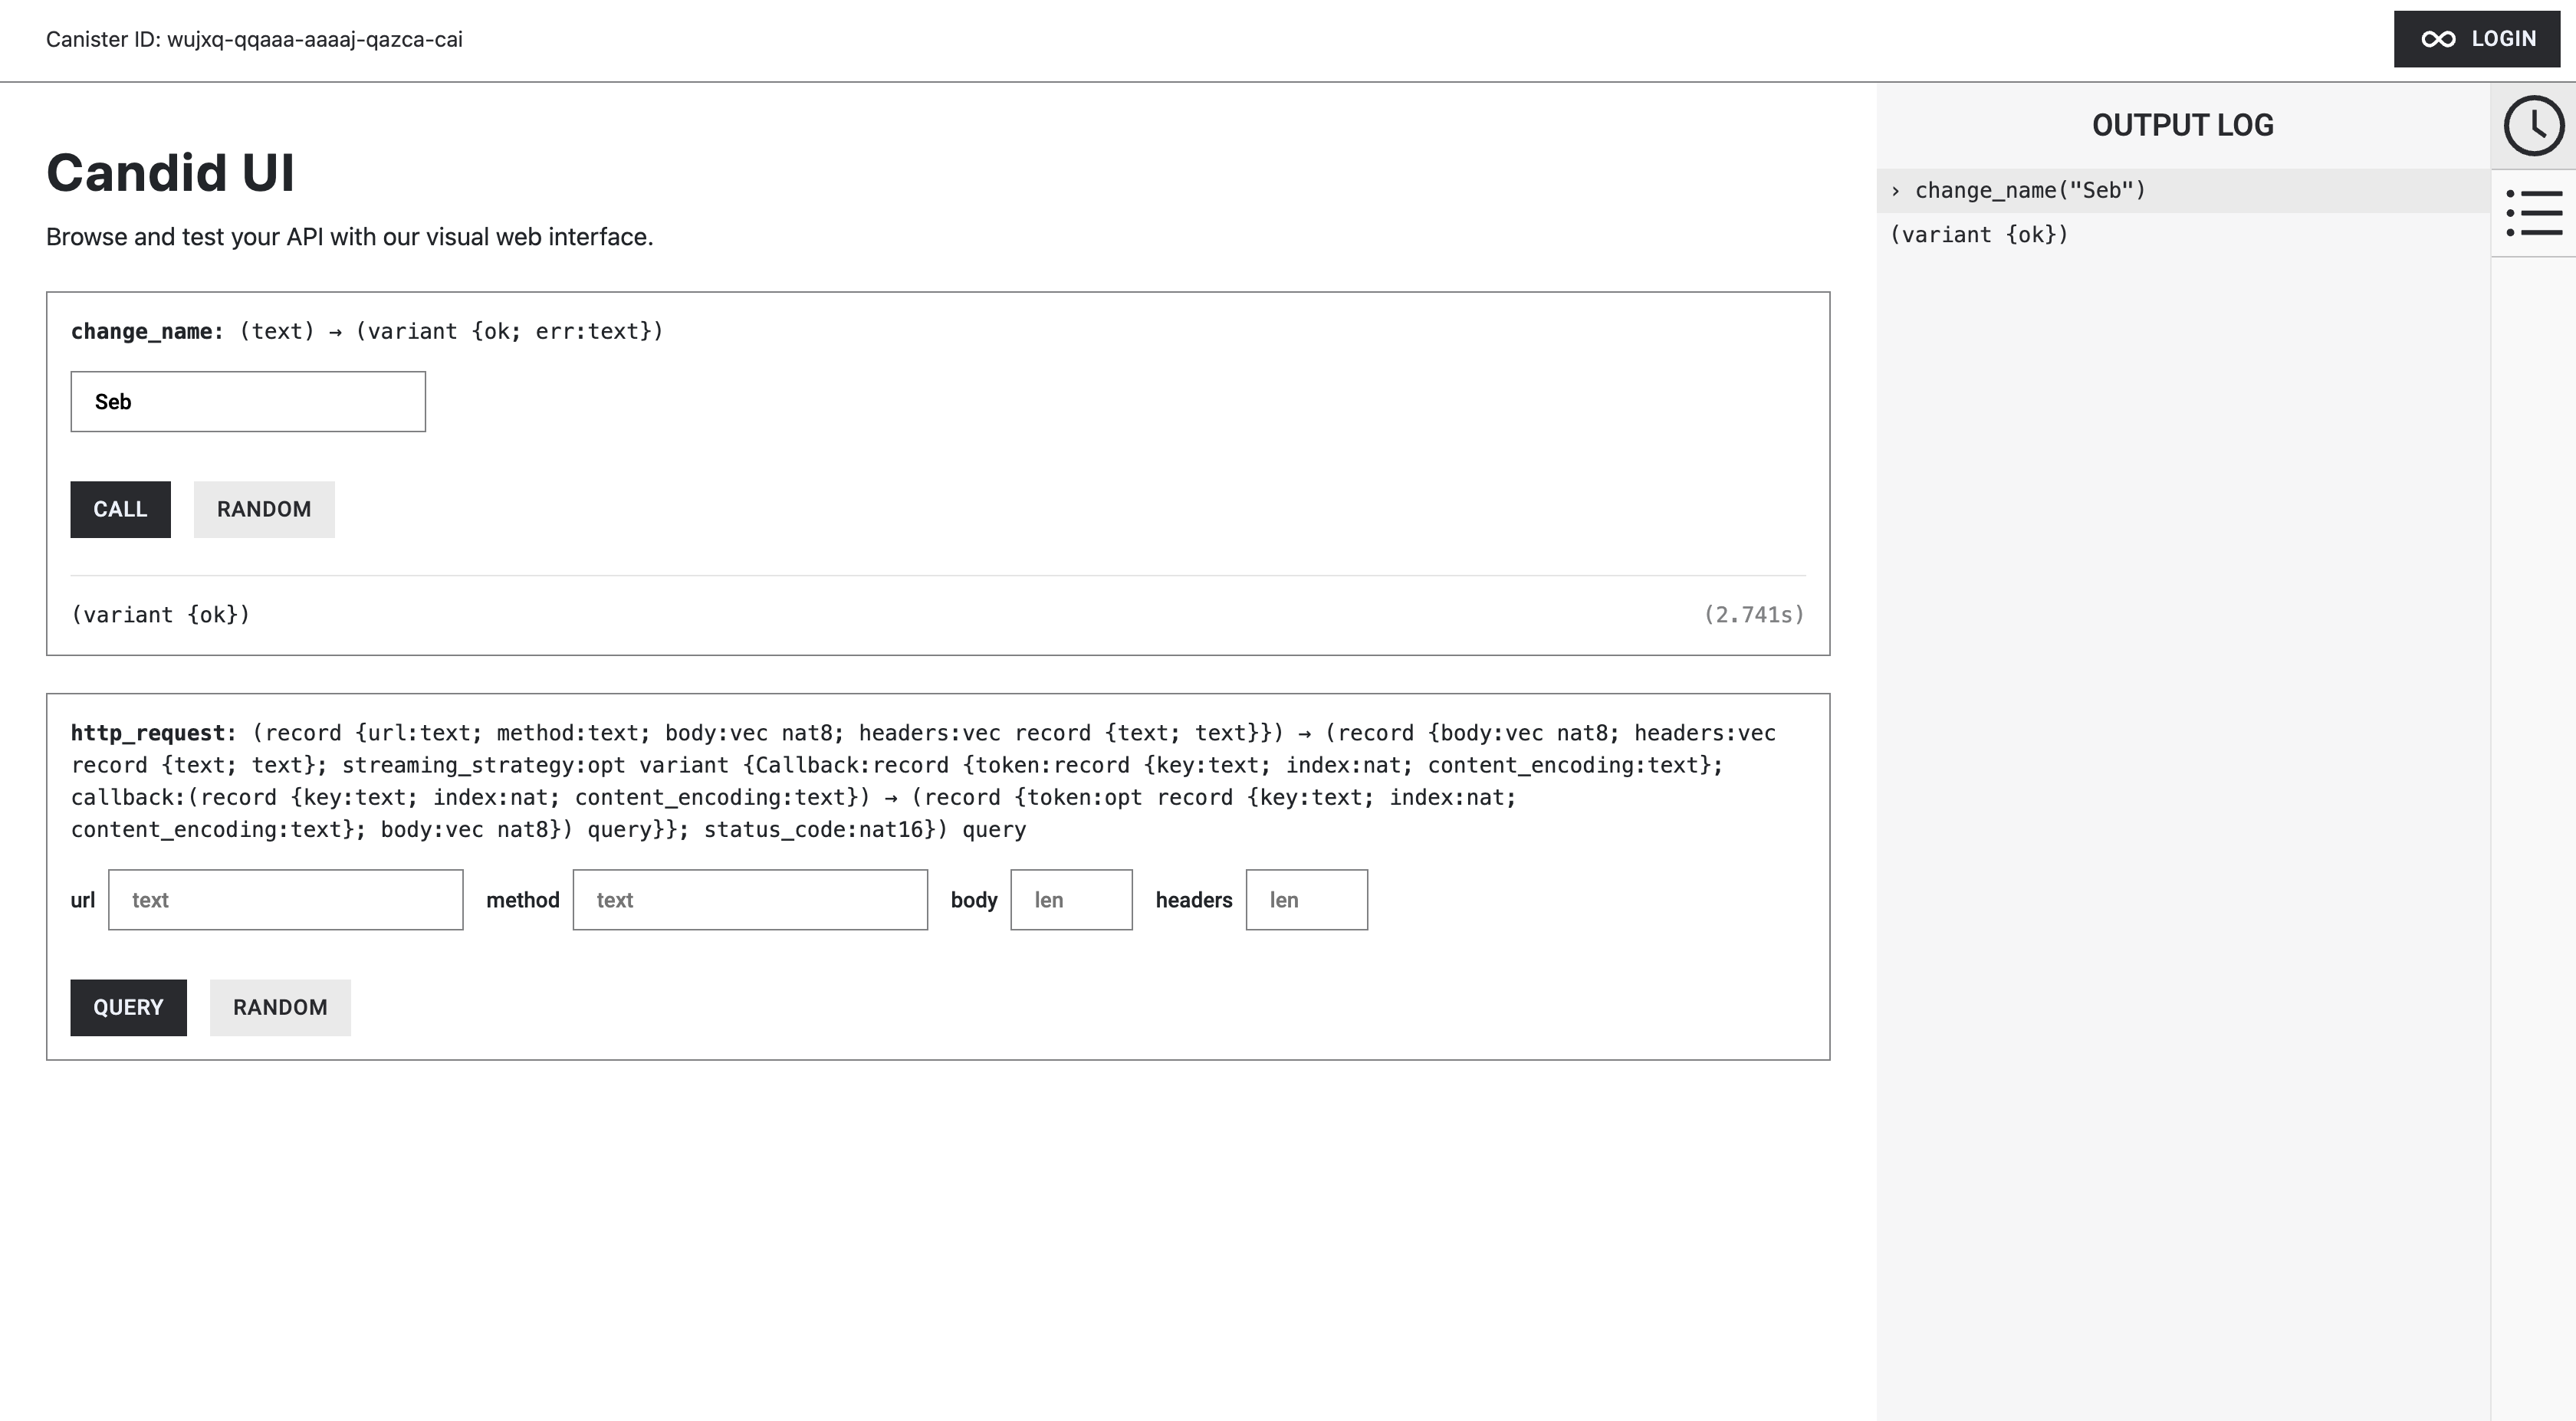
The content of the webpage can be dynamically modified based on the state of the canister - leave your name!
Appendix 1 - Unlocking the power of DAOs
🧩 What is a DAO?
During this week you will have the opportunity to build a prototype for a Decentralized Autonomous Organization (DAO). This is why we want to answer an important question: What is a DAO?
🏛️ Decentralized Autonomous Organization: a new model of governance?
![]()
Throughout history, humans have found different creative ways to organize in social groups and structures. They have done so for different reasons such as safety, support, social identity, work, power or even economics. A few common groups include: family unit, tribes, clans, states, guilds, secret societies, political parties...
With the advent of the Internet, social networks, cryptocurriencies & smart contracts many believe that a new type of organization is about to start a new chapter of human history: DAO.
A Decentralized Autonomous Organization (DAO) is a digital organization that is composed of members living all around the world, and is governend and organized through smart contracts.
Smart contracts execute automatically, are decentralized, transparent and can't be censored or modified by any individual. The same applies to DAOs in the sense that they are not controlled by any single individual or entity, they rather operate based on the collective decision-making of their members.
A few use cases for DAOs include:
-
Decentralized venture capital: DAOs can be used to enable decentralized venture capital funds, in which members can propose and vote on investments in projects. The DAO was one of the first DAOs to be created and was designed to be a decentralized venture capital fund, although it was controversial and ultimately failed due to a hack.
-
Decision-making: DAOs can be used to enable members to make decisions about the direction of a project or organization. For example, MakerDAO is a decentralized finance (DeFi) platform that is built on the Ethereum blockchain and is governed by a DAO, in which members can vote on proposals to change the parameters of the MakerDAO system, such as the interest rates on loans.
🙁 Limitations of DAOs
As we've said DAOs are formed through smart contracts. However, smart-contracts are pretty limited:
- They can't store any meaningful amount of data (photos, videos, files...). The cost of storing 1GB of data in the Ethereum blockchain has been estimated at around $5.5M
- It is not possible to interact with smart contracts directly from a browser. A wallet needs to be installed and acts as a relay.
- Smart contracts rely on oracles to gather information from the external world and facilitate communication with it, as they are unable to interact with anything outside of the blockchain on their own.
- Smart contracts are limited in terms of computational power they have access to.
Those technical limitations results in concrete actions that a DAO would be unable to do:
- 🌳 Interact with the physical world: DAOs are limited to the digital world and cannot interact with the physical world. A DAO could not plant a tree, turn on a light switch, or deliver a physical letter.
- 📲 Access external data sources: For example, a DAO could not retrieve the current temperature from a weather website, or the current stock price from a financial website.
- 🔮 Use advanced computational power: For example, a DAO could not run simulations to predict the outcome of a complex system, such as the spread of a pandemic or the performance of a financial portfolio.
- 🗂️ Handle large amounts of data: For example, a DAO could not store and process the complete medical records of millions of patients.
Those important limitations are preventing DAOs from having a meaningful impact in the world.
🚀 From smart-contracts to canisters
Imagine that smart-contracts could:
- Store unlimited amount of data & run any computation.
- Be accessible directly from any browser.
- Communicate with the external world trough HTTP requests.
- Create and sign transactions on any blockchain (Bitcoin, Ethereum...).
- Being upgradable to constantly add new features & fix potential bugs.
- Remove fees and enable anyone to interact with them.
Does it sound interesting? Welcome to the fabulous world of canisters!
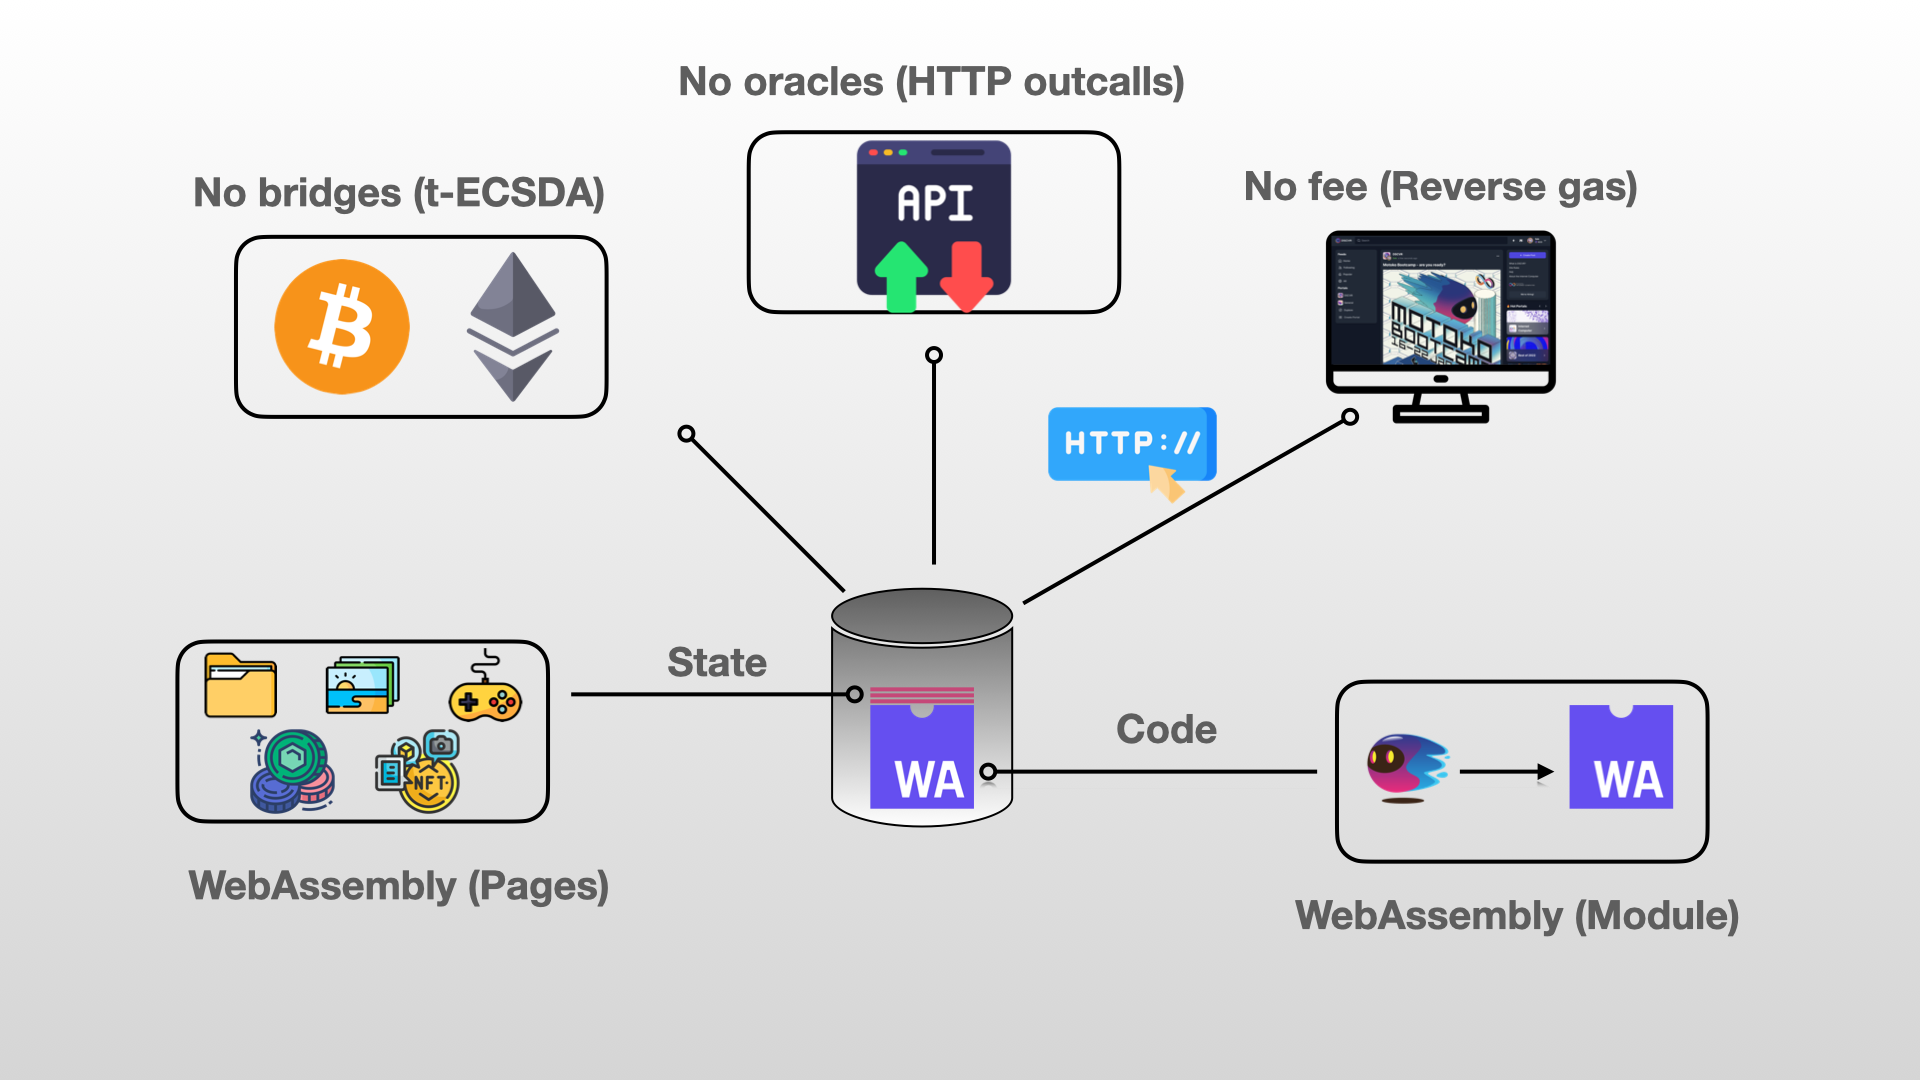
Imagine what DAOs will be able to achieve using canisters!
By using canisters, DAOs are now able to control entire web applications.This means that future web services (social network, search engine, games, mail client, messaging application...) can run entirely on a set of canisters, where the governance of those canisters is ensured through a tokenized public governance canister.

This concept is called Open Internet Services. The aim is to end the current monopoly of BigTech companies (Facebook, Google, Apple, Twitter, Microsoft, Tiktok... ) that profits from the centralized aspect of the Internet. By aligning incentivizes between investors, users, and developers, those services are expected to operate in a more transparent, privacy-friendly and cooperative manner.
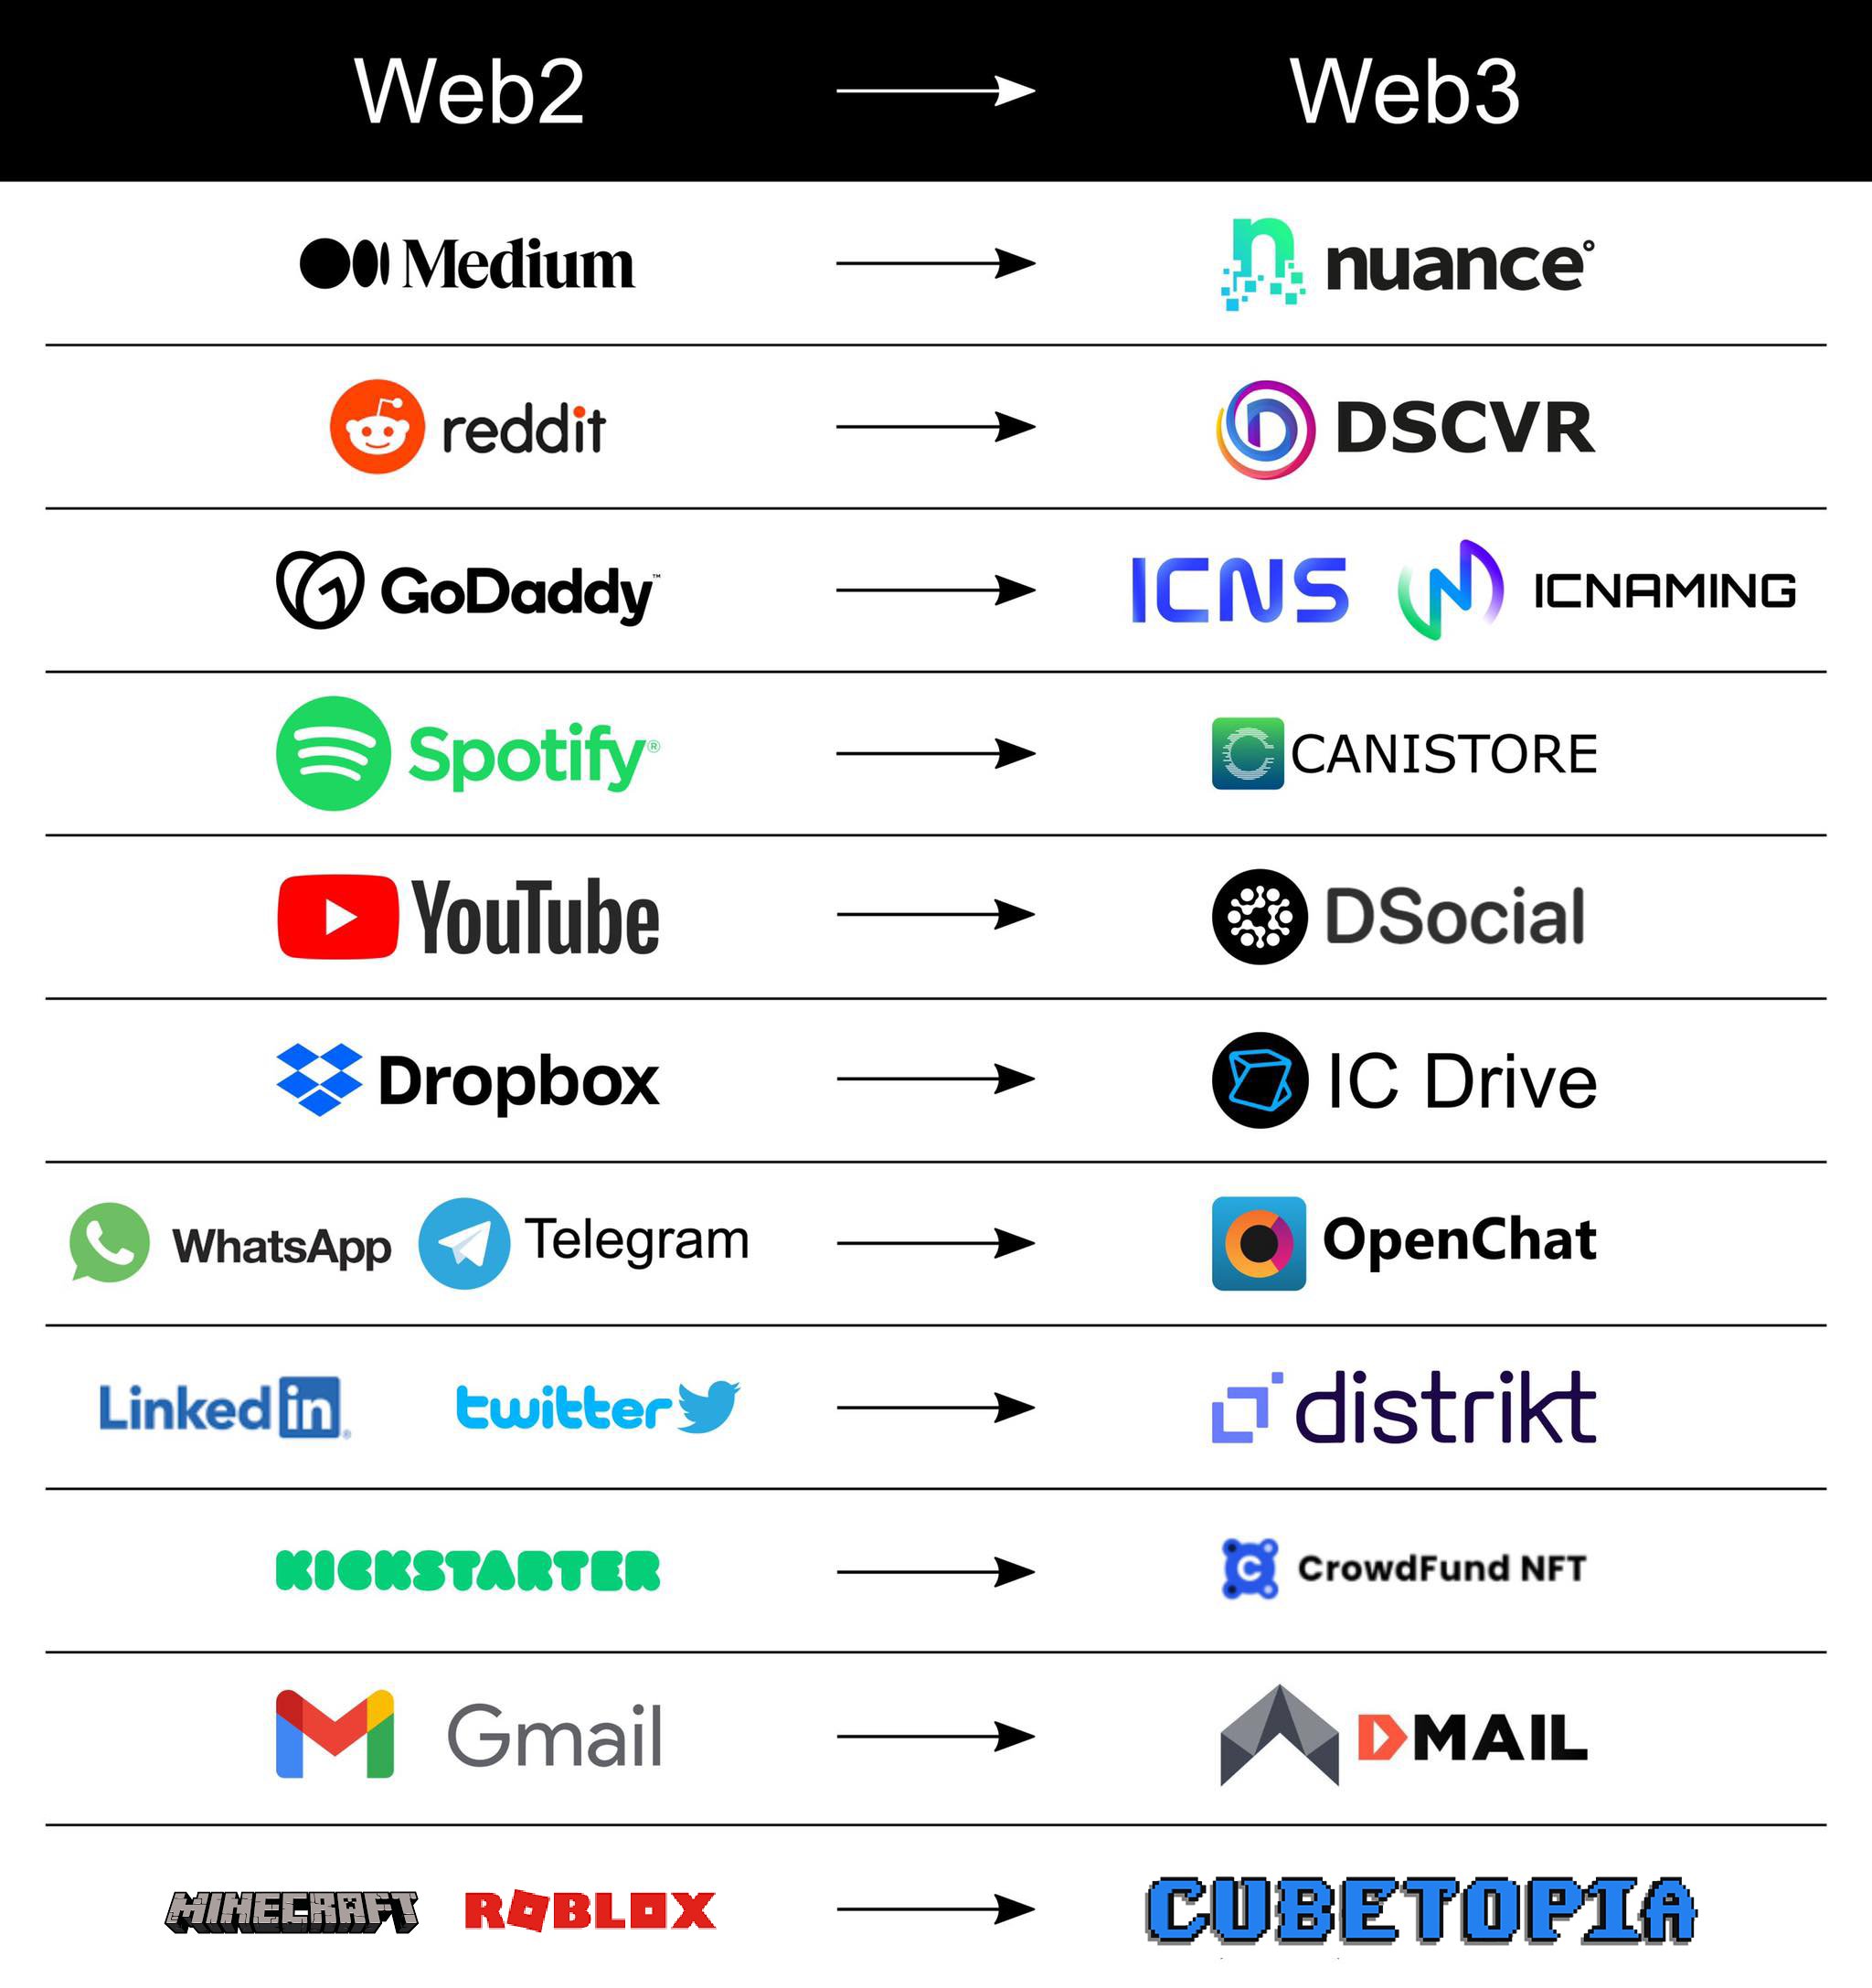
A prediction?
Open Internet Services are powerful and won't stop with social networks or messaging apps. They are here to revolutionize the way we work and live together. With unprecedented scalability of collaborative work enabled by the combined power of DAOs and OISs, the sky's the limit! Imagine the positive impact on humanity with projects like environmental conservation, medical research, and education all being amplified by this new level of coordination and collaboration. And this is just the tip of the iceberg, as this new technology could open the door to even more innovative solutions to some of the world's most pressing problems. This is an opportunity to make real progress and change the world in ways we never thought possible. Get ready, the future is here!
Appendix 2 - The Network Nervous System (NNS)

Home page of the NNS
The most developed DAO operating on the IC (so far!) is the one that manages the network itself. This DAO is called the Network Nervous System and it is responsible for making decisions about the future of the network, coordinating various parties, and arranging the network's structure.
Typically, when a blockchain needs to be upgraded, it takes a few weeks or months to complete the process. This requires node operators to upgrade their software. If some node operators refuse to upgrade or if a group of them install a different version, it can result in a "fork," where the blockchain splits into two separate chains - creating two completely different network of lower sizes.
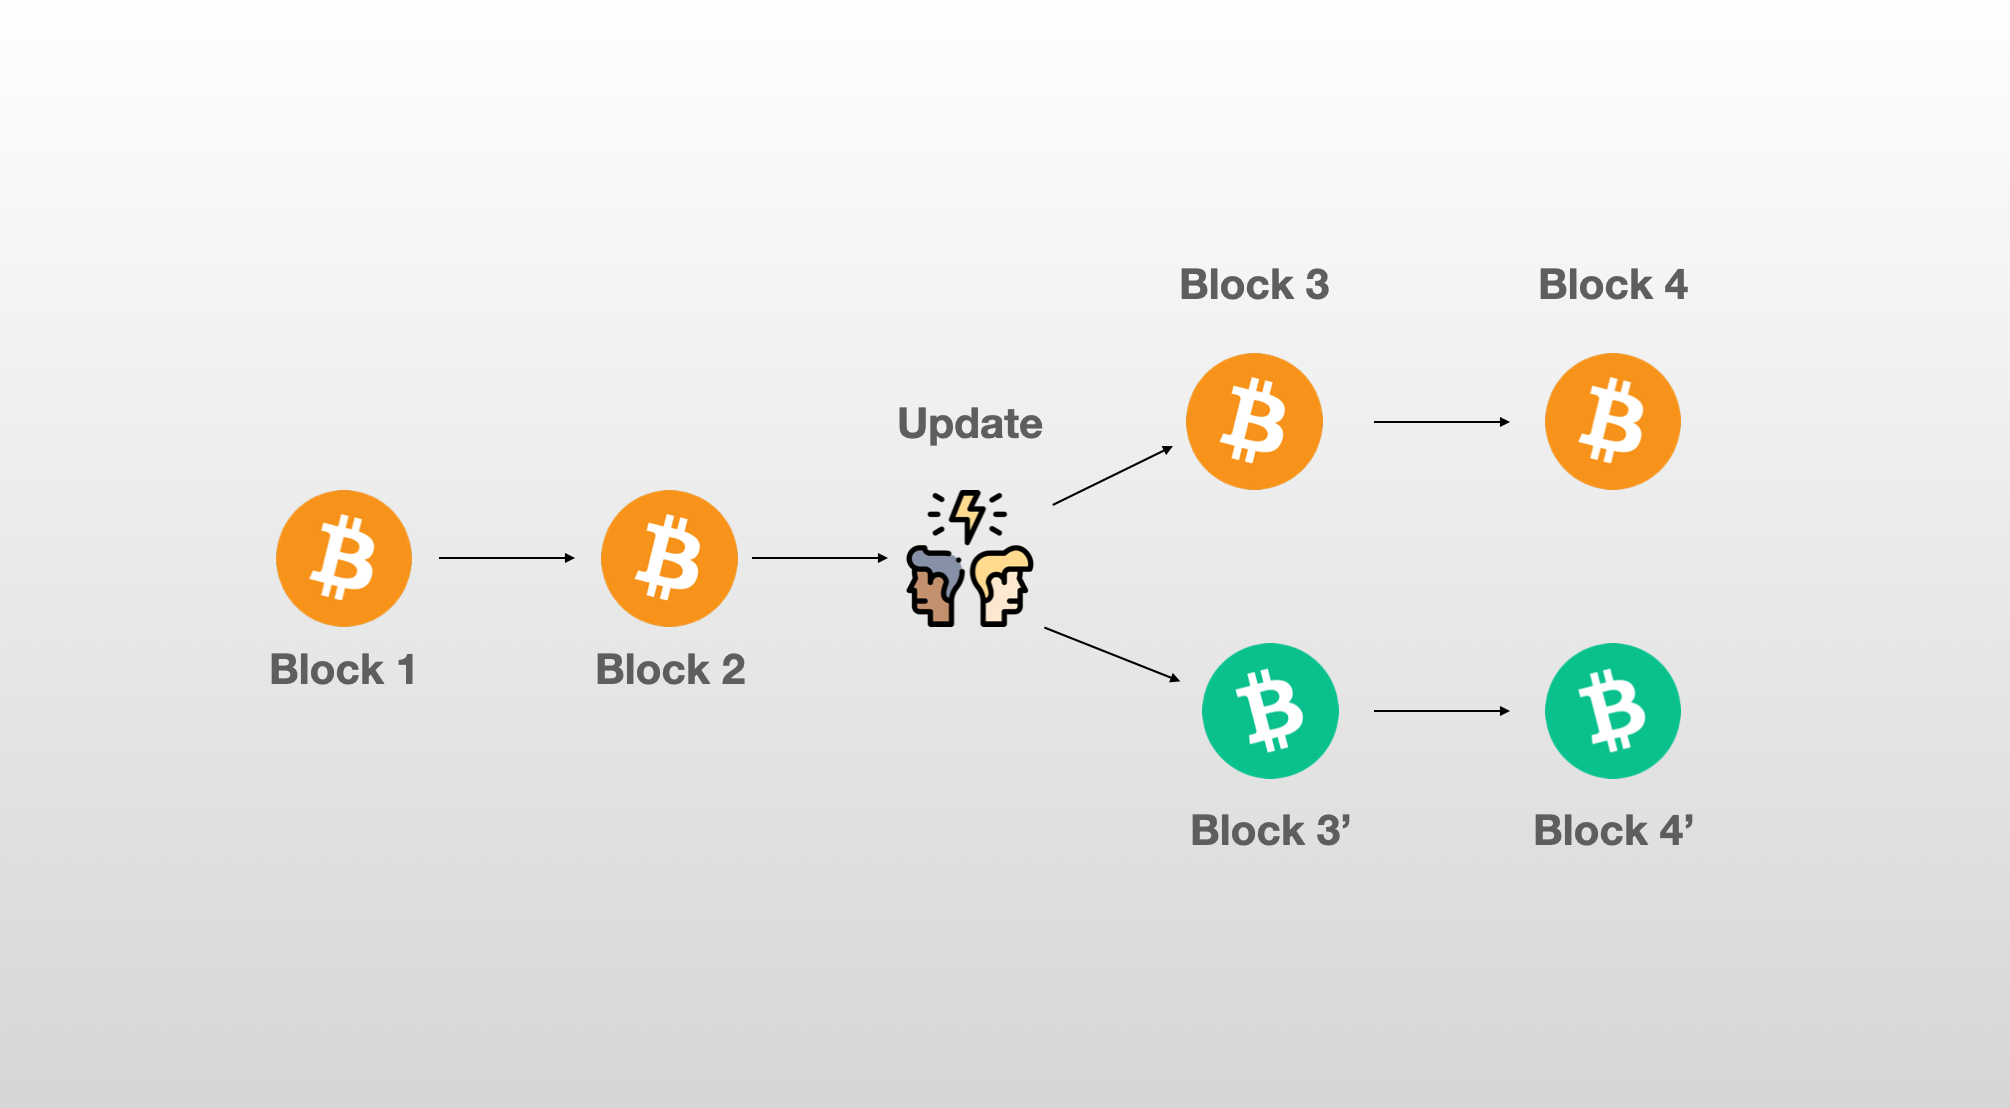
The 2017 Bitcoin fork split the community, with some advocating for increased block size, leading to the creation of two versions: the original Bitcoin and Bitcoin Cash with new rules
On the Internet Computer, upgrades are voted on by the Network Nervous System (NNS). If the upgrades are accepted, the software of the nodes is directly upgraded, which mitigates the possibility of a fork.
The NNS is governed by a liquid democracy, in which ICP holders stake their ICPs to create neurons.
The voting power of these neurons is based on :
- The amount of staked ICPs.
- The duration of the staking.
- The age of the neuron.
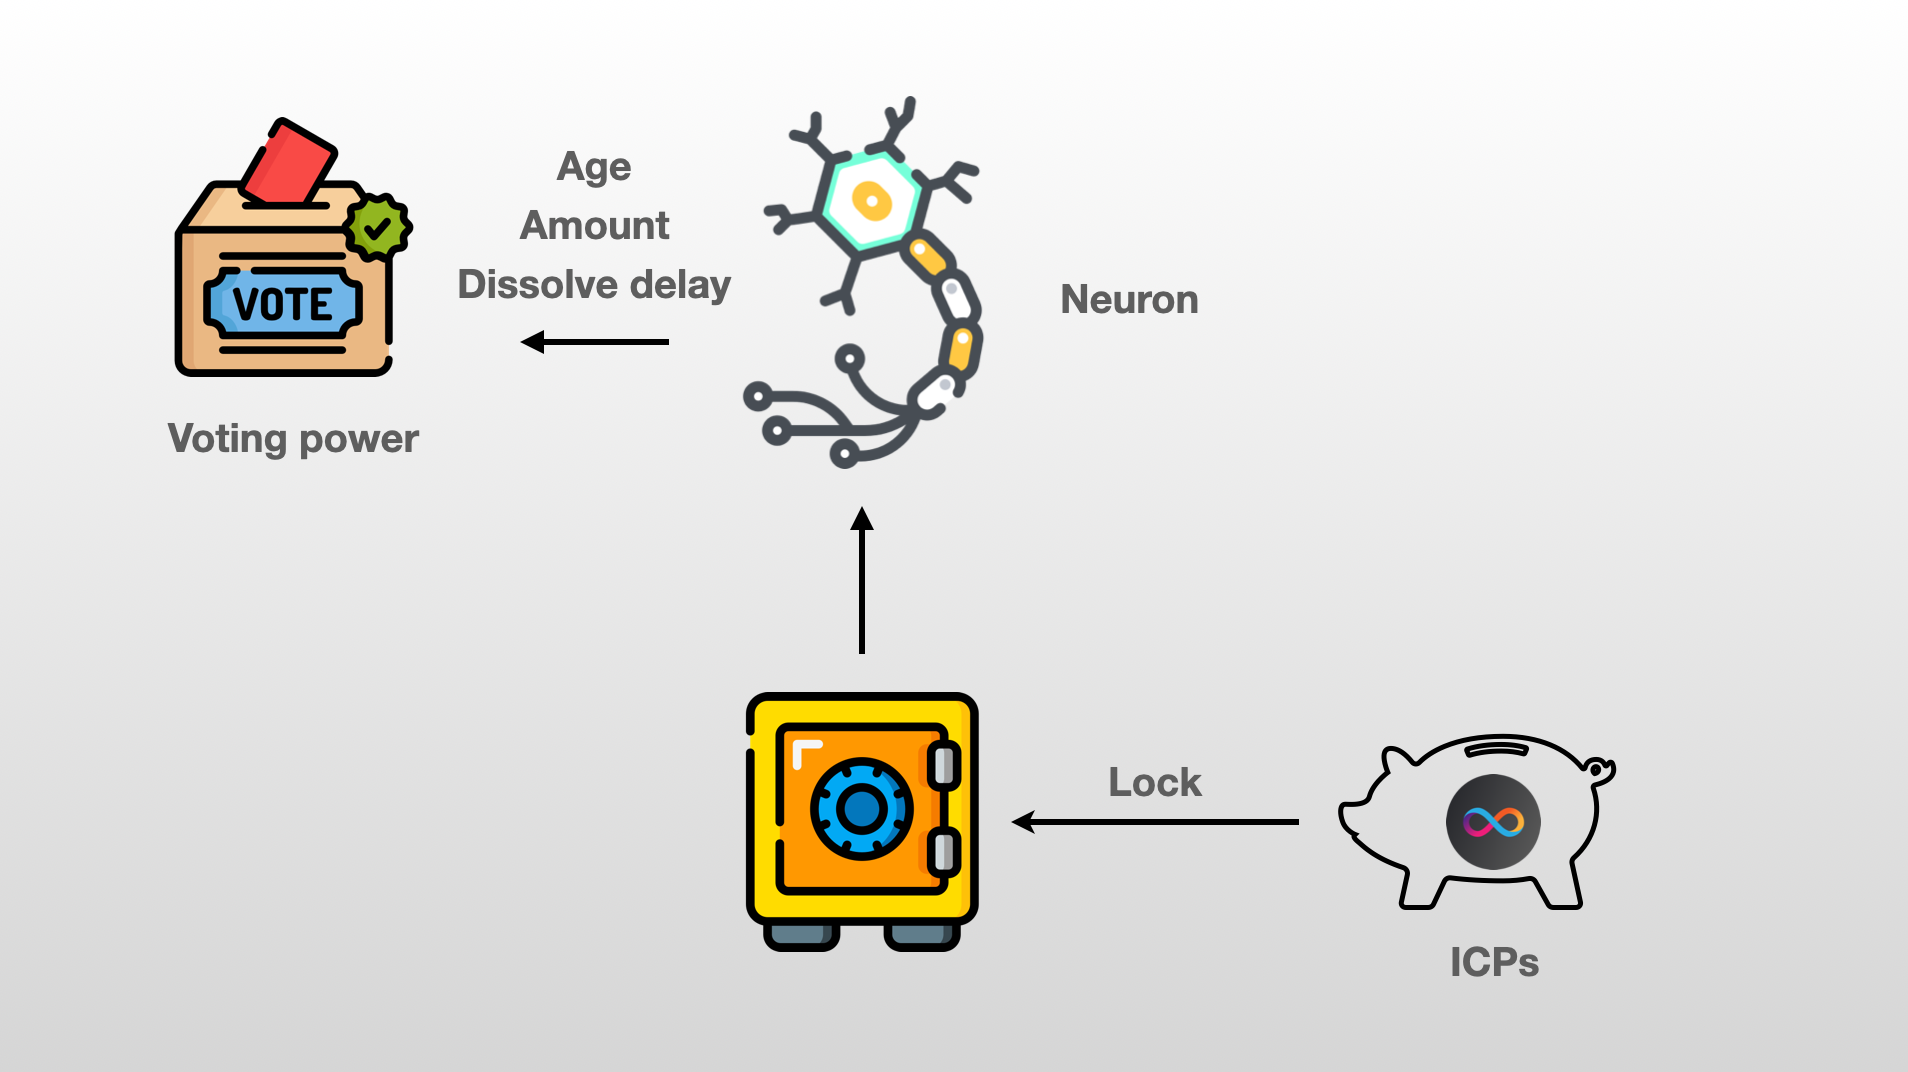
The proposals that can be voted on by the NNS (Network Nervous System) are grouped into different categories, such as:
- 💸 Network economics: proposals related to determining the rewards paid to node operators.
- 👨💼 Node administration: proposals related to administering node machines, including upgrading or configuring the operating system, virtual machine framework, or node replica software.
- 🌏 Subnet management: proposals related to administering network subnets, such as creating new subnets, adding and removing subnet nodes, or splitting subnets.
- 🧑⚖️ Governance: proposals related to administering governance, such as motions and configuring certain parameters.
To learn more about the incredible power of the NNS, check out the NNS Documentation.
The NNS is constitued of different canisters. Each canister is deployed on the same subnet which is also called the NNS subnet.
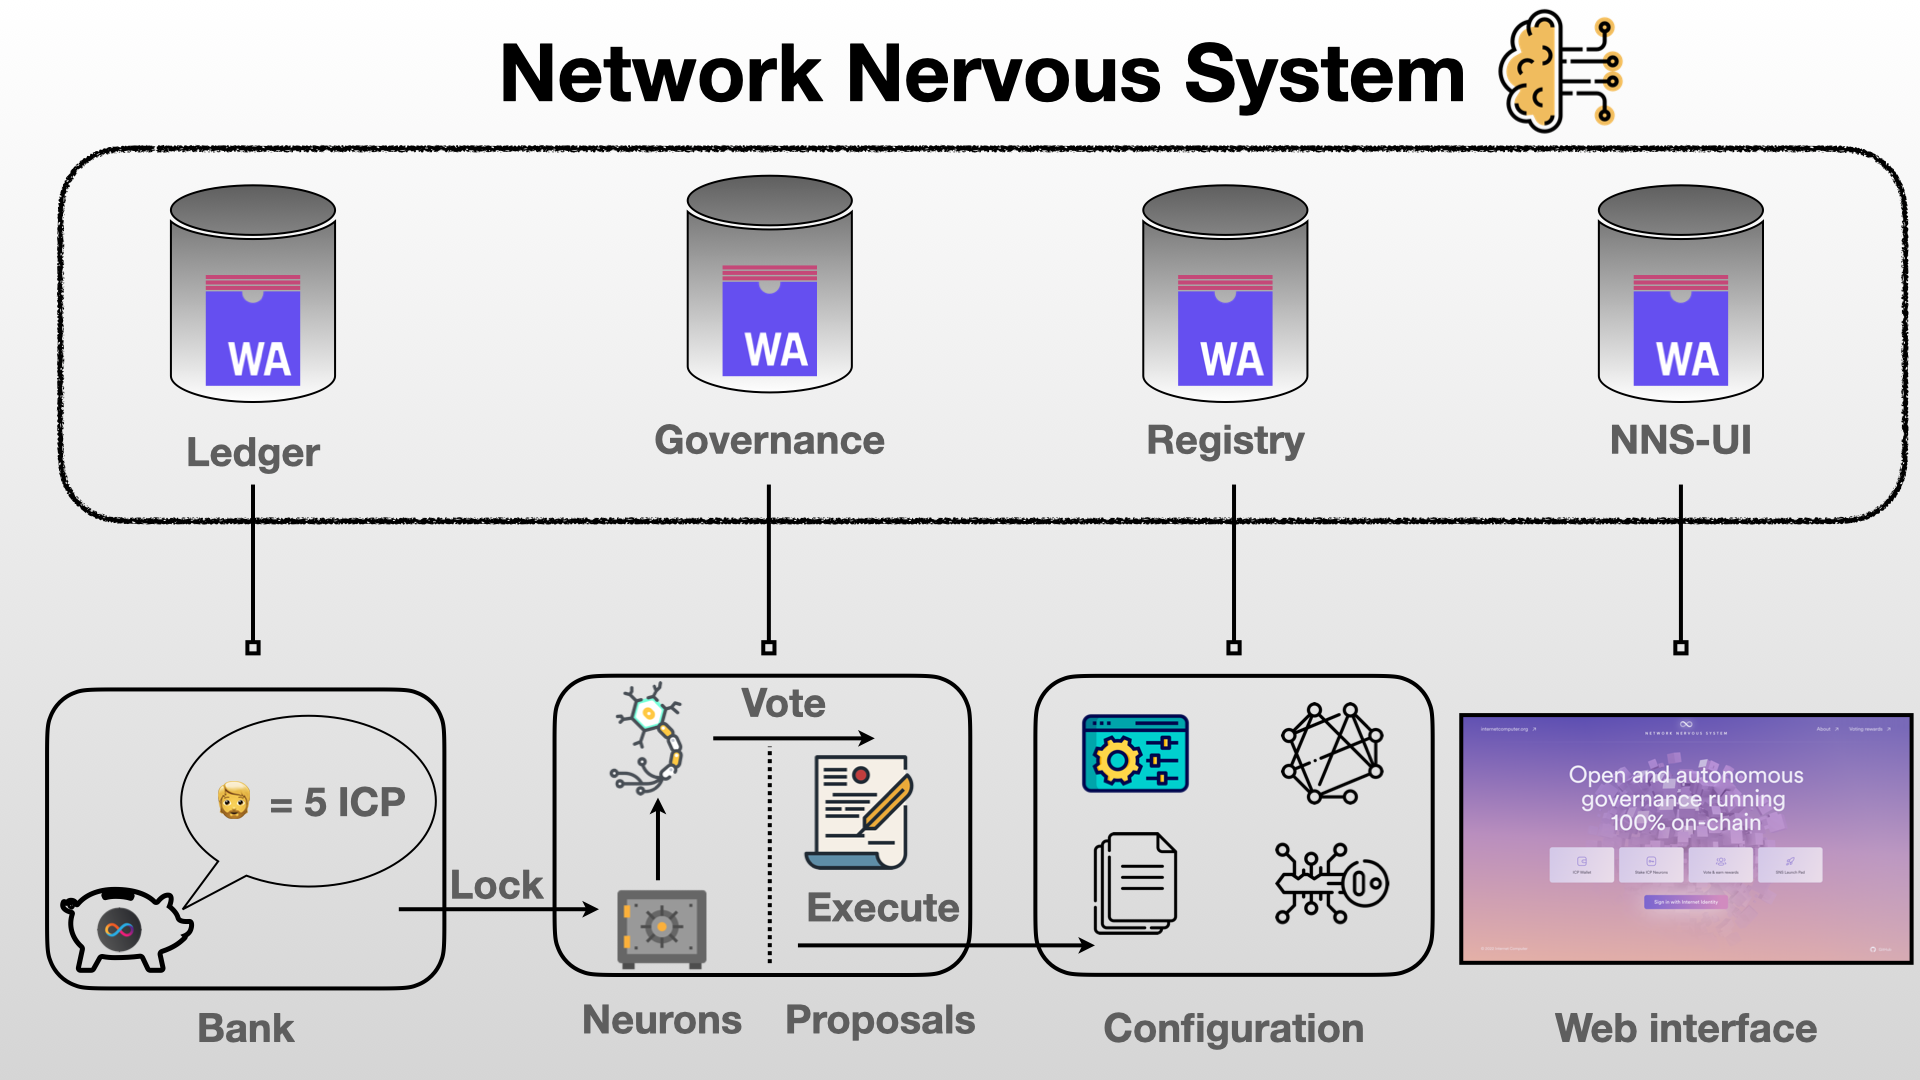
Overview of the canisters running the NNS
- 🏦 Ledger: This canister is responsible for controlling the balance of ICPs for all users, processing transactions, minting & burning ICPs.
- 🏛️ Governance: This canister is responsible for keeping track of neurons, proposals & votes and ultimately taking actions when the proposals are accepted or rejected.
- 🏭Registry: This canister is responsible for storing and modifying the configuration of the Internet Computer (Adding or removing nodes, adding or removing subnets, storing public keys of subnets, assign nodes to subnets, storing canister ids and which subnet they belong to....)
- 🪟 NNS-UI: This canister is responsible for storing the official interface that gives users a way to interact with the 3 others canisters.
NNS-UI is the main interface for interacting with the NNS, but other user-friendly interfaces can be created. The community has already created an interface that allows proposal creation without using a terminal, a missing feature in the main NNS-UI.
As we seen with the example of the NNS - building a DAO can involve deploying and managing multiple canisters.